hp some keys not working on laptop

Title: SOLUTION Some Keys Not Working on Laptop Keyboard
Channel: Tech Express
SOLUTION Some Keys Not Working on Laptop Keyboard by Tech Express
hp some keys not working on laptop, hp keyboard not working on laptop, hp laptop keyboard some keys not working windows 11, hp keys not working laptop, why are my keys not working on my laptop, hp laptop function keys not working
Laptop Keys Dying? FIX This NOW!
Laptop Keys Keeling Over? Don't Panic! Revive Your Keyboard Today
We've all been there. That sinking feeling as you furiously type, only to realize your "e" key has seemingly decided to retire prematurely. Or maybe it's the "spacebar's" sudden and inexplicable aversion to, well, spacing. Fear not, fellow laptop warriors! A keyboard rebellion doesn't have to spell doom for your productivity. In fact, fixing those finicky keys is often easier than you think.
The Keyboard Crisis: Recognizing the Symptoms
Before you start throwing your laptop across the room (tempting, I know!), let's accurately diagnose the problem. Is your keyboard truly at death's door, or is it simply experiencing a minor ailment? Symptoms can range from the intermittent failure of a single key to the complete shutdown of the entire keyboard. Here’s what to watch out for.
- Sticky Situation: Keys sticking down, refusing to spring back to their original position. This often signals debris lurking beneath the surface.
- Ghost Typing: Your laptop seemingly types on its own, registering phantom keystrokes. That's not a poltergeist; it's likely a hardware glitch.
- The Silent Treatment: Keys unresponsive to your frantic tapping. Silence is often the loudest symptom.
- Erratic Behavior: Some keys work sometimes, and other times they don’t. This inconsistency can drive you crazy.
Dust Bunnies and Debris: The Usual Suspects
More often than not, keyboard woes are caused by simple culprits: dust, crumbs, and general gunk that accumulates over time. After all, consider how much we use these devices! The good news? Cleaning is often the simplest, and most effective, solution.
Step 1: The Gentle Brush-Off
First, power down your laptop and unplug it. Remove the battery if possible (always a smart move). Next, grab a soft-bristled brush. A paintbrush or even a clean toothbrush works well. Gently brush between the keys. This dislodges loose debris. Be careful, though!
Step 2: The Air Assault
Next, deploy compressed air. Hold the can upright. Direct the nozzle in short bursts between the keys. This blasts away stubborn particles the brush missed. Aim for the gaps between the keys. That’s where the crud likes to hide.
Step 3: The Alcohol Wipe Down (Proceed with Caution!)
For tougher grime, you can carefully use isopropyl alcohol. First, dampen a soft cloth or cotton swab with the alcohol. Gently wipe around the affected keys. Never apply the liquid directly to the keyboard. Let it dry completely before turning your laptop back on. Always unplug your laptop first.
Keyboard Cleaning: A Delicate Balancing Act
Cleaning your keyboard is not rocket science. However, it’s a delicate procedure. Avoiding aggressive cleaning tactics also helps. Prevent damage to the delicate internal components. Be mindful of the type of cleaning solution you employ.
Beyond Cleaning: Exploring Deeper Fixes
If cleaning doesn't work, further investigation may be required. You might need to dig a little deeper.
The Keycap Shuffle
Remove the keycap in question. Use a plastic spudger or a small, flat-head screwdriver. Be extremely careful not to break the keycap. You should then inspect the scissor mechanism beneath. Clean this area with compressed air. Reattach the keycap.
Software Solutions: The Digital Fix
Sometimes, the problem isn’t hardware. It might be a software glitch.
- Driver D-Day: Make sure your keyboard drivers are up to date. You can find them in your device manager.
- Sticky Keys Beware: Disable the "Sticky Keys" feature. This can sometimes cause conflicts.
- Virus Vigilance: Run a thorough virus scan. Malware can interfere with keyboard functions.
Hardware Heroes: The Last Resort
If all else fails, more drastic measures are necessary.
The External Savior: Consider using an external keyboard. It can be a temporary, or even permanent, solution. These are often inexpensive.
The Repair Route: If you are not comfortable with DIY, a professional repair is another option. Locate a reputable laptop repair shop. They can diagnose and repair more complex issues.
The Keyboard Replacement: If the keyboard is beyond repair, replacing it is the ultimate solution. This can be a simple fix, or a more involved process. Research your laptop's model number before purchasing a replacement.
Preventative Measures: Keep Your Keyboard Healthy
Prevention is always better than cure.
- Eat Smart: Avoid eating near your keyboard. Crumbs are the enemy.
- Cover Up: Use a keyboard cover. This provides an extra layer of defense.
- Hand Hygiene: Wash your hands frequently. This minimizes oil and grime buildup.
Conclusion: Reclaiming Your Keys and Your Sanity
Keyboard problems can be frustrating. But you are now equipped with the knowledge to troubleshoot and conquer them. Don't let a few malfunctioning keys grind your productivity to a halt. With a bit of patience and the right approach, you can restore your keyboard to its former glory. Get back to typing without the drama!
Is Your Acer Windows 8 Touchscreen DEAD? (FIX THIS NOW!)Laptop Keys Dying? FIX This NOW!
Hey there, fellow digital wanderers! Ever felt that sinking feeling when your trusty laptop keys start to… well, die? It’s like watching your favorite team lose the championship – frustrating and, frankly, stressful. We’ve all been there, staring at a blank screen, desperately trying to type a simple email, only to have the "e" key repeatedly fail us. Fear not, because we’re diving deep into the world of flaky keys, sticky situations, and how to resurrect those digital warriors. Think of this guide as your personal key-reviving manual – your secret weapon against the tyranny of unresponsive letters and numbers!
1. The Key to the Problem: Understanding Why Keys Give Up the Ghost
Before we start playing keyboard mechanic, let's understand why these little plastic warriors decide to go on strike. Think of your keyboard like a miniature city. Each key is a tiny building, connected by intricate pathways (the circuits) to the central command center (your laptop's brain). Many things can cause a key to stop functioning properly. Dust bunnies and crumbs can be major saboteurs, infiltrating the underbelly of your keys and wreaking havoc. Imagine them as tiny squatters, jamming the works! Then there's the dreaded liquid spill – a true digital apocalypse. Coffee, juice, wine… all notorious key killers. And sometimes, it’s just good old-fashioned wear and tear. Like well-worn tires on a car, keys eventually reach the end of their lifespan, especially if you're a heavy typist like moi.
2. Dust Bunnies & Crumbs: The Silent Key Killers
Let's tackle the most common culprits: the microscopic criminals, dust, and crumbs. They sneak in, unnoticed, and slowly but surely disrupt the delicate mechanics beneath your keys. Think of it as a slow-motion version of the Titanic sinking – insidious and ultimately devastating to your typing flow.
- The Symptoms: Sticky keys, keys that don't register, or keys that repeatedly type a certain character.
- The Solution: Regular cleaning! We’ll cover that in detail shortly.
3. The Liquid Spill Disaster: A Digital Apocalypse
Picture this: You’re engrossed in something, maybe binging your favorite show, and bam! A rogue cup of coffee takes a swan dive onto your keyboard. This is a digital nightmare, a disaster that strikes fear into the hearts of laptop users everywhere. The liquid seeps into the circuits, short-circuiting everything.
- The Immediate Action: Unplug your laptop immediately! Don't delay. Shut it down completely. Time is of the essence.
- The Follow-Up: The sooner, the better. Disassemble and clean the keyboard. But if you feel nervous about disassembling, it is best to take your laptop to a professional and seek assistance.
4. Wear and Tear: The Inevitable Fate of Your Keyboard
Even the toughest keyboards eventually succumb to the relentless pressure of constant use. Think of it like a well-loved, worn-out pair of jeans. Eventually, they’ll get holes, no matter how much you cherish them. And that’s okay! It means you’ve had some good times together.
- The Signs: Keys become less responsive, require more force to press, or simply stop working altogether.
- The Remedy: Unfortunately, wear and tear often signals the need for key replacement or a new keyboard entirely.
5. Quick Fixes: DIY Key Resuscitation (For the Brave!)
Before calling in the tech troops, let's try some simple DIY solutions. Think of these as digital CPR for your keys. These methods are non-invasive (most of the time) and could save you a headache.
- Air Blasting: Give it a good blast with compressed air. This is the digital vacuum cleaner for your keyboard, blasting away those pesky dust bunnies. Hold the can at an angle, and aim for the spaces between the keys.
- Key Removal and Cleaning: Gently pry off the affected key (or keys). Use a small tool, like a flathead screwdriver or a keycap remover (you can find these cheap online). Clean the keycap itself with warm, soapy water. Then, carefully clean the area underneath with a cotton swab dampened with isopropyl alcohol. Leave it to dry completely before snapping the key back on.
- The Alcohol Solution: Isopropyl alcohol (rubbing alcohol) can work wonders for cleaning electronics. Avoid using strong cleaners and make sure your laptop is switched off and unplugged.
6. The Art of Deep Cleaning: Going Beyond the Surface
Sometimes, a quick blast isn't enough. When the problem persists, it's time to get serious. This means a more thorough cleaning session.
- Unplug and Power Down: Always, always, always unplug your laptop before you begin any cleaning.
- Remove the Keys: This is often the most effective method, but it does take some finesse.
- Cleaning the Base: Use a soft brush to remove any remaining debris. Then, lightly dampen a cloth with isopropyl alcohol (never pour it directly onto the laptop!) and wipe down the base.
7. When to Call in the Professionals: Know Your Limits
Okay, sometimes DIY just isn’t cutting it. If you’ve tried the above steps and your keys are still misbehaving, it’s time to admit defeat. It’s similar to when you have a bad toothache – eventually, you have to see a dentist.
- Signs You Need Help:
- You're uncomfortable with the disassembly process.
- The problem is widespread (multiple keys are affected).
- You spilled liquid and the keys are still sticky after cleaning.
- Finding a Repair Shop: Do some research! Read reviews, check their pricing, and ensure they have experience with your specific laptop model.
8. Key Replacement 101: Swapping Out Those Stubborn Keys
If the problem lies within a specific key or set of keys, replacing those individually might be a viable option.
- Research Replacement Keys: The first step is to identify the type of keys your laptop uses and then find replacement keys online or from a qualified professional.
- The Removal Process: Carefully pry off the affected key(s) using a keycap removal tool or small flathead screwdriver.
- The Installation: Align the new keycap with the switch underneath and press down firmly until it clicks into place.
9. External Keyboards: A Temporary Lifeline
While you're waiting for repairs or saving up for a new laptop, an external keyboard can be a lifesaver. It's like having a spare tire when one of your car tires blows out.
- Bluetooth or USB? Consider your mobility needs. USB keyboards are simple and plug-and-play, but Bluetooth keyboards offer wireless freedom.
- Ergonomics: Choose a keyboard that offers good ergonomics to keep you comfortable.
10. Preventing Future Key Troubles: Proactive Measures
Let's think prevention. We should apply these strategies in our tech lives as much as possible!
- Regular Cleaning: Make it a habit! At least once a month, give your keyboard a good cleaning.
- Protective Measures: Consider a keyboard cover to protect against spills and debris.
- Mindful Eating/Drinking: Keep those snacks and beverages away from your typing zone. Be safe and be aware.
11. The Software Side: Check for Sticky Keys and Other Accessibility Settings
Sometimes, the issue isn't hardware-related at all! Check your laptop's accessibility settings.
- Sticky Keys: Ensure that Sticky Keys and Filter Keys are turned off unless you specifically need them.
- Driver Updates: Make sure your keyboard drivers are up to date.
12. Keyboard Covers: Shielding Your Keys from the Elements
Keyboard covers are like a raincoat for your laptop keys, defending them against dust, spills, and crumbs. They are a simple, yet effective, preventative measure.
- Pros: They are inexpensive, easy to install, and protect your keyboard from various hazards.
- Cons: They can alter the feel of typing for some, and the fit might not be perfect for every laptop model.
13. Diagnosing the Problem: Is It the Keyboard, or Something Else?
Sometimes the problem may not lie with your physical keyboard.
- Test With an External Keyboard: Plug in an external keyboard and see if the problem persists. If it doesn't, the original keyboard is likely the culprit.
- Reboot Your Laptop: It seems basic, but sometimes this can resolve issues related to software glitches.
14. Understanding Laptop Keyboard Anatomy: What Makes It Tick?
Knowing how your laptop's keyboard is put together helps with troubleshooting.
- Keycaps: The individual plastic keys you press.
- Key Switches: The mechanism under each key that registers the keystroke (membrane, scissor, or mechanical).
- The Base: The frame that holds everything together.
15. Beyond the Keyboard: Considering a New Laptop
If your keyboard problems are severe and persistent, it might be time to consider a new laptop.
- Assess Your Needs: What do you use your laptop for? What features are essential?
- Set a Budget: Determine how much you're willing to spend
How to Fix Some Keys Not Working on Laptop Keyboard Keyboard Not Working

By Tech White How to Fix Some Keys Not Working on Laptop Keyboard Keyboard Not Working by Tech White
Fix Some keys on Laptop Keyboard Not Working in Windows 10 Solve keyboard keys Won't typing

By Victor Explains Fix Some keys on Laptop Keyboard Not Working in Windows 10 Solve keyboard keys Won't typing by Victor Explains
HP Laptop Brightness Keys Not Working FIX
By Graphically Challenged HP Laptop Brightness Keys Not Working FIX by Graphically Challenged
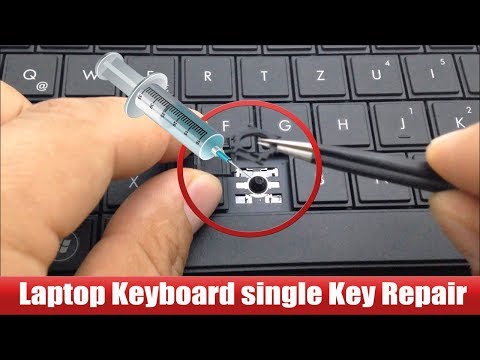
Title: Laptop Keyboard key repair very easy way.
Channel: Hit Short Films
Laptop Keyboard key repair very easy way. by Hit Short Films
Laptop Working
Laptop Keys Dying? FIX This NOW!
We've all been there: the frustrating moment when a laptop key stubbornly refuses to respond, or worse, begins to malfunction entirely. It can be a minor inconvenience, like a mis-typed email, or a significant roadblock, halting productivity and causing untold frustration. Don’t despair! There are several clear steps to diagnosis and repair, and this guide will walk you through them, ensuring you can get back to typing with ease.
Understanding the Culprits: Why Laptop Keys Fail
Before diving into solutions, let’s examine the common causes behind failing laptop keys. Understanding the root of the problem is crucial for effective troubleshooting and preventing future issues.
Dust and Debris: This is the most frequent offender. Tiny particles of dust, crumbs, pet hair, and other debris accumulate beneath the keys, significantly hindering their mechanical function. Over time, this buildup can obstruct the key's movement, leading to sticky keys or no response at all.
Liquid Spills: Accidental liquid spills (coffee, soda, water) are catastrophic for laptop keyboards. Liquids seep into the delicate circuitry beneath the keys, causing corrosion, short circuits, and ultimately, key failure. The type of liquid dictates the severity, with sugary drinks causing the most significant damage.
Physical Damage: Instances like dropping your laptop or applying excessive force can physically damage the keys or the underlying mechanisms. This could involve a broken keycap, a detached scissor mechanism, or damage to the keyboard membrane.
Wear and Tear: Over extended use, the mechanical components of the keys, such as the scissor mechanism and rubber domes, can experience wear and tear. This degradation can lead to keys becoming less responsive or failing entirely.
Software Conflicts: Believe it or not, software can occasionally impact key functionality. Driver issues, malware, or conflicting software can interfere with how the keyboard communicates with the operating system, leading to unresponsive keys.
Step-by-Step Diagnostics: Pinpointing the Problem
The first step in resolving your key issues is accurate diagnosis. Here are several steps to help you determine the cause:
Identify the Problem Keys: Which keys are malfunctioning? Are they all unresponsive, or are just specific keys acting up? Note the specific keys that are giving you trouble, as this will help narrow down the issue.
Visual Inspection: Carefully examine each key. Look for any visible signs of damage, such as a detached keycap, a bent or broken scissor mechanism, or any debris lodged between the key and its base. Use a bright light to aid in this process.
Cleaning the Keyboard: This is the starting point, especially if you suspect dust or debris. Turn off your laptop and unplug it to prevent accidental electrical damage.
- Compressed Air: Use compressed air to blow out any particles trapped beneath the keys. Hold the can at a slight angle and direct the airflow between the keys, moving across the entire keyboard. Do this in a well-ventilated area.
- Keyboard Brush: Use a soft-bristled brush, such as a toothbrush, to gently dislodge any debris. This is crucial for cleaning the areas around the keys.
Software Troubleshooting: Before jumping into hardware repairs, check the software or driver issues:
- Restart Your Laptop: This resolves any temporary software glitches that could be affecting key function.
- Update Drivers: Outdated keyboard drivers can cause malfunctions. Visit the manufacturer's website of your laptop or use Device Manager to update your keyboard drivers.
- Run a Virus Scan: Malware can interfere with keyboard functionality. Run a comprehensive virus scan to remove any potential threats.
External Keyboard Test: If you’re still experiencing problems, try connecting an external USB keyboard. If the external keyboard works properly, it strongly suggests the problem is within your laptop’s internal keyboard. If the external keyboard exhibits the same issues, the problem might lie with software or a widespread system issue.
Solutions: Bringing Your Keyboard Back to Life
Now that you've diagnosed the problem, here are solutions to address the most common keyboard issues.
Thorough Cleaning: Once you’ve used compressed air and a brush, follow up with a more detailed cleaning:
- Keycap Removal (Optional): Many laptops allow you to remove the keycaps for more thorough cleaning. Use a small plastic tool, such as a spudger, to carefully pry off the keycap. Take photos beforehand to remember the layout.
- Isopropyl Alcohol: Lightly dampen a cotton swab or microfiber cloth with isopropyl alcohol (at least 70% concentration). Gently wipe around the key mechanisms to remove any residue or stickiness.
- Reassemble & Test: Once everything is dry, reattach the keycaps and test the keyboard.
Dealing with Liquid Spills: Act immediately! Time is critical:
- Power Down and Unplug: Shut down your laptop immediately and unplug it from the power source.
- Invert the Laptop: Flip your laptop upside down, with the keyboard facing down. This helps prevent the liquid from spreading further.
- Immediate Drying: Use a towel to blot up any visible liquid.
- Professional Repair: For severe spills, especially those with sugary drinks, professional repair is generally the best course of action. Take your laptop to a qualified repair technician as soon as possible. They can perform a more thorough cleaning and replacement of damaged components.
Key Replacement: This is common for physical damage.
- Purchase Replacement Keys: If a keycap or scissor mechanism is broken, you can often purchase replacement parts online from specialty retailers.
- Keycap Replacement: Gently snap the keycap back onto the scissor mechanism.
- Scissor Mechanism Replacement: Carefully detach the old scissor mechanism (if possible) and attach the new one. These can be surprisingly delicate, so proceed with caution.
Keyboard Replacement: If the issue is widespread and cleaning isn't working, a full keyboard replacement might be necessary.
- Research Your Laptop Model Determine the exact model of your laptop.
- Order a Replacement Keyboard Purchase a replacement keyboard that is compatible with your laptop model.
- Professional Installation (Recommended): Keyboard replacement can be intricate; if you're not comfortable, consider taking the laptop to a professional repair shop for installation.
Software Solutions: These are useful if your keyboard is malfunctioning due to software reasons.
- Keyboard Troubleshooter: Windows has built-in keyboard troubleshooters that can automatically detect and fix common issues.
- Reinstall Keyboard Drivers: Uninstall and then reinstall your keyboard drivers, either through Device Manager or by downloading them from the manufacturer's website.
Preventative Measures: Keeping Your Keyboard Healthy
Preventing future keyboard issues is just as important as resolving current problems. Here are several tips:
Regular Cleaning: Establish a routine cleaning schedule (weekly or bi-weekly), using compressed air and a soft brush to remove dust and debris.
Avoid Eating and Drinking Near Your Laptop: Minimize the risk of spills and debris by keeping food and drinks away from your keyboard.
Use a Keyboard Cover: Consider a silicone keyboard cover to protect your keyboard from spills and dust. However, remove the cover regularly to prevent moisture buildup.
Proper Ventilation: Avoid using your laptop in dusty or smoky environments. Ensure adequate ventilation to prevent excessive heat buildup, which can damage internal components.
Gentle Typing: Avoid excessive force when typing. This can damage the keys and the underlying mechanisms over time.
Backup Important Data: Back up any critical information on your computer in case of accidental damage to your laptop.
When to Seek Professional Help
While many keyboard problems can be fixed at home, sometimes the expertise of a professional repair technician is needed. Consider seeking professional help if:
- The Problem Persists: If you’ve tried all the troubleshooting steps and the keys are still not working.
- Liquid Damage is Extensive: If a spill caused significant damage (sugar-based drinks, large spills), it's best to let a professional handle the repair.
- You're Uncomfortable with Disassembly: If you're not comfortable removing keys or disassembling your laptop, it's better to leave it to the experts.
- There are Internal Hardware Issues: Damage to the keyboard’s internal components (motherboard, etc.) requires professional diagnostic and repair.
Following these thorough diagnostic steps and repair solutions, your laptop keys should be working at their best. Remember, preventative measures are key to keeping your keyboard functioning well for years to come. By taking care of your laptop keyboard, you can avoid a lot of frustration and maximize your productivity.
