why aren't my laptop speakers working

Title: monitor sound not working fixed shorts techsupport techtips
Channel: Shiny Tech Things
monitor sound not working fixed shorts techsupport techtips by Shiny Tech Things
why aren't my laptop speakers working, why are my laptop speakers not working mac, why isn t my hp laptop speaker working, why aren't my speakers working on my hp laptop, why aren t my dell laptop speakers working, why aren't my laptop speakers not working, why are my hp laptop speakers not working, why are my laptop built in speakers not working, why aren t my speakers working on my lenovo laptop, why aren t my speakers working on my asus laptop
Laptop Speakers DEAD? This SHOCKING Trick Will FIX Them!
Laptop Speakers Silent? Unveiling a Miracle to Get Your Audio Back!
Have you ever felt the unsettling quiet? You power up your laptop, ready to dive into a thrilling movie or a crucial work presentation. Then, nothing. Just…silence. Your laptop speakers are dead. It’s a frustrating experience, isn't it? But before you resign yourself to expensive repairs or external speakers, there is hope. We’re going to explore a surprising fix. This could revive your laptop's sound. Prepare to be amazed because it’s not what you think!
The Usual Suspects: Ruling Out the Obvious
Before we unveil the secret, let's address the basics. We surely don't want to miss something simple. First, double-check the volume controls. Is your system muted? Or perhaps the volume is turned down to zero? It seems obvious, but it sometimes happens. Then, verify your speakers are selected as the default audio output. This is easy to overlook. This is a good start, so let’s proceed.
Additionally, inspect your laptop's audio settings. Often, operating systems can have their own sound configurations. Ensure the sound is channeled to the correct place. These are elementary checks. However, these shouldn't be skipped. If these quick checks don't work, we'll delve deeper.
The Shocking Revelation: The Power of Driver Resets
Now, let’s get to the core of the matter. The "shocking trick" is actually not that complicated. It is surprisingly effective, however. It involves a simple, yet powerful, solution: a driver reset. Many times, audio issues stem from corrupt or outdated audio drivers. Drivers are essential software. They essentially act as translators. They allow your operating system to communicate with your hardware, including your speakers. A driver reset often resolves this issue.
Here’s how to perform a driver reset on most Windows laptops:
- Access Device Manager: You'll need to open the Device Manager. You can search for it in the Windows search bar. Or, right-click the start menu to get there.
- Locate Sound Controllers: In Device Manager, pinpoint "Sound, video, and game controllers." Expand this category. You will see your audio devices listed.
- Uninstall the Driver: Right-click on your laptop's audio device (e.g., "Realtek High Definition Audio"). Select "Uninstall device." This is a vital step.
- Restart Your Laptop: After uninstalling, restart your laptop. Windows will automatically attempt to reinstall the correct driver during the boot process. This is often enough.
For Mac users, the process is somewhat different. Apple typically manages driver updates automatically. Try restarting your Mac. Then, check for updates in System Preferences. This can frequently solve audio problems.
Beyond the Reset: Other Troubleshooting Steps
If the driver reset doesn’t work immediately, don’t panic. There are other things to consider. First, go to the manufacturer’s website. Download the newest driver for your specific laptop model. Then, manually install it. This can sometimes bypass automatic updates.
Second, consider the possibility of hardware failure. Test your speakers. Plug in external headphones or speakers. If you hear sound through them, the problem may be with your internal speakers. In this case, repairs may be needed.
Third, a virus or malware infection sometimes interferes with audio functions. Run a thorough scan with your antivirus software. It’s always a good idea to keep your system clean. Therefore, this is an important step.
Preventative Measures: Keeping Your Speakers Alive
Prevention is always better than cure. So, how do you protect your laptop speakers? It is a valid question.
Make sure to update your drivers. Check for driver updates regularly. It's simple to do. Software like Driver Booster can automate this process. Also, avoid exposing your laptop to extreme temperatures. Heat is the enemy of all electronics. Finally, be mindful of the volume settings. Avoid blasting your speakers at maximum volume for extended periods. This may damage them.
The Final Verdict: Sound Restored!
So, there you have it! The seemingly "dead" laptop speakers can often be brought back to life. The driver reset is a powerful technique. And it should be your first line of defense. Before discarding your laptop or spending money on repairs, you should try this method. After all, you’ve got nothing to lose. Hopefully, the steps we’ve discussed will completely resurrect your sound. Enjoy the music, movies, and meetings once again!
Lenovo Laptop Mic Dead? This SHOCKING Fix WORKS!Laptop Speakers DEAD? This SHOCKING Trick Will FIX Them!
Hey tech lovers! Let's be real, there's nothing worse than your laptop speakers suddenly going silent. One minute you’re grooving to your favorite playlist, the next… crickets. It's like the soundtrack of your life has been abruptly muted. We’ve all been there, haven't we? That sinking feeling, the immediate panic, the desperate Google search for "laptop speakers not working!" Well, breathe easy, friend. Because today, we're diving headfirst into the wasteland of dead laptop audio and learning a shocking trick that might just resurrect those silent speakers and bring the music back to your digital life.
1. The Silent Symphony: Recognizing the Signs of Speaker Death
Before we get to the Lazarus-like revival, let's confirm the patient is actually… you know… dead. Sometimes, it’s not a speaker issue at all. It’s like assuming your car engine has blown when you’ve just run out of gas. So, how do you know if your laptop speakers are really, truly gone to the great audio graveyard?
- No Sound at All: This is the big one. If absolutely nothing comes out of your speakers – no system sounds, no video audio, nada – it’s a strong indicator.
- Crackling or Distorted Sound: Think of it like a scratchy record. If your audio is filled with static, popping, or sounds like a robot gargling, something's definitely amiss.
- Intermittent Sound: One minute you have audio bliss, the next, it's gone. This could point to a loose connection or a failing component.
- Quiet Sound, Even at Max Volume: Even with the volume cranked to eleven (or, you know, 100%), the sound is barely audible. This isn't always a death knell, but it’s a serious symptom.
If you're experiencing any of these symptoms, then we can proceed. Let's explore!
2. The Usual Suspects: Common Culprits Behind Speaker Problems
Before you start tearing your laptop apart (which, by the way, don't do until you've tried everything else!), let’s examine the usual suspects. Think of them as the villains in this audio drama.
- Software Glitches: Sometimes, a simple software hiccup is the culprit. It’s like a digital gremlin messing with your settings.
- Driver Issues: Like the software gremlins' sidekicks, outdated or corrupted drivers are known troublemakers.
- Muted Settings: It sounds silly, but check those volume controls! Have you accidentally muted your laptop, or specific applications? I've done this more times than I'd like to admit.
- Hardware Failure: This is the worst-case scenario, but sometimes the speakers themselves just give up the ghost.
- External Devices: Are headphones or external speakers plugged in? If so, your laptop might be routing the sound there instead of through the built-in speakers.
3. The First Line of Defense: Troubleshooting the Obvious Stuff
Okay, let's get practical. Before you go fiddling with any internal components, try these initial fixes. Think of them as the basic training before entering the audio battlefield.
- Restart Your Laptop: The age-old solution. Sometimes, a simple reboot can fix everything. It’s like hitting the reset button on your brain.
- Check the Volume Controls: Make sure your laptop isn’t muted, and that the volume is turned up in both the system settings and the application you're using (like your music player or video streaming service). Don't forget to check the volume controls on the keyboard itself.
- Unplug External Devices: Disconnect any headphones, speakers, or other audio devices you have connected. This ensures the sound is directed to your laptop speakers.
- Update Your Drivers: Head to your laptop manufacturer's website and download the latest audio drivers for your specific model. Drivers are like the translators that allow your software and hardware to communicate.
- Run the Windows Troubleshooter: Windows has a built-in troubleshooter that can often identify and resolve audio problems. It's like having a built-in tech support agent.
4. The SHOCKING Trick: Resetting Your Audio Settings (The Secret Weapon!)
Okay, drumroll please! The trick, the secret weapon, the revelation that might just breathe life back into your laptop speakers is this: resetting your audio settings.
Now, this isn't some complicated technical mumbo-jumbo. It's about re-calibrating the system to ensure everything is working as it should. Think of it as performing audio CPR. The process can differ slightly depending on your operating system (Windows or macOS) but the underlying principle remains the same.
For Windows:
- Go to Control Panel: You can usually find this by searching in the Windows search bar.
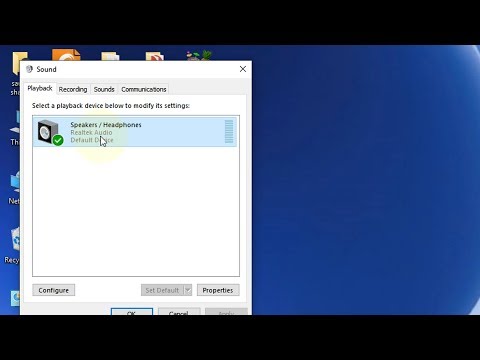
- Select "Hardware and Sound": Then, click on "Sound."
- Go to the Playback Tab: Here, you will see a list of audio devices. Right-click on your default speaker and select "Properties."
- Look for "Enhancements": In the "Enhancements" tab, you might find options to disable or reset audio enhancements. Experiment with these settings. Sometimes, a specific enhancement is causing the problem.
- Check "Advanced": In the "Advanced" tab, make sure the default format is set to the highest quality supported by your speakers.
For macOS:
- Open System Preferences: Click on the Apple menu in the top-left corner, and select "System Preferences."
- Go to "Sound": Within System Preferences, click on "Sound."
- Select the "Output" Tab: Choose your laptop's built-in speakers from the list of output devices.
- Adjust the Volume: Make sure the output volume is turned up. Check if “Mute” is selected.
- Reset Audio MIDI Setup (Advanced): Go to Applications - Utilities - Audio MIDI Setup. If you see the laptop's sound device listed, right-click on it and click "Use this device for sound output."
This process resets your audio settings to defaults. Don't be surprised if it feels like going back to square one, but sometimes, that's exactly what's needed.
5. Diving Deeper: Advanced Troubleshooting Techniques
If the secret weapon doesn't work, don’t despair! We have more techniques in our arsenal. These are a bit more hands-on, but can be well worth the effort.
- Check Your Sound Card: Your sound card is the heart of your audio system. If it's faulty, you're out of luck. You can often diagnose this by accessing the Device Manager (Windows) or System Information (macOS) and checking for any errors related to your sound card.
- Test with External Speakers or Headphones: If you have headphones or external speakers, connect them to your laptop. If the sound works through these devices, it strongly suggests a problem with your laptop's internal speakers.
- Inspect Physical Connections (If Possible): If you're comfortable with it (and your laptop's design allows), you can carefully inspect the internal speaker connections. Warning: This can void your warranty. Proceed with caution!
- Check for Interference: Place your laptop away from any devices that may cause interference such as other electronic devices, microwaves or Bluetooth devices.
6. The "Speaker Swap": Replacing Your Laptop Speakers (The Riskier Option)
If all else fails, it might be time to consider replacing your laptop speakers. This involves opening up your laptop, which can be tricky, and purchasing replacement speakers.
- Research Your Laptop Model: Find the exact model number of your laptop. This is essential to ensure you buy the correct replacement speakers.
- Find a Reliable Source for Replacement Speakers: Websites such as eBay, Amazon, and specific laptop part retailers are good places to start.
- Follow a Detailed Guide: Always use a step-by-step guide or video tutorial when opening your laptop.
- Take Your Time: Be patient, careful, and methodical.
- Consider Professional Help: If you're not comfortable with this process, consider taking your laptop to a qualified repair shop.
7. Preventive Measures: Keeping Your Speakers Healthy
Like any piece of technology, your laptop speakers benefit from some TLC. Here's how to keep them in tip-top shape.
- Keep your Laptop Clean: Dust and debris can get into your speakers, causing damage. Regularly clean your laptop, especially the speaker grills.
- Avoid Extreme Temperatures: Avoid using your laptop in excessively hot or cold environments.
- Don't Overload the Volume: Playing audio at maximum volume for extended periods can damage your speakers.
- Regular Software Updates: Keeping your operating system, drivers, and applications up-to-date can prevent compatibility issues that might affect your audio.
8. The Software Side: Optimizing Your Audio Experience
Good hardware is only half the battle. Here’s how to optimize your audio experience on the software side.
- Use a Good Music Player: Some music players offer better sound quality and customization options than others.
Please fix laptop speakers

By Surfshark Academy Please fix laptop speakers by Surfshark Academy
How to fix No Sound on Windows 10
By The Geek Page How to fix No Sound on Windows 10 by The Geek Page
Laptop Speakers Not Working But Headphones Work Windows 1011 FIXED

By Murugan S Laptop Speakers Not Working But Headphones Work Windows 1011 FIXED by Murugan S

Title: My Laptop Sound Not Working How To Fix Windows 10 Laptop No Sound Not Working Problem
Channel: FIXsage
My Laptop Sound Not Working How To Fix Windows 10 Laptop No Sound Not Working Problem by FIXsage
Laptop Working
Laptop Speakers DEAD? This SHOCKING Trick Will FIX Them!
If the silence emanating from your laptop speakers has you in despair, we understand. That frustrating moment when your favorite tunes, crucial meeting audio, or engaging game sounds are abruptly replaced by nothing is a universal tech woe. Before resigning yourself to the expense of new hardware or the irritation of external speakers, take heart. We’re here to offer a comprehensive guide to reviving those seemingly defunct laptop speakers, employing techniques that are often shockingly effective. Forget the usual troubleshooting rundowns; we're diving deep into the specifics to get you back to audio nirvana.
Initial Diagnosis: Pinpointing the Source of the Silence
Before we unleash our arsenal of solutions, let's establish a systematic approach. The “dead speaker” scenario can stem from various culprits, and correctly identifying the problem is half the battle.
- The Obvious Suspects: Volume and Mute Controls. Perhaps the most common (and easily remedied) cause is a simple oversight. Double-check your volume levels, both via the system tray icon (usually a speaker symbol) and any physical volume controls on your laptop. Ensure the mute function isn't inadvertently activated. A quick restart can often knock things back into place.
- Software-Level Hiccups: Driver Conflicts and Audio Device Selection. Operating systems, especially Windows and macOS, can sometimes misconfigure audio output. Ensure the correct audio device (usually the built-in speakers) is selected in your operating system's sound settings. Check your sound driver - a corrupt, missing or outdated driver is a frequent audio offender.
- Hardware Indicators: Physical Damage and Internal Connections. A more serious, but less frequent, cause is physical damage to the speakers themselves or internal connection issues. Inspect the exterior for any obvious signs of trauma (e.g., cracks, punctures). This is less likely, but always to be considered.
Diving Deep: Advanced Troubleshooting Techniques
Now, armed with this initial assessment, let’s move into more advanced troubleshooting techniques designed to breathe life back into your ailing laptop speakers.
Step 1: Driver Diagnostics and Reinstallation
Faulty audio drivers are a prime suspect. Here’s how to perform a thorough driver check:
- Accessing Device Manager (Windows): Right-click the Windows Start button and select "Device Manager." Look for "Sound, video, and game controllers." Expand this section to reveal your audio devices (typically your laptop sound card and integrated speakers).
- Driver Examination: Right-click on your audio device (e.g., "Realtek High Definition Audio") and select "Properties." In the "General" tab, check the "Device status" field. It should say, "This device is working properly." If an error message appears, it’s a clear indication of a driver problem.
- Driver Update: Within Device Manager, select the driver and choose "Update driver." Allow the system to search automatically for updated drivers.
- Manual Reinstallation (If Automatic Update Fails): If the automatic update doesn't yield results, you’ll need to reinstall the driver manually.
- Uninstall the Driver: In Device Manager, right-click the audio device and select "Uninstall device." Confirm by ticking the box to delete the driver software, if given the option.
- Restart Your Laptop: This is crucial. The operating system will attempt to reinstall the driver automatically.
- Manufacturer's Website: If the system doesn't automatically reinstall the driver, or if the reinstalled driver doesn't fix the problem, visit your laptop manufacturer's website (e.g., Dell, HP, Lenovo). Search for the drivers specific to your laptop model and operating system. Download and install the audio driver from the official site.
- macOS Equivalent: On macOS, navigate to "System Preferences" -> "Sound." Here, you can select your output device, and any available associated drivers. However, direct control over driver management is less granular compared to Windows. A restart is still a good idea after any change here.
Step 2: Audio Enhancements and Equalizer Settings
Operating systems often include built-in audio enhancement features that can, paradoxically, contribute to audio problems if misconfigured.
- Windows Enhancements: In the Sound settings (right-click the speaker icon in the system tray and select "Open Sound settings"), navigate to "Sound Control Panel." Select your speakers, then click “Properties.” In the "Enhancements" tab, uncheck any active enhancements (like "Loudness Equalization" and "Bass Boost") and see if sound returns. In the "Advanced" tab, experiment with different sample rates and bit depths.
- macOS Audio MIDI Setup: Open "Applications" -> "Utilities" -> "Audio MIDI Setup." This utility allows you to configure audio input and output devices. Check that the volume levels are correct for your built-in speakers.
Step 3: Hardware-Level Checks (Use with Caution)
This step involves a degree of technical expertise, but it's an option if the previous techniques fail.
- Internal Inspection (Proceed with extreme caution): If comfortable with basic computer hardware, you can attempt opening the laptop to inspect the internal speaker connections. This will void your warranty, so only proceed if the warranty has expired.
- Power Down and Disconnect: Completely shut down your laptop and unplug the power adapter. Remove the battery if possible.
- Consult Your Laptop's Service Manual: Find a service manual for your laptop model online. It will detail the disassembly process.
- Locate the Speakers: Carefully unscrew the bottom panel and locate the speakers within the laptop chassis.
- Inspect Connections: Examine the speaker wires and connectors for any loose connections or visible damage.
- Re-Seat the Connectors: If possible, gently unplug and re-plug the connectors to ensure a secure connection.
- Reassemble Carefully: Reassemble the laptop carefully following the service manual's instructions.
Step 4: Dealing With Physical Damage (Less Common, but Serious)
If you suspect physical damage to the speakers themselves, you'll likely need to replace them.
- Identifying Physical Damage: Look closely at the speakers. Are there tears, cracks, or other signs of physical trauma?
- Speaker Replacement: Replacement parts can be purchased online, usually from electronics parts retailers, or from the laptop manufacturer. Be certain you know the exact model of your laptop when ordering replacement speakers.
- Professional Repair: If you are not comfortable with the disassembly and reassembly, consider taking your laptop to a qualified repair technician.
Step 5: The Shocking Trick: Sound Test and System Restore
Here's the "shocking" part – a couple of solutions often overlooked:
- The Sound Test: Run a sound test. Many online sites offer a quick frequency test, which is helpful in identifying if there is something wrong with your speakers, because it will help determine if they work or not.
- System Restore (Windows): If you suspect that a recent software installation or driver update has caused the issue, the System Restore feature in Windows allows you to revert your system to a previous state when your speakers were functioning correctly. Search for "Create a restore point" in the the Windows search bar. Then, select "System Restore." Follow the prompts to select a restore point from a date when your audio was working. This can be a bit like traveling back in time, so to speak.
Step 6: Specialized Troubleshooting and Third-Party Software
In rare cases, third-party software interactions or corrupted system files can be the root cause.
- Conflict with Third-Party Software: Occasionally, third-party audio enhancement software or audio drivers can conflict with your system's built-in audio controls. If you've installed such software, try uninstalling it temporarily to see if this fixes the problem.
- System File Checker (SFC) Scan (Windows): Run the System File Checker to scan for corrupt system files. Open Command Prompt as an administrator (search for "cmd" in Windows, right-click the "Command Prompt" app, and select "Run as administrator"). Type
sfc /scannowand press Enter. The system will scan for and attempt to repair corrupted files.
Preventive Measures: Keeping Your Speakers in Top Shape
Once you've successfully revived your laptop speakers, take some proactive steps to prevent future issues.
- Regular Driver Updates: Keep your audio drivers up-to-date.
- Cleanliness: Keep your laptop clean. Dust and debris can occasionally interfere with audio output.
- Safe Volume Levels: Avoid blasting your speakers at maximum volume. Overuse can damage them, or make them wear down faster.
Wrapping Up: Returning to Audio Perfection
We’ve covered everything from the basics to the more obscure techniques for restoring your laptop speakers. By following these steps, you'll significantly increase your chances of resolving the audio issue and returning to a world of vibrant sound. Remember, patience and a systematic approach are key. If all else fails, a qualified technician can inspect your laptop, offering a last solution, but hopefully, you'll be enjoying clear audio by now.
