1080p gpu doesn't work for laptop monitor basic display driver

Title: Easy Steps To Enable Current Graphics Adapter From Microsoft Basic Display Adapter
Channel: TDG Gaming
Easy Steps To Enable Current Graphics Adapter From Microsoft Basic Display Adapter by TDG Gaming
1080p GPU Fail? Laptop Screen BLACKOUT! (Easy Fix Inside!)
Laptop Screen Troubles Got You Down? Don't Panic! (A Quick Guide to Fixing Blackouts)
Have you ever been in the middle of something important, then… BAM! Your laptop screen goes completely dark? It's a terrifying experience, to be sure. You're left staring at a black abyss, wondering if your precious device has met its untimely demise. But before you start mourning your data (or your gaming streak), take a deep breath. In fact, there's a good chance you can fix it yourself! Therefore, let's troubleshoot this common problem.
Is It Really a GPU Failure? Assessing the Situation
First things first: don't instantly assume the graphics processing unit (GPU) is toast. After all, a black screen doesn't always mean hardware failure. Sometimes, it’s a much simpler issue. Consequently, carefully consider when the black screen appeared. Was it after a specific action, like installing updates or connecting an external monitor? Moreover, is there any activity on the laptop? For example, do you hear the fan spinning? Maybe the power light is on. These are all clues. In essence, a little detective work can save you a lot of stress. Conversely, a GPU failure can cause a blank screen.
Troubleshooting Steps: Before You Call for Backup
Now, with that said, let's get things up and running again. You should try these basic troubleshooting steps first. Because you should always try the easiest solutions first.
The Power Cycle: Initially, this sounds simplistic, but it’s often the magic bullet. Shut down your laptop completely. Then, remove the battery (if possible). Next, hold the power button down for 30 seconds. After that, put the battery back in (if you removed it) and restart. This clears any residual power and can resolve many problems. It is a good first step.
External Monitor Test: Connect your laptop to an external monitor or TV. If the display appears on the external screen, the problem is likely with the laptop's internal screen or its cable. Therefore, your GPU is likely still fine.
Check Brightness: Occasionally, the screen brightness might be set to zero. Thus, try pressing the brightness up key (usually a function key) repeatedly. You might bring the screen back to life. Alternatively, try holding the "FN" key and pressing the brightness keys.
Safe Mode Boot: Furthermore, restarting in safe mode can help. Essentially, it loads Windows with minimal drivers. Consequently, this can help determine if driver issues are the cause of the problem. To illustrate, restart your laptop. After, repeatedly press the appropriate key (usually F8, F11, or Shift+F8) during startup until you see the safe mode options. Then, select "Safe Mode." If the screen works in safe mode, driver problems are very likely.
Driver Issues: The Usual Suspects
Driver problems are frequently the root cause of black screens. So, let's explore this further.
Driver Updates: First of all, outdated or corrupted graphics drivers often cause these issues. Therefore, download the latest drivers. To do this, go to the manufacturer's website. Alternatively, you can use the device manager. You can try uninstalling your graphics drivers. Then restart your laptop and reinstall them.
Driver Rollback: Sometimes, a new driver might be the culprit. Consequently, try rolling back to a previous driver version. To do this, navigate to the device manager. Then, right-click on your graphics card. Choose "properties," then go to the "driver" tab. Next, click the "rollback driver" button.
Hardware Glitches: When Things Get Tricky
If the above steps don't work, then it's time to consider potential hardware issues. However, don't panic yet.
Loose Connections: Typically, a loose connection is the culprit. For instance, a dislodged display cable inside the laptop may be responsible. Therefore, if you're comfortable, you could open the laptop and inspect the screen cable connection. But before you do this, make sure you know what you are doing. Similarly, if you are not comfortable, then seek professional help.
Screen Issues: Furthermore, the screen itself might be faulty. For example, there could be a problem with the backlight or the LCD panel. In this case, you’ll likely need professional repair or screen replacement.
Seeking Expert Help: Knowing When to Call in the Pros
- *Consequently, if you've tried everything and still have a black screen, it's time to seek professional help.* However*, *before* you go to a repair shop, make a backup of your data.
- Professional Diagnosis: Technicians can diagnose the specific problem. Additionally, they have the tools and expertise to fix it. Besides, they can order screen replacement.
Wrapping Up: Back in the Game!
Black screen problems can be frustrating. But as well as being frustrating it is often fixable. Because of this, don't give up on your laptop just yet. By following these steps, you should be able to get your screen working again. In the event of a hardware failure, remember to seek professional assistance. However, don't forget to back up your data before. Then enjoy your freshly working laptop!
Work From Home? These Laptops Won't Break the Bank!1080p GPU Fail? Laptop Screen BLACKOUT! (Easy Fix Inside!)
Hey everyone! Ever felt that gut-wrenching moment when your laptop screen suddenly goes black? You know, that feeling like your digital life has just vanished into the abyss? Yeah, we’ve all been there. Especially when you're in the middle of something important - maybe gaming, editing a video, or just trying to catch up on your favorite show. Often, the culprit? A grumpy, underperforming GPU, particularly when you're aiming for that glorious 1080p resolution. But don't despair! Today, we're diving deep into the mystery of the black screen, focusing on those pesky GPU failures at 1080p and, most importantly, how to easily fix them. Consider this your digital rescue mission, a guide to bring your screen back to life!
The Black Screen Blues: Why Is My 1080p GPU Giving Me Grief?
So, you boot up your laptop, ready for some HD goodness, and bam - the screen goes dark. What gives? Well, several things can cause this digital heartbreak. The most common culprit, as we hinted at, is a problem with your Graphics Processing Unit (GPU). Think of the GPU as the engine of your display. It's the one that tells your screen what to show. When it stutters, fails, or simply gives up, the screen goes with it. This issue can be magnified when you crank up the resolution to 1080p, which demands more processing power. Let's break down some possible causes:
- Overheating: Like any engine, your GPU can overheat, especially in laptops where space is limited. Dust buildup inside your laptop can worsen this issue, acting like a blanket.
- Driver Issues: Drivers are the software that allows your operating system to communicate with your hardware. Corrupted or outdated drivers can cause all sorts of glitches, including a black screen. Think of them as the translator – if the translator is broken, you won’t understand the instructions.
- Hardware Failure: Sometimes, the GPU itself is simply failing. This is less common but can happen due to manufacturing defects, age, or excessive wear and tear. This is like a car engine blowing up.
- Power Supply Problems: If your laptop isn't getting enough power, the GPU might struggle, particularly when running at 1080p.
- Software Conflicts: Certain software, especially games or resource-intensive applications, might clash with the GPU or its drivers.
Diving Deeper: Identifying the 1080p GPU Black Screen Problem
Okay, so you’ve got the black screen, but how do you know it's a GPU problem, especially at 1080p? Well, there are telltale signs:
- Consistent Blackouts: Does it happen only when you're gaming or running demanding applications at high resolutions like 1080p? This points directly to a GPU issue related to increased processing load.
- Error Messages (Sometimes): You might see error messages before the screen goes black, possibly mentioning graphics drivers. These are like digital alarms going off.
- Audio Still Playing: If you can still hear sounds (like in-game music) even though the screen is black, it suggests the system is still running, but the display isn't getting the information it needs from the GPU.
- External Monitor Test: Hook up your laptop to an external monitor. If the display does work on the external monitor, it heavily suggests a problem with the laptop's internal display or the GPU’s connection to it.
The DIY Rescue: Easy Fixes for Your Black Screen Woes
Alright, let's roll up our sleeves and try some DIY fixes before you start thinking about trips to the repair shop. We’ll start with the simplest solutions and work our way up. Remember, patience is key, and always back up your important data before making major changes!
- The Restart Remedy: This might sound too basic, but sometimes a simple restart (or a hard reset by holding down the power button) can clear up temporary glitches. Think of it as hitting the reset button on a video game.
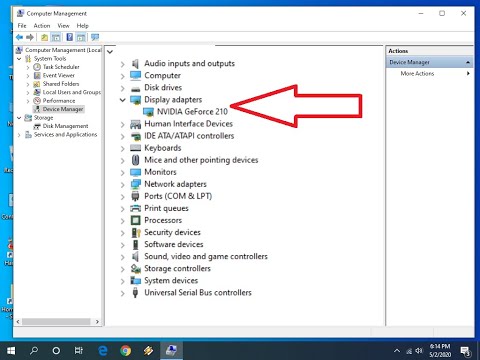
- Driver Drama: Updating & Rolling Back: Head into your device manager (search for it in the Windows search bar). Under "Display adapters," locate your GPU (e.g., NVIDIA GeForce, AMD Radeon). Right-click on it and select "Update driver." Choose "Search automatically for drivers." If that doesn't work, try rolling back to a previous driver version. Right-click the GPU, choose "properties", go to the "driver" tab, and select "Roll Back Driver." This is your digital undo button.
- Cooling Crisis: Checking for Overheating: Feel the vents on your laptop. Are they hot? If so, overheating is a likely culprit. Let your laptop cool down. Consider using a laptop cooling pad, or ensure adequate ventilation. Think of it as giving your engine some fresh air.
- Cleaning Crew: The Dust Bunny Buster: Gently open your laptop (if you're confident and comfortable doing so – and after you research how to do it safely for your specific model). Use compressed air to blow out dust from the vents and around the fan. This is like giving your laptop a good spring cleaning. Important Note: Be very careful and gentle when you open and handle the internal components.
- Power Play: Check Your Power Settings: Make sure your laptop is plugged in (if it needs to be) and that power settings aren't hindering performance. You don't want your GPU starved for juice.
Advanced Troubleshooting: When the Easy Fixes Fail
If those basic fixes don't work, it's time to dig a little deeper. Here are some more advanced troubleshooting steps:
- Boot into Safe Mode: Starting your laptop in Safe Mode (usually by repeatedly pressing F8 or Shift+F8 during startup) loads a bare-bones version of Windows, using basic drivers. If the screen does work in Safe Mode, it strongly suggests a driver or software conflict.
- System File Checker (SFC) Scan: Open Command Prompt as an administrator and type
sfc /scannow. This tool checks and repairs corrupted system files, which can sometimes cause display issues. - Memory Meltdown: RAM Test: Run a memory diagnostic tool (Windows has one built-in – search for "Windows Memory Diagnostic") to check for RAM (Random Access Memory) issues. While RAM problems don't always cause black screens, they can contribute.
- Reinstall Windows (As a Last Resort): This involves backing up all your data and reinstalling the operating system. It's a drastic step but can fix deep-seated software problems.
Identifying GPU Hardware Failure
Sometimes, despite your best efforts, the black screen persists. This could mean hardware failure:
- Consistent Problems Across Applications: If the black screen happens regardless of what you're doing (gaming, browsing, etc.), it points more towards a hardware issue.
- Testing with a Different GPU (If Possible): If you have access to another graphics card (or a laptop with integrated graphics), try using it to see if the problem persists. If the other GPU works, it strongly suggests a problem with your original card.
- Professional Help: If nothing else works and you suspect a hardware failure, it's time to take your laptop to a qualified repair technician. They can diagnose the problem, potentially replace the GPU, and get your screen back to life.
Preventing the Black Screen: Tips for a Healthy GPU
Prevention is always better than cure, right? Here are some tips to keep your GPU happy and healthy:
- Regular Cleaning: Dust your laptop's vents regularly.
- Proper Ventilation: Ensure your laptop has good ventilation to prevent overheating. Use a cooling pad, or simply avoid using it on soft surfaces like beds or carpets.
- Up-to-Date Drivers: Keep your graphics drivers updated, but be cautious about installing the very latest drivers immediately. Check for user reviews and stability first.
- Monitor Temperatures: Use software to monitor your GPU's temperature. If it consistently runs hot, address the issue.
- Avoid Overclocking (Unless You Know What You're Doing): Overclocking pushes your GPU beyond its designed limits, increasing the risk of failure.
The 1080p Sweet Spot: Optimizing for Performance
When you're gaming or using demanding applications at 1080p, optimizing performance is critical to avoid black screens. Here's how to get the most out of your GPU:
- In-Game Settings: Adjust the graphics settings in your games. Lowering settings like shadows, textures, and anti-aliasing can reduce the load on your GPU.
- Monitor Refresh Rate: Ensure your monitor's refresh rate is set correctly in your display settings (often 60Hz or higher).
- Update Your Software: Keep your games, operating system, and other software up-to-date.
- Background Apps: Close unnecessary applications running in the background. They can eat up valuable GPU resources.
Black Screen Breakdown: Understanding the Underlying Causes
Let's take a deeper dive into those technical nitty-gritty of what causes your screen to go black:
- Driver Instability: Drivers are the communication bridge between your OS and your hardware. If they are
How to fix Missing Display Adapters Solution

By Sam Fishing How to fix Missing Display Adapters Solution by Sam Fishing
How to update intel R HD graphics in windows 10

By Hadi Tech Mayo How to update intel R HD graphics in windows 10 by Hadi Tech Mayo
How to Get Back Missing Display Graphic Driver in Device Manager
By MJ Tube How to Get Back Missing Display Graphic Driver in Device Manager by MJ Tube

Title: How to set NVIDIA as default graphics card for Windows 10 computers and laptops - 2025 Tutorial
Channel: GMODISM
How to set NVIDIA as default graphics card for Windows 10 computers and laptops - 2025 Tutorial by GMODISM
Wifi Not Found
Here's the title: The Ultimate Guide to Choosing the Perfect Wedding Venue: A Comprehensive Checklist
The Ultimate Guide to Choosing the Perfect Wedding Venue: A Comprehensive Checklist
Planning a wedding is a journey, a thrilling expedition filled with dreams and details. And amidst the flurry of floral arrangements and guest lists, one decision reigns supreme: the selection of your wedding venue. This is not merely a location; it’s the canvas upon which your celebration will be painted. The perfect venue sets the tone, shapes the atmosphere, and becomes the backdrop for memories that will last a lifetime. Navigating this crucial choice can feel overwhelming, but with a structured approach, you can transform the process from daunting to delightful. This comprehensive checklist offers a detailed roadmap, guiding you through every consideration to ensure you discover the venue that perfectly reflects your love story.
Phase 1: Defining Your Vision and Budget
Before you even begin browsing, a period of introspection is essential. This first phase is about understanding your desires and defining the parameters within which you’ll operate. It's the foundation upon which all subsequent decisions will be built.
Envisioning Your Dream Wedding: Close your eyes and truly visualize your ideal wedding day. Where are you standing when you say "I do"? What is the prevailing aesthetic? Is it a sun-drenched garden ceremony or a sophisticated ballroom affair? Consider the overall vibe: intimate and romantic, grand and luxurious, or perhaps rustic and relaxed. Jot down specific details – the types of flowers you envision, the music you hope to hear, the color palette that resonates with you. The more vividly you can imagine your perfect day, the clearer your venue preferences will become.
Determining Your Realistic Budget: The budget is the pragmatic cornerstone of your wedding planning. Sit down with your partner and family members (if applicable) to honestly assess your financial resources. Itemize all anticipated expenses – catering, photography, attire, entertainment, and, of course, the venue. Research average costs in your geographical area to avoid unrealistic expectations. Once a total budget is established, allocate a percentage specifically for the venue. This will inform the types of locations you can realistically consider. Be sure to factor in potential add-on costs like taxes, service charges, and mandatory gratuities.
Guest List Estimation: While it’s not necessary to have a final guest list at this stage, a rough estimate is crucial. This will significantly impact the size of venue you require. Remember, a venue that’s too small will feel cramped and uncomfortable, while a venue that’s too large can feel empty and impersonal. Create a preliminary list of potential guests, keeping in mind that the ultimate number may fluctuate. Knowing the approximate number of attendees will help you filter venues based on their capacity limits.
Phase 2: Identifying Venue Options and Conducting Preliminary Research
Now that you have a clear vision and budget, it’s time to delve into the actual venues. This phase is all about exploration and initial investigation.
Leveraging Online Resources and Referrals: The digital world is your oyster when it comes to venue scouting. Begin by using search engines like Google, typing in keywords such as "wedding venues [your city or region]," "rustic wedding venues," or "beachfront wedding venues." Explore wedding planning websites, such as The Knot and WeddingWire, which often feature venue directories with photos, reviews, and pricing information. Don’t underestimate the power of word-of-mouth referrals. Ask recently married friends, family, or colleagues for their recommendations.
Defining Venue Style and Amenities: Based on your envisioned wedding, identify the venue styles that best align with your vision. The options are incredibly diverse: ballrooms, barns, gardens, historic mansions, hotels, restaurants, vineyards, and more. Research the specific amenities you require. Do you need on-site catering, ample parking, handicap accessibility, or a dedicated bridal suite? Consider the logistical aspects, such as proximity to ceremony locations, accommodation options for guests, and ease of access for vendors.
Creating a Shortlist and Initial Screening: Compile a shortlist of potential venues based on your research. Before scheduling in-person visits, conduct a preliminary screening. Review online photos, read reviews from previous couples, and check pricing information. Ensure the venue’s capacity aligns with your guest list estimate and that the style complements your desired atmosphere. Eliminate any venues that immediately fall outside your criteria to save time and energy. Reach out to the venues on your shortlist via email or phone to inquire about availability and pricing.
Phase 3: Venue Visits and In-Depth Evaluation
This phase is where you go from virtual exploration to tangible experience.
Scheduling and Preparing for Venue Visits: Schedule venue visits strategically, allowing ample time to thoroughly inspect each location. Before each visit, create a list of questions to ask the venue coordinator. These should cover the venue’s policies, pricing structures, available packages, and included amenities. Prepare a set of questions related to catering, bar service, vendor restrictions, and inclement weather protocols. Bring a notebook and pen to take detailed notes.
Evaluating the Venue's Aesthetics and Functionality: During your visit, pay close attention to the venue’s overall aesthetic. Does it resonate with your personal style? Consider the architectural details, the interior design, and the surrounding landscape. Is the space well-maintained and clean? Assess the flow of the venue. Does it allow for a seamless transition between ceremony, cocktail hour, and reception? Consider the layout for seating arrangements, dance floor, and other key features.
Assessing Amenities, Services, and Vendor Policies: Carefully examine the amenities offered by each venue. Does the venue include tables, chairs, linens, and tableware, or are these items rented separately? Inquire about the venue’s policies regarding catering, bar service, and outside vendors. Are you required to use specific vendors, or do you have flexibility in choosing your own? Understand the venue’s policies regarding setup, teardown, and cleanup. Evaluate the accessibility features, such as ramps, elevators, and accessible restrooms.
Understanding Pricing and Contracts: Request a detailed price breakdown from each venue, including all associated costs. Clarify any hidden fees, such as service charges, administrative fees, or mandatory gratuities. Compare pricing structures across different venues. Ask about the venue’s cancellation policy and any potential penalties for changes to your booking. Carefully review the contract before signing, ensuring that all agreed-upon terms and conditions are clearly stated.
Phase 4: Making Your Decision and Securing Your Venue
The final phase involves comparing your options, making a decisive choice, and securing your venue.
Comparing and Contrasting Your Shortlist: After visiting all the venues on your shortlist, take time to compare and contrast your notes. Review your evaluations, photographs, and price breakdowns. Create a spreadsheet or a list to compare key features, amenities, and costs. Consider the overall “feel” of each venue and how well it aligns with your vision. Discuss your findings with your partner and family, seeking input and perspectives.
Weighing the Pros and Cons: For each venue, create a list of pros and cons. Consider the factors that are most important to you and your partner, such as aesthetics, budget, location, and included amenities. What are the strengths and weaknesses of each option? Identify the deal-breakers for each venue.
Negotiating and Finalizing the Contract: If you've narrowed down your choices to two or three venues, don't hesitate to negotiate. Discuss any areas where the pricing or terms could be adjusted. Be prepared to walk away if the venue is unwilling to meet your needs. Once you have reached an agreement, carefully review the final contract. Ensure that all agreed-upon details, including pricing, dates, services, and cancellation policies, are accurately reflected in the document.
Securing Your Date: Once you are completely satisfied with the contract, sign it and submit the required deposit to secure your date. This is the crucial step that officially reserves your chosen venue. Immediately communicate with your wedding planner (if you have one) and your other vendors to inform them of your decision. Finally, breathe a sigh of relief and celebrate this significant milestone in your wedding planning journey.
Phase 5: Post-Venue Selection and Ongoing Planning
The selection of your venue is not the end, but the beginning of a new chapter in your wedding planning process.
Coordinate with Other Vendors: Once your venue is booked, you can begin to coordinate with other vendors, such as your caterer, photographer, florist, and DJ. Share your venue information and any specific requirements or restrictions with each vendor. Ensure that all vendors are aware of the venue’s policies regarding setup, teardown, and access.
Planning Site Visits: Schedule site visits with your wedding planner (if applicable) and your key vendors, such as your caterer, photographer, and florist. This allows them to familiarize themselves with the venue and its layout, and to determine the best locations for their services. Take detailed notes and photos during these visits. Discuss any specific requirements or challenges with your vendors.
Confirming Details and Finalizing Logistics: Stay in close communication with the venue coordinator to confirm all details related to your wedding. This includes your schedule, setup requirements, and any last-minute changes. Finalize your guest list and seating arrangements. Confirm all vendor agreements and deadlines.
Enjoying the Run-Up to Your Big Day: Finally, as your wedding day approaches, take time to relax and savor the anticipation. Delegate tasks to your wedding party and trusted family members. Remember to focus on the joy of the occasion and truly enjoy the journey of planning your wedding.
