my headphone jack is not working laptop

Title: Fix Earphones Headphone Not Working On Windows 11
Channel: ITGuy360
Fix Earphones Headphone Not Working On Windows 11 by ITGuy360
my headphone jack is not working laptop, my headphone jack is not working on my dell laptop, my headphone port is not working on my laptop, my hp laptop headphone jack is not working, my laptop earphone jack is not working, why is my headphone jack not working on lenovo laptop, what to do if headphone jack is not working in laptop
Laptop Headphone Jack Dead? FIX IT NOW! (Easy Steps!)
Laptop Headphone Jack Blues? Don't Panic, We Got This!
Is your laptop's headphone jack suddenly silent? Suddenly, a world of sonic despair has descended. Fear not, fellow audiophiles, for the end is not nigh! This guide will help you revive that dormant audio port. We’ll troubleshoot it together. We'll get your tunes flowing again.
The Silence of the Headphones: Diagnosing the Problem
First things first: let's figure out what’s going on. Before any frantic clicking, consider the basics. Is the volume turned up? Check your system volume. Is the headphone plug fully inserted? Sometimes, the simple solutions are the best. Is the jack clean? Dust and debris can be villains. Consequently, let's delve deeper into potential solutions.
Step 1: The Dreaded Software Glitch – A Digital Hiccup
Software can be the culprit. Occasionally, a simple restart can work wonders. Therefore, restart the laptop. After the restart, test your headphones again. If that doesn’t work, investigate your audio drivers.
Updating Your Audio Driver is essential
Outdated drivers are often the issue. Access your Device Manager. You can usually find it by searching in the Start menu. Expand the "Sound, video and game controllers" section. Right-click on your audio device, usually identified as "Realtek Audio" or similar. Choose "Update driver." Select "Search automatically for drivers." Windows will search for the latest drivers. If a newer driver is found, install it immediately. Then, restart your laptop once more.
Step 2: Hardware Hurdles Unveiled – Physical Inspection
Not all problems are software-based. Sometimes it's simply the hardware. Examine the headphone jack itself. Look inside the jack with a flashlight. Is there any sign of debris? Lint, dust, or other particles could be causing the issue. If you see anything, carefully remove it. Use a compressed air can or a small, non-metallic tool. Be gentle. You don't want to damage the jack further.
Step 3: The Windows Audio Troubleshooter – Your Digital Detective
Windows features a built-in troubleshooter. It's often overlooked, but it's a valuable tool. Access the Troubleshooter. Search for "Troubleshoot settings" in the Start menu. Click on "Playing Audio." Follow the on-screen instructions. The troubleshooter will attempt to identify and fix problems. It will guide you through possible solutions.
Step 4: External Devices in the Mix – Check for Interference
Other devices might be the problem. Sometimes external speakers or Bluetooth devices can interfere. Check if any other audio device is connected. Disconnect any external speakers. Also, disable any Bluetooth devices. Test the headphone jack. If it works now, reconnect your external devices. The problem could be compatibility-related, or the devices could be conflicting.
Step 5: The Hardware Check – A Deeper Dive
Let's assume all previous steps failed. It's time for a more detailed hardware check. Try a different pair of headphones. This will determine if the problem is your headphones. If other headphones work, the issue lies with your original pair. Next, carefully try a different headphone jack. Test jacks on other devices. If the headphones work elsewhere, the issue is with the laptop.
Step 6: Advanced Troubleshooting – Consider the Alternatives
If the headphone jack remains stubbornly silent, consider alternatives. A USB audio adapter is an easy fix. These are inexpensive and easy to use. Connect it to a USB port. Connect your headphones to the adapter. Bluetooth headphones are another option. They offer a wireless listening experience. Finally, consult a professional repair service. They can diagnose and repair more complex hardware issues.
Step 7: Prevention is Key – Guarding Your Audio Future
Preventing future problems is always smart. Avoid excessive force when inserting or removing plugs. Store your laptop in a clean environment. Keep the headphone jack free of debris. Handle your equipment with care. These actions can help prevent future issues.
The Final Symphony: Success!
We've covered several troubleshooting steps. Hopefully, your laptop's headphone jack is now working again. Music should be playing through your headphones once more. If you still encounter problems, don't despair. Remember, seeking professional help is always an option. Enjoy your audio!
Laptop Keyboard Dead? FIX IT NOW! (Easy Steps)Laptop Headphone Jack Dead? FIX IT NOW! (Easy Steps!)
Alright, fellow tech enthusiasts! We've all been there. You're ready to dive into a movie marathon, blasting your favorite tunes, or hopping on a crucial video call, and… nothing. Utter silence. The dreaded laptop headphone jack is officially kaput. It’s the digital equivalent of a flat tire on a cross-country road trip. But fear not! Before you resign yourself to speakerphone hell or the expense of a new laptop, let's get that audio flowing again. We're going to tackle this problem head-on, and I promise, it's easier than you think. Remember that time my cat decided my headphone jack was a chew toy? Yeah, let's just say I perfected these troubleshooting steps.
1. The Dreaded Silence: Initial Diagnosis of a Dead Headphone Jack
First things first: we need to figure out if the problem is the jack itself or something else entirely. Think of it like a detective arriving at a crime scene. We need to gather evidence and make a preliminary assessment. Does your laptop even recognize that you’ve plugged in headphones?
- Listen closely: Can you hear a faint static, a pop, or any sign of life when you plug in and unplug your headphones? If you do, there's a glimmer of hope!
- Check the obvious: Is the volume turned up? I know, it sounds silly, but we all have those moments. Double-check the volume mixer in your operating system (Windows or macOS) and on your laptop.
- Test different headphones: This is crucial. Your headphones might be the issue, not the jack. Try another pair of headphones, or even a different set of earbuds, to see if that makes a difference. It’s like swapping out a lightbulb to see if the problem is the bulb or the lamp.
- Try different devices: If possible, plug your headphones into another device (your phone, a tablet, another laptop) to see if they work. This helps isolate the problem.
If you've run through these preliminary checks and still hear nothing, let's move on.
2. Software Solutions: Diving Into Your Operating System
Sometimes, the fix is as simple as a software tweak. Let's explore the digital realm for any potential gremlins causing the issue. Think of it like updating your antivirus software – it's preventative maintenance for your audio.
- Restart, Restart, Restart: Yes, the classic "turn it off and on again" trick. A simple restart can often clear up minor software glitches that might be interfering with audio output. It's like a digital reset button.
- Driver Updates: Outdated or corrupted audio drivers are the bane of many a tech user’s existence. In Windows, you can update your drivers through Device Manager. In macOS, driver updates are generally handled automatically through software updates. Search for "Device Manager" in your Windows search bar, expand "Sound, video and game controllers," right-click on your audio device, and select "Update driver."
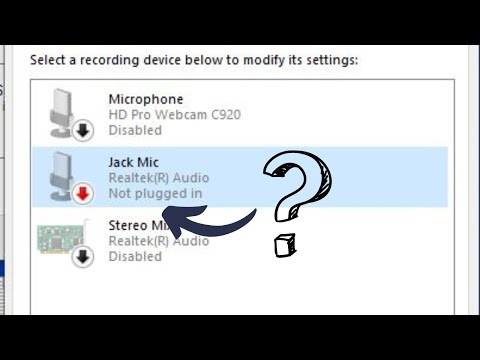
- Check Audio Playback Devices: Within your operating system’s sound settings, ensure your headphones are selected as the default playback device. Windows and macOS have different approaches to this, so a quick online search for “how to set default audio playback device Windows/macOS” will guide you.
- Run the Troubleshooter: Both Windows and macOS have built-in troubleshooters that can automatically diagnose and often resolve audio issues. In Windows, you can access the troubleshooter via the Sound settings. macOS also has troubleshooting features you can explore within System Preferences (now System Settings).
3. Hardware Hunt: Inspecting the Physical Connection of the Headphone Jack
Now, things get a bit more hands-on, like a mechanic popping open the hood of a car. We're going to get up close and personal with the hardware.
- Visual Inspection: Carefully examine the headphone jack itself. Is there any visible debris, like dust, lint, or small obstructions? Use a flashlight to get a good look. If you see something, don’t just shove a toothpick in there! Gently use a compressed air can to blow out any foreign objects.
- Wiggle Test: While headphones are plugged in (and the volume is up), gently wiggle the headphone plug. Do you hear anything? A crackle or intermittent sound could indicate a loose connection.
- External USB Sound Card: If you're comfortable with it, consider using an external USB sound card. These are relatively inexpensive and can bypass the laptop's internal audio circuitry altogether. It’s like putting on a brand-new pair of glasses when your old ones are blurry.
4. Advanced Troubleshooting: Diving Deeper If Needed
Okay, let's assume those initial steps didn't quite do the trick. We'll get a little more techy, but don't worry, we'll keep it user-friendly.
- BIOS/UEFI Check: Accessing your laptop's BIOS (Basic Input/Output System) or UEFI (Unified Extensible Firmware Interface) can sometimes reveal audio settings that might be affecting output. Restart your laptop and immediately press the key that gets you into the BIOS (usually Del, Esc, F2, F10, or F12; the specific key is often displayed on the startup screen). Look around. In the BIOS, you likely won't see granular settings, so this is less likely to yield success, but it's worth a shot.
- System Restore (Windows): If you suspect a recent software update or installation might have caused the problem, you can try a system restore to revert your machine to a previous working state. This is like hitting the rewind button on your computer.
- Check for Physical Damage: Carefully inspect the headphone jack area for any signs of physical damage. If there's a crack, bent pins, or other significant damage, this might be a problem that needs professional repair.
- Reinstall the Audio Driver (Advanced): If you're comfortable, you can completely uninstall and then reinstall the audio driver. Go into Device Manager (Windows), right-click on your audio device, select "Uninstall device," and then restart your computer. Windows should automatically reinstall the drivers upon restart.
5. DIY Repair: Proceed with Caution
This is where we separate the brave from the faint of heart. I am not a professional engineer, and these are suggestions.
- Replacement Jack (If Comfortable): If you're tech-savvy and have experience, and if the problem is the jack itself, you could attempt to replace it. This usually involves disassembling your laptop, soldering skills, and a replacement jack. It is risky and can void your warranty. Proceed with extreme caution! Consult online repair guides first. There are usually guides available online that tell you how to disassemble your laptop, but they vary by model.
- External Audio Device: A USB sound card is simpler and less risky than a physical repair.
Warning: If you're not comfortable with disassembling electronics, leave the repair to a professional. You could cause further damage to your laptop.
6. Preventing Future Headphone Jack Headaches
Prevention is always better than a cure!
- Protective Covers: Consider a headphone jack cover to prevent dust, debris, and accidental physical damage.
- Gentle Handling: Avoid yanking the headphone plug or putting undue stress on the jack.
- Regular Cleaning: Periodically clean the jack with compressed air to remove dust and debris.
- Avoid Extreme Temperatures and Humidity: These can damage internal components, including the headphone jack.
7. When to Call in the Experts
Sometimes, the problem is beyond our DIY capabilities. There's no shame in seeking professional help!
- Warranty: If your laptop is still under warranty, contact the manufacturer or an authorized repair center.
- No Success: If you've tried all the troubleshooting steps and the jack still won't work, it's time to consult a professional.
- Physical Damage: If there's obvious physical damage to the jack, skilled hands are required.
8. The Rise of Wireless: Exploring Bluetooth Alternatives
Let's briefly talk about the modern world, where wires are sometimes optional.
- Bluetooth Headsets: Seriously, consider embracing the wireless revolution! Bluetooth headphones are convenient, offer excellent sound quality (in many cases), and eliminate the need for a headphone jack.
- Bluetooth Adapters: If you don't want to replace your wired headphones, you can use a Bluetooth adapter that plugs into your laptop's USB port.
9. The Psychology of a Dead Headphone Jack
Why does a dead headphone jack feel like such a blow? It's a connection to our digital worlds.
- Loss of Privacy: The ability to listen privately is gone.
- Inconvenience: The inability to listen to music or watch/listen to movies.
- Frustration: It’s just annoying!
10. Troubleshooting vs. Upgrade: Making the Decision
Is it really worth the effort to fix?
- Laptop's Age: A newer laptop is more likely to warrant repairs.
- Cost: Determine the cost of repair vs. the cost of a new laptop or the cost of accessories (such as Bluetooth).
- Your Needs: Repair makes more sense to keep existing hardware.
11. Tools
Dell Laptop F Keys DEAD? Fix This NOW!LFC118 - Soket Headphone Asus X551

By Adamant IT LFC118 - Soket Headphone Asus X551 by Adamant IT
MEMPERBAIKI Masalah Kesalahan Jack Audio Depan Tidak Berfungsi di Windows 11 Dengan Sangat Mudah & Cepat

By TechFixIT MEMPERBAIKI Masalah Kesalahan Jack Audio Depan Tidak Berfungsi di Windows 11 Dengan Sangat Mudah & Cepat by TechFixIT
Cara Memperbaiki Mic Headset Jack Menampilkan Tidak Dicolokkan iiGoreng
By iiFry Cara Memperbaiki Mic Headset Jack Menampilkan Tidak Dicolokkan iiGoreng by iiFry

Title: Headphone not working windows 10 2025 FIX
Channel: Etechniz
Headphone not working windows 10 2025 FIX by Etechniz
Wifi On Laptop Phone
Title: Unveiling the Secrets of Sustainable Urban Gardening: A Comprehensive Guide to Flourishing Green Spaces
Introduction: Cultivating a Greener Future, One Garden at a Time
We find ourselves at a pivotal juncture, a moment where the concrete expanses of our cities must embrace the verdant embrace of nature. Within this transformation, sustainable urban gardening emerges not merely as a trend, but as a fundamental necessity. It’s a practice that reconnects us with the earth, provides fresh, healthy food, and fosters a resilient community. In this guide, we will delve into the core principles, practical techniques, and inspiring examples that will empower you to cultivate thriving green spaces, no matter the size or location.
Planning Your Urban Oasis: From Concept to Creation
The journey to a vibrant urban garden begins with meticulous planning. Before the first seed is sown, a clear understanding of your available resources and goals is paramount.
Assessing Your Space: Sunlight, Soil, and Surroundings
The cornerstone of any successful garden is a comprehensive assessment of its environment. Begin by meticulously evaluating the amount of sunlight your space receives throughout the day. Observe the path of the sun, noting how many hours of direct sunlight different areas experience. This information is crucial for selecting plants that will flourish in your specific microclimate.
Next, consider the soil quality. Urban soil often suffers from compaction, contamination, and nutrient deficiencies. Soil testing is highly recommended. Contact your local agricultural extension office; they often provide cost-effective soil testing services. Based on the results, you can amend the soil with organic matter such as compost, aged manure, or leaf mold.
Finally, analyze your surroundings. Are there strong winds? Are there existing structures that cast shade? Are there potential sources of pollution? These factors will influence your choice of plants and gardening techniques.
Choosing the Right Plants: A Feast for the Senses and the Plate
Selecting plants that thrive in an urban environment is essential for a successful garden. Prioritize plants that are well-suited to your local climate and the specific conditions of your space.
Vegetable Varieties for Compact Spaces: Consider compact varieties of vegetables, such as bush beans, dwarf zucchini, and container-friendly tomatoes. Leafy greens such as lettuce, spinach, and kale are incredibly versatile and can be grown in various containers. Herbs, with their fragrant foliage and culinary uses, are perfect for any urban garden.
Selecting Fruit Trees and Berries: Certain fruit trees, such as dwarf apple and pear varieties, are well-suited for container gardening. Consider growing berries, like strawberries and raspberries, which can produce abundantly in relatively small spaces.
Flowers to Attract Pollinators: Incorporate flowers that attract pollinators to promote biodiversity and increase yields. Lavender, bee balm, and sunflowers are excellent choices. Select varieties known for their resilience and adaptability to urban conditions.
Embracing Sustainable Practices: Nurturing the Earth, Nourishing Your Garden
Sustainable urban gardening goes beyond simply growing plants. It is about creating an ecosystem that supports itself and minimizes environmental impact.
Composting: Turning Waste into Wealth: Composting is a cornerstone of sustainable gardening. Transform kitchen scraps, yard waste, and other organic materials into nutrient-rich compost, which provides essential nutrients to your plants. A small-scale compost bin is easily accommodated in most urban gardens.
Water Conservation: Harvesting the Precious Resource: Water conservation is critical, especially in urban environments where water resources may be limited. Employ techniques such as rainwater harvesting, using mulch, and grouping plants with similar water needs. Drip irrigation systems deliver water directly to the roots, minimizing water waste.
Pest and Disease Management: A Natural Approach: Embrace integrated pest management techniques to control pests and diseases without resorting to harmful chemicals. Encourage beneficial insects by planting flowers, handpick pests whenever possible, and use organic pest control methods such as insecticidal soap.
Building Your Garden: From Containers to Raised Beds
The construction of your urban garden depends on the available space and your personal preferences.
Container Gardening: The Versatile Solution: Container gardening is ideal for urban spaces with limited ground area. Choose containers made from durable, non-toxic materials. Ensure the pots have drainage holes to prevent waterlogging.
Raised Beds: Enhancing the Soil and Accessibility: Raised beds offer numerous advantages, including improved drainage, enhanced soil quality, and easier accessibility. Construct raised beds from wood, composite materials, or even repurposed materials.
Vertical Gardening: Maximizing Limited Space: Vertical gardening is an innovative technique that allows you to grow plants upwards, maximizing space. Use trellises, hanging baskets, and vertical planters to cultivate plants along walls, fences, and balconies.
Maintenance and Beyond: Cultivating a Thriving and Sustainable Garden
Once your garden is established, consistent maintenance is crucial for its long-term success.
Watering and Fertilizing: Water your plants regularly, especially during hot and dry periods. Fertilize your plants with organic fertilizers such as compost tea or fish emulsion to provide essential nutrients.
Weeding and Pest Control: Weed regularly to prevent weeds from competing with your plants for resources. Monitor your plants for pests and diseases and take appropriate action as needed.
Extending the Growing Season: Extend the growing season by utilizing techniques such as cold frames and row covers. This will allow you to enjoy fresh produce for a longer period.
The Benefits of Urban Gardening: More Than Just Food
Urban gardening provides a multitude of benefits that extend far beyond the simple pleasure of growing your own food.
Health and Well-being: Gardening is a therapeutic activity that reduces stress and promotes physical activity. Being in nature has been scientifically proven to improve mental health.
Community Building: Urban gardens can serve as community hubs, bringing people together to share knowledge, learn from each other, and build stronger relationships.
Environmental Impact: Urban gardening reduces your carbon footprint by providing locally grown food, decreasing reliance on transportation and packaging materials.
Conclusion: Cultivating a Legacy of Sustainability
Sustainable urban gardening allows you to foster a greener future, one seed at a time. By embracing the principles and techniques outlined in this guide, you can transform your urban space into a thriving oasis of beauty, abundance, and ecological resilience. With each plant you sow, with each drop of water you conserve, and with each piece of compost you create, you will be cultivating not just a garden, but a legacy of sustainability for generations to come.
