headphone jack on mac laptop not working

Title: How to Fix Mac Headphones Jack Not Working One Side No Sound
Channel: Fix369
How to Fix Mac Headphones Jack Not Working One Side No Sound by Fix369
headphone jack on macbook pro not working, what to do if headphone jack is not working in laptop
Mac Headphone Jack DEAD? FIX This NOW!
Mac Headphone Jack: Is Yours Truly Gone? Don't Panic, Here's What to Do!
Have you ever experienced that sudden, sinking feeling? You reach for your trusty headphones, ready to lose yourself in a world of music or podcasts. Then, silence. Complete and utter, frustrating silence. Your Mac's headphone jack seems unresponsive. Is it truly gone? Breathe deep, friend. We'll navigate this together. There's a good chance we can bring your sonic companion back to life.
Troubleshooting Tango: Decoding the Mac's Headphone Havoc
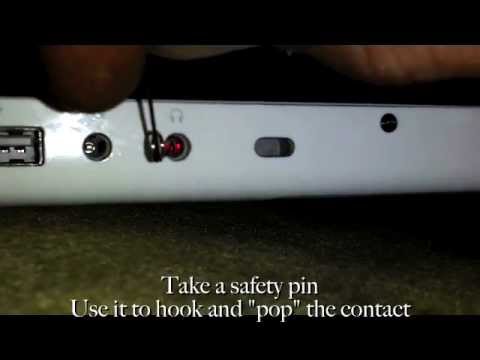
First, it's crucial to eliminate the simple culprits. Sometimes, the issue is straightforward. Check for physical obstructions. Dust, debris, or even a bent pin could be the problem. Gently inspect the headphone jack opening. Use a small, non-metallic tool, like a toothpick, to carefully remove anything you find.
Next, meticulously examine your headphones. Are they functioning correctly? Test them on another device. This step is crucial. You must rule out a faulty pair of headphones. Because, if your headphones are the issue, you're in luck. A simple replacement might be all you need.
Consider the software side of things, too. A minor software glitch can sometimes wreak havoc. Furthermore, a restart can be a surprisingly effective fix. It resets your Mac's audio settings. Click the Apple menu. Subsequently, select "Restart." It is a quick and easy first step.
Digging Deeper: Unveiling the Hidden Audio Settings
Okay, so a simple restart didn't do the trick. Don't fret. Now, let's check your Mac's audio settings. Navigate to System Preferences. Then, click on "Sound." In the "Output" tab, ensure your headphones are selected. Sometimes, your Mac might default to its internal speakers. This will leave you in audio limbo.
Also, review the "Input" tab, just to be thorough. Ensure the correct microphone is chosen. While seemingly unrelated, sometimes, setting errors can mess with audio output. Because, weird things can happen in the digital universe.
Furthermore, check your MIDI setup. Open "Utilities" (found within the "Applications" folder). Then, open "Audio MIDI Setup". This is where you can manage all your audio devices. Ensure the headphones are recognized and configured. Sometimes, incorrect settings here can cause output troubles. However, don't make any dramatic changes unless you know what you are doing!
The Hardware Hurdle: When a Repair is Required
If you've thoroughly investigated all the above, but the headphone jack stubbornly refuses to cooperate, it might be a hardware problem. This is less than ideal, honestly. Often, the jack itself has suffered physical damage. It can also be a more significant issue with the logic board.
At this point, it's vital to seek professional help. Taking your Mac to an authorized Apple service provider is the best course of action. They have the expertise and tools to diagnose the precise problem. Then, they can perform any necessary repairs.
Also, if your Mac is still under warranty, this is excellent news! The cost of repair will likely be covered. However, even outside of warranty, a repair might be worth it. Especially if you rely on your Mac for work or enjoyment. The headphone jack is essential for a seamless audio experience.
External Solutions: Embracing the Adapter Age
While repairing the headphone jack is always possible, there are other options. Because, let's be honest, sometimes life throws curveballs. One simple solution is to use an external audio interface. These devices connect to your Mac via USB. Moreover, they provide a dedicated headphone jack.
Additionally, these interfaces often offer superior audio quality. If sound fidelity is critical for you, this is a great upgrade. Another option is to use a USB-C to 3.5mm headphone adapter. These are affordable and readily available. They plug into your Mac's USB-C port and provide a standard headphone jack.
Ultimately, these are convenient solutions. They allow you to bypass the potentially faulty internal jack altogether. Even if the repair is successful, these are excellent alternatives.
Preventative Measures: Safeguarding Your Headphone Jack Future
Prevention is always better than cure. So, what can you do to protect your Mac's headphone jack? First, always handle your headphones gently. Avoid forcefully yanking the plug from the jack. This can cause damage over time.
Next, consider investing in a protective case for your Mac. This will not only protect from accidental damage. Also, it acts as a shield against dust and debris. Moreover, avoid exposing your Mac to extreme temperatures or humidity. These can also contribute to hardware issues.
Finally, clean the headphone jack regularly. However, do so gently. This will help keep it free from dust and debris that could cause problems.
Conclusion: Ensuring Your Audio Adventure Continues
A non-functioning headphone jack can be a real headache. Still, don't despair. In this guide, we've explored several troubleshooting steps. Moreover, we've delved into potential solutions. From a quick restart to professional repairs, there are options galore.
By taking the necessary steps, you can restore your Mac's audio functionality. Whether that involves fixing the jack or utilizing external alternatives. So, take a deep breath. Then, work through the guidance provided. You've got this! Your musical journey need not be cut short. And now, go forth, and enjoy the sounds!
ASUS X551M Keyboard DEAD? FIX IT NOW! (Easy Steps!)Mac Headphone Jack DEAD? FIX This NOW!
Hey everyone, if you’re like me, your Mac is practically an extension of yourself. It's where the magic happens – the work, the play, the endless scrolling, the music… and that brings us to the dreaded scenario: your Mac headphone jack has decided to call it quits. The sound simply vanished, poof! Gone! It's like your personal concert hall suddenly went silent, and trust me, I’ve been there, staring blankly at my screen, wondering what in the world happened. Don't panic! We're going to dissect this problem, figure out what's going on, and, most importantly, get your audio bliss back.
1. The Silent Treatment: Recognizing the Problem
First things first: let's make sure we actually have a problem. Sometimes, the solution is incredibly simple, like a loose cable or a setting gone awry. So, before we accuse the headphone jack of dereliction of duty, let's do a quick checkup.
Is it the Headphones or the Mac? Plug your headphones into another device. Does the audio work? If it does, we’re on the right track. If not, it's time to troubleshoot your headphones first. Think of it like this: you wouldn't blame your car for not starting if the battery's flat, would you?
Volume Check: This sounds obvious, but are the volume levels turned up? Check both the system volume (top right corner of your screen) and the volume on your plugged-in device. Sometimes, the simplest things are the easiest to miss.
Restart and Reset: A classic for a reason. Restarting your Mac can miraculously fix all sorts of woes, including audio glitches. It's the tech equivalent of hitting the "reset" button.
2. Software Snafus: Diving Into the macOS Sound Settings
Alright, so the basics are covered, and still crickets? It’s time to delve a little deeper into the software side of things. macOS, bless its heart, can be a little…temperamental sometimes.
System Preferences/Settings: Head over to System Preferences (or System Settings, the newer version) and find "Sound". Click on "Output". Is your headphone jack selected as the output device? If not, select it. Sometimes, the Mac gets confused and decides to send the audio elsewhere.
Audio MIDI Setup: This is macOS's audio control center. Search for it in Spotlight (the magnifying glass in the top right corner). Inside, make sure your headphone jack is enabled and the output levels are set correctly. It's your audio command center.
App-Specific Settings: Are you only having problems with a specific app, like Spotify or iTunes? Check the audio settings within that app. Perhaps the output device is incorrectly selected. Each app has its own preferences, so don't neglect them.
3. The Dusty Abyss: Cleaning the Headphone Jack
Okay, let's get physical for a moment. Your headphone jack is a tiny portal into your Mac's audio world, and it's prone to collecting…stuff. Dust, lint, crumbs… you name it. It's like a little black hole for debris, and it can definitely cause connection problems.
The Gentle Approach: Use a can of compressed air to gently blow out any gunk. Angle it at different points to make sure you get it all. Think of it as a micro-vacuuming session, but way gentler.
The Non-Conductive Tool Method: A toothpick (with the pointy end broken off) or a cotton swab can be your friend here. Very, very gently, try to scoop out any visible debris. Avoid using anything metal, of course, as it could cause a short circuit. It's like archaeological excavation but for your Mac.
4. Hardware Headaches: Assessing the Damage
If you've exhausted the software and cleaning methods, we might sadly be facing a hardware issue. This is where things get a little more complicated.
External Devices Test: Have you tried different headphones? Perhaps the issue is with the headphone jack itself. A failed headphone jack can act as a conduit for noise pollution to enter your audio stream.
The Sound Test: Try plugging in an external USB audio device. If the sound works through the external device, it points more conclusively to an issue with the internal jack.
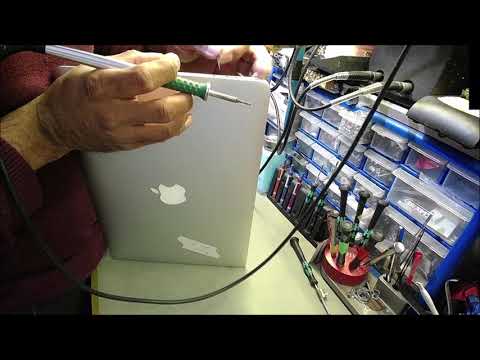
Professional Inspection: If you’re not comfortable opening up your Mac (and frankly, I don't blame you!), it's time to visit a repair shop. They have the tools and expertise to diagnose and fix the problem. Think of them as the Mac's emergency room.
5. External Solutions: Embracing the USB Age
Sometimes, the best solution is to work around the problem. If your headphone jack is truly dead, there are other ways to get your audio fix.
- USB Audio Adapters: A simple and relatively inexpensive solution. These adapters plug into a USB port and offer a headphone jack. It is like having a backup headphone jack.
- Bluetooth: If your headphones are Bluetooth-enabled, pairing them with your Mac is a convenient option. No wires, no problem. Just ensure your Bluetooth signal is stable.
6. Resetting the Sound System: A Deep Dive
Sometimes, a more drastic measure is needed. Resetting the system’s sound preferences is a potential fix, acting as a deep clean of those troublesome settings.
- Resetting the System: In Terminal, you can use certain commands to reset the sound system. However, be careful with commands, as you don’t want to mess up other components.
- The PRAM/NVRAM Reset: Power up your Mac and immediately hold down the Option, Command, P, and R keys. Hold these keys down for about 20 seconds, or until you hear the startup chime again. This reset can sometimes address stubborn audio glitches.
7. Updating macOS: Keeping Current
Outdated software can sometimes lead to compatibility issues, impacting your headphone jack. Updating your macOS is like giving your Mac a health check.
- Check for Updates: Navigate to System Preferences/System Settings and search for Software Update. See if any updates.
- Install and Restart: Applying those updates can often resolve all sorts of audio-related gremlins.
8. Avoiding Future Headphone Jack Woes
Prevention is key. Let’s take precautions to keep your headphone jack humming in harmony.
- Gentle Insertion: Avoid forcing plugs into the jack. Slow and steady wins the race.
- Protect from Moisture: Keep your Mac away from liquids. Spills are the enemy of electronics.
- Clean Regularly: Dust builds up, so a quick cleaning every now and then can work wonders.
9. The "Audio MIDI Setup" Tool: Your Audio Control Center
Your Mac's Audio MIDI Setup is like the control center for your audio devices. Let's make sure everything is configured correctly.
- Device Properties: Open Audio MIDI Setup. Click on the built-in output device. Ensure the “Format” is not causing any issues.
- Monitoring the Volume: Check the volume levels here too.
10. Investigating Third-Party Apps
Sometimes, a rogue third-party app can meddle with your audio settings.
- Identify Potential Culprits: Close recently installed audio apps.
- Test Audio After Each Closing: Reboot after closing.
11. Troubleshooting Through Safe Mode
Safe Mode is a diagnostic environment where macOS loads only essential components. It helps to rule out software conflicts.
- Boot into Safe Mode: Restart your Mac. Press and hold the Shift key as it restarts.
- Test Audio Performance: Does the headphone jack work in Safe Mode? If yes, a third-party app is probably to blame.
12. External DACs: An Elevated Audio Experience
A Digital-to-Analog Converter (DAC) can significantly improve audio quality.
- Connecting and Configuring: Plug in the external DAC, and select it in your System Preferences.
- Listening for the Difference: With a DAC, audio sounds elevated.
13. Wireless Solutions: Embracing a Cordless World
Bluetooth and other wireless technologies offer a convenient alternative.
- Pairing Your Headphones: Initiate the pairing process for your headphones, and select your Mac.
- Enjoying Wireless Audio: Enjoy your content without any cords.
14. Hardware Repair Options
If all else fails, it's time to consider hardware repair.
- Contacting Apple Support: Reach out to Apple for potential solutions.
- Third-Party Repair Services: Explore reputable repair shops.
15. Releasing the Mac's Potential
Addressing your Mac's headphone jack is an opportunity to discover the full potential of your device.
- Optimizing your audio experience leads to an improved listening experience.
- Taking care of your Mac is like taking care of yourself.
Wrapping Up the Audio Saga
So, we've covered a lot of ground. From the simplest fixes to more complex troubleshooting steps, hardware inspections, and even workarounds. Hopefully, one (or more) of these methods has helped you resurrect your Mac headphone jack.
Remember, technology can be finicky, but don’t be intimidated. Step by step, we can isolate the
Remote Work Revolution: The BEST Laptop for Unstoppable ProductivityHEADPHONE AUDIO JACK FIX ON MACBOOK PRO 15'SO EASY TRY AT YOUR OWN RISK

By Reinoso Designs HEADPHONE AUDIO JACK FIX ON MACBOOK PRO 15'SO EASY TRY AT YOUR OWN RISK by Reinoso Designs
Macbook Red Light audio fix
By TheSoundDrifter Macbook Red Light audio fix by TheSoundDrifter
HOW TO FIX MACBOOK A1466 BROKENSTUCK HEADPHONE JACK REMOVAL
By iTCXtreme HOW TO FIX MACBOOK A1466 BROKENSTUCK HEADPHONE JACK REMOVAL by iTCXtreme

Title: Apple The headphone jack on my MacBook Pro just stopped working. How do I fix it 9 Solutions
Channel: Roel Van de Paar
Apple The headphone jack on my MacBook Pro just stopped working. How do I fix it 9 Solutions by Roel Van de Paar
Laptop Wifi Hotspot
Here's the title: The Ultimate Guide to Mastering Sourdough: From Starter to Slice
The Ultimate Guide to Mastering Sourdough: From Starter to Slice
Embark on a culinary journey that transcends mere baking—a voyage of transformation where the simple alchemy of flour and water yields a loaf of unparalleled flavor, texture, and character: sourdough. This guide isn’t just about following a recipe; it’s about cultivating a deep understanding of the process, embracing the nuances of your ingredients and environment, and ultimately, creating sourdough that will leave you and others yearning for more.
Cultivating Your Sourdough Starter: The Heart of the Operation
The cornerstone of exceptional sourdough is, without question, a thriving starter. Think of it as a living organism, a colony of wild yeasts and beneficial bacteria working harmoniously to ferment the dough. The health of your starter directly influences the flavor, rise, and overall quality of your bread.
The initial phase of starter development requires patience and consistency, the two pillars upon which success is built. Commence by combining equal parts of whole wheat flour (for its wealth of nutrients and wild yeasts) and non-chlorinated or filtered water in a clean glass jar. Avoid tap water, which can contain chlorine that might impede the growth of your starter. Stir thoroughly to ensure all flour is hydrated. This initial mix is the genesis of your starter; your commitment is its vital force.
For the first few days, simply cover loosely (a lid placed gently on top or cheesecloth secured with a rubber band works well) and allow it to rest at room temperature, typically around 70-75°F (21-24°C). Observe. You might notice small bubbles forming, a testament to the early activity of the microorganisms.
After 24 hours, discard roughly half of the starter (this is crucial to prevent an overly acidic environment) and feed it with equal parts of fresh flour and water. Repeat this process every day. As the days progress, you should witness increasingly more vigorous activity—larger bubbles, a slight rise, and a subtle, pleasant sour aroma developing.
The timing for the maturity of your starter will vary; however, after about a week or two, your starter is likely ready for the baking of bread. However, this is something to consider when measuring the true maturity. To test your starter's readiness, perform the "float test." Drop a teaspoon of starter into a glass of water; if it floats, it's active and ready to be incorporated into your dough.
Understanding Flour: The Building Blocks of Flavor and Structure
The type of flour you select will exert a profound influence on your sourdough. Each flour type contributes unique characteristics to the final bread, from flavor profiles to structural integrity.
- Whole Wheat Flour: This flour, derived from the entire wheat kernel, is robust. It offers a complex, slightly nutty flavor and contributes to a tight crumb structure. Its high bran content absorbs water, which can sometimes lead to a dense loaf if not properly managed. It is also the most nutritious option.
- Bread Flour: Bread flour, with its higher protein content, is key to achieving a strong gluten network. The stronger the gluten, the better the rise. When combined with proper techniques, it results in a wonderfully airy and open crumb structure.
- All-Purpose Flour: All-purpose flour can be used for sourdough but will offer a slightly less dramatic rise compared to bread flour. It's a versatile option for those just starting out.
- Rye Flour: Rye flour provides a distinct, earthy flavor and contributes to a moist crumb. It also introduces a stickiness to the dough, which, when used in conjunction with higher hydration levels, often yields bread with complex flavors.
Experiment with different flour combinations to unlock the myriad of taste and structural possibilities. A blend of bread flour and whole wheat flour, for example, provides a balanced mix of structure and flavor, making it an excellent choice for beginners, or a combination of rye and bread flour.
Mastering the Art of the Dough
The process of crafting the dough is where the magic fully takes shape. It's a delicate balance of incorporating ingredients, developing the gluten, and allowing the natural fermentation to flourish.
- Autolyse: Before adding the salt, many bakers practice autolyse. This technique involves mixing the flour and water and letting it rest for 30 minutes to an hour. This allows the flour to fully hydrate and starts the gluten development process, which in turn makes the dough much easier to work with and yields a better crumb.
- Incorporating the Starter: Add the active starter to the autolysed dough. Use your hands to gently mix the starter, ensuring that it is evenly distributed throughout the dough. This should take a few minutes, and the dough may be a little sticky.
- Salt: Salt plays a crucial role, not only in flavoring the bread but also in controlling the fermentation process and strengthening the gluten network. Add the salt and mix it into the dough, ensuring it is evenly distributed.
- Bulk Fermentation: Bulk fermentation is the period during which the dough rises at room temperature. The duration will depend on the temperature of your environment. During this stage, you can employ a series of "stretch and folds" every 30-60 minutes for the first few hours. This maneuver improves gluten development and builds strength in the dough. Observe the dough during this time. As it ferments, it will increase in size, and bubbles should begin to form. During this stage, expect the dough to approximately double in volume.
- Shaping the Dough: After bulk fermentation, gently turn the dough out onto a lightly floured surface. Shape the dough into a round (boule) or an oblong (batard), creating surface tension by tucking the edges underneath. Surface tension supports the rise of the dough during baking.
- Proofing: The shaped dough goes into a banneton basket (a proofing basket lined with floured cloth) for its final rise, referred to as proofing. This is usually done over a period of 12-24 hours in the refrigerator. The cold environment slows down the fermentation process, allowing for a more complex flavor development.
- Scoring: Before baking, score the top of the loaf with a sharp knife or lame. The score allows the bread to expand and directs the rise, preventing the loaf from bursting unevenly. Scoring also offers an opportunity for artistic expression.
Baking Your Sourdough to Perfection
Baking a sourdough loaf in a Dutch oven is a classic technique that creates the perfect environment for the loaf to rise in.
- Preheating the Dutch Oven: Preheat your oven to 450-500°F (232-260°C) with the Dutch oven inside. Preheat the Dutch oven for at least 30 minutes – this allows the Dutch oven to retain its heat, which is imperative for the rise.
- Adding the Dough: Carefully remove the hot Dutch oven from the oven. Gently place the proofed dough into the Dutch oven.
- Baking with the Lid On: Cover the Dutch oven with the lid for the first 20-30 minutes of baking. This creates a steamy environment, which allows the dough to expand fully before the crust sets.
- Baking with the Lid Off: Remove the lid and continue baking for another 20-30 minutes, or until the crust is deeply golden brown and the internal temperature reaches 200-210°F (93-99°C).
- Cooling Completely: Let the baked loaf cool completely on a wire rack before slicing. This is a test of patience. Allowing the inside to cool completely allows moisture to properly redistribute, which results in a superior texture.
Troubleshooting Common Sourdough Issues
Baking sourdough is a journey, and inevitably, challenges may arise. Here are some frequent issues and solutions:
- Flat Loaf: This is often due to an under-proofed starter, under-fermentation, or weak gluten development.
- Dense Crumb: This can be caused by under-proofing, insufficient gluten development, or too much whole wheat flour.
- Sour Taste: This is often due to a starter that is too acidic or long fermentation.
- Uneven Crumb: This can be due to uneven scoring, inadequate shaping, or inconsistent proofing temperature.
- Lack of Oven Spring: This happens when fermentation is not long enough, the oven is not hot enough, or the starter is dead.
Experimentation and Refinement
The world of sourdough is vast and rewarding. Once you've mastered the basics, there's a world of exploration awaiting.
- Flour Variations: Experiment with different flours to observe how each type of flour influences the texture, flavor profile, and the overall appearance of your bread.
- Hydration Levels: Adjust the hydration of the dough, from a higher hydration, which yields a more open crumb, to a lower hydration, which makes the dough more manageable.
- Add-ins: Add ingredients like nuts, seeds, dried fruits, or herbs.
- Flavor Enhancements: Try different types of flours, such as adding a small amount of rye for a tangy flavor.
Sourdough baking is a practice that rewards patience, consistency, and a deep appreciation for the process. Embrace the learning, celebrate your successes, and take heart in the fact that each loaf is a unique creation, a testament to your dedication, and a delicious experience.
