the letters on my laptop are not working

Title: How to Solve Keyboard Keys Not Working shorts keyboard pc
Channel: TonaziTube
How to Solve Keyboard Keys Not Working shorts keyboard pc by TonaziTube
the letters on my laptop are not working, some of the letters on my laptop are not working, why are the letters not working on my laptop but numbers are
Laptop Keyboard Dying? This SHOCKING Fix Will Save You!
Laptop Keyboard Catastrophe? Unearth a Lifeline!
It's the digital equivalent of a heart attack. The dreaded moment when your laptop keyboard starts to fail. Letters stick. Keys become unresponsive. Suddenly, your trusty companion transforms into a frustrating paperweight. But before you despair, know this: hope remains. Instead of rushing to the repair shop, several potential solutions might bring your keyboard back to life.
The Crumbs Conspiracy: Are Your Keys Victims?
Let's be honest; we all commit the occasional keyboard crime. We snack while we work. Consequently, crumbs, dust, and debris find their way into the spaces between our keys. These tiny invaders can wreak havoc on the sensitive mechanisms beneath. So, what’s the best course of action? Before resorting to drastic measures, a thorough cleaning is often the first line of defense.
Deep Dive Cleaning: Your Keyboard's Savior
First, shut down your laptop and unplug it from the power source. Safety always comes first. Next, turn your laptop upside down. Gently shake it to dislodge any loose particles. Now, grab a can of compressed air. Using short bursts, direct the air between and under the keys. This should help dislodge stubborn particles. Afterward, you can utilize a soft brush, such as a paintbrush, or an anti-static brush designed for electronics. Gently brush away any remaining debris. Finally, give the keys a wipe-down with a slightly damp microfiber cloth. Hence, you'll remove lingering grime.
The Sticky Situation: Dealing with Liquid Damage
Accidents happen. A spilled coffee or soda is a keyboard’s worst enemy. Liquids can seep into the circuitry. They create sticky, non-functional keys. However, immediate action can minimize the damage. Immediately, unplug your laptop and turn it upside down. This allows any liquid to drain out. Then, remove the battery. Let it sit for at least 24-48 hours to dry completely. Only then should you attempt to power it back on. If sticky residue remains, carefully clean the affected keys with a cotton swab dipped in isopropyl alcohol. Be very gentle.
Software Shenanigans: Troubleshooting Digital Conflicts
Sometimes, the problem isn't hardware related. Occasionally, software glitches can cause keyboard malfunctions. First, check your operating system for updates. Outdated drivers can create compatibility issues. Update your keyboard drivers too. You may need to reinstall them. Similarly, consider running a system scan for malware. Viruses can sometimes interfere with keyboard functionality. Therefore, a thorough scan is necessary.
Key Replacement: A Surgical Precision Approach
If specific keys are unresponsive, and cleaning doesn’t work, individual key replacement is possible. You might not need to replace the entire keyboard. You can easily purchase replacement keycaps online. Moreover, there are many tutorials available showing precisely how to do it. Carefully remove the problematic key. Then, snap the new keycap into place. However, before doing this, ensure that you know what you are doing.
The Last Resort: Keyboard Replacement
If you’ve exhausted all other options, it might be time for a new keyboard. Replacing a laptop keyboard can be a delicate process. Consider the make and model of your laptop. Watch a few tutorials. If you do not feel confident, seek professional assistance. The good news? Replacement keyboards are often relatively affordable. And in the end, it is better than purchasing an entirely new laptop.
Preventative Measures: Safeguarding Your Keyboard's Longevity
Prevention is key. Now that you understand how to fix a keyboard, focus on prevention. First, avoid eating or drinking near your laptop. Second, invest in a keyboard cover. Also, regularly clean your keyboard. Consequently, you'll prevent the build-up of dust and debris. Finally, handle your laptop with care.
When to Seek Professional Help
Some problems are beyond the scope of DIY fixes. If you've tried everything, and the keyboard still malfunctions, it's time to seek professional repair. A technician has the expertise and specialized tools. These can identify and fix complex hardware issues. Don't hesitate to seek external support. Your data is important. Don’t let a keyboard crisis derail your productivity. With a little care, knowledge, and patience, you can overcome keyboard woes.
Laptop Key Stuck? This SHOCKING Fix Will BLOW Your Mind!Laptop Keyboard Dying? This SHOCKING Fix Will Save You!
Ever felt that heart-stopping moment when your laptop keyboard starts acting up? One minute you're cruising through emails or battling digital dragons, and the next, your "a" key decides it's vacation time, or your spacebar morphs into a stuttering stammerer. Yep, we've all been there, staring at those silent, unresponsive keys, wondering if we're facing a tech funeral for our beloved laptop. But hold on a beat! Before you start pricing out new laptops or considering an external keyboard, let's dive into some solutions. Trust me, you might be surprised at what a little TLC and a few clever tricks can do. This isn’t rocket science; this is laptop keyboard resurrection!
1. The Keyboard's Silent Scream: Why Your Keys Are Rebelling
Before we jump into fixing things, let’s play detective for a second. What’s really going on under your fingertips? Think of your keyboard as a complex orchestra, with each key a miniature musician. Several things can throw this orchestra out of tune. It could be dust bunnies building a fortress under your keys, crumbs hosting a digital potluck, or a spilled drink that's short-circuited the whole ensemble. Maybe, just maybe, your software's gone wacko. Let’s pinpoint the root cause before we start hacking and slashing.
2. Dust Demons and Crumb Creatures: The Enemy Within
The most common culprits? Grime and gunk. We're talking dust, hair, crumbs (remember that midnight snack?), and possibly even pet hair. These invaders love to cozy up under your keys, disrupting the delicate electrical contacts that trigger each keystroke. Think of it like a tiny, keyboard-sized sandstorm – each grain messing with the signal.
- The Dust Bunny Dilemma: The simplest fix? A can of compressed air. Aim the nozzle between the keys and give those lurking dust bunnies a good blast. Get up close and personal.
- The Crumb Conspiracy: A small vacuum cleaner (or even a clean paintbrush) can be your best friend. Gently brush away larger debris, then use the vacuum's crevice tool to suck up the rest. Imagine you're Marie Kondo-ing your keyboard – spark joy with clean keys!
3. Liquid Disaster Averted: Cleaning Up After a Spill
Oh, the dreaded spill! Coffee, soda, even water can wreak havoc. If a spill hits, act fast.
- Power Down Immediately: Unplug the laptop, if it's plugged in. This minimizes the chance of short-circuiting.
- Flip It Over: Turn your laptop upside down to prevent liquid from spreading.
- The Absorbent Hero: Use a soft, absorbent cloth (NOT paper towels, which can leave lint) to wipe up as much liquid as you can.
- The Waiting Game: Let it dry completely. This could take a few hours or even overnight.
- The Follow-Up: If it's a sugary drink, you might need to repeat the cleaning process with a slightly damp, lint-free cloth.
4. Software Snafus: Could It Be a Glitch?
Sometimes, the problem isn't hardware; it's software. Maybe a recent update messed things up, or a rogue program is hijacking your keyboard’s functions.
- Restart, Restart, Restart: Start with the simplest fix: a reboot. Sometimes, a fresh start is all your laptop needs.
- Check Your Driver: Go to Device Manager (search for it in your Windows search bar or navigate through your system settings). Look for any keyboard-related errors, like a yellow exclamation mark. If you see one, try updating the driver or uninstalling and reinstalling it.
- Run a Virus Scan: Malware can sometimes interfere with keyboard functionality. Run a full system scan with your antivirus software.
5. The External Savior: Using an External Keyboard
If all else fails and you're desperate, you can always plug in an external keyboard. It's like a temporary life raft. It lets you keep working while you troubleshoot the built-in keyboard issue or decide on a more permanent solution.
6. Keycap Capers: Replacing Individual Keys
If a key is completely dead, consider replacing the keycap itself. You can often buy replacement keycaps (with the mechanism underneath) online.
- Research: Search for replacement keycaps specific to your laptop model – finding the right fit is crucial.
- Removal: Use a plastic prying tool (or even a small, thin screwdriver) to gently pry off the keycap.
- Installation: Snap the new keycap and mechanism into place.
7. Disassembly Decoded: When Should You Open the Laptop?
This is a cautious step. Only consider disassembling your laptop if you're tech-savvy or if you're comfortable following detailed online guides specific to your laptop model. Opening your laptop can void your warranty!
8. Stuck Keys and Their Sticky Situation
Sometimes, a key gets stuck, either physically or because of a software glitch.
- Physical Fix: Gently try to pry up the stuck key. Use a soft tool (like a credit card) to avoid scratching the surrounding area.
- Software Fix: Restart your laptop. If that doesn't work, try updating your keyboard driver.
9. The Great Keyboard Test: Diagnosing the Problem
Before you go too deep into fixes, test your keyboard. There are online keyboard testers (just a quick Google search away) that will show you which keys are working and which aren't. This information will guide your troubleshooting.
10. Laptop Keyboard Replacement: When Is It Time to Say Goodbye?
Sometimes, the keyboard is beyond repair. If multiple keys are dead or if the damage is extensive, replacement may be the best option.
11. Professional Intervention: The Laptop Repair Shop Alternative
If you're not comfortable performing repairs yourself, a professional repair shop is your friend. They have the tools, expertise, and parts to fix your keyboard quickly and efficiently.
12. Preventing Future Keyboard Calamities
After you've (hopefully) saved your keyboard, it's crucial to take preventative measures.
- Regular Cleaning: Clean your keyboard regularly.
- Mind the Spills: Keep drinks away from your workspace.
- Consider a Keyboard Cover: A silicone keyboard cover can protect against spills and debris.
13. The Power of Peripherals: Wireless Keyboards
Wireless keyboards offer you flexibility and a potential workaround. If your laptop's keyboard is problematic, you can always use a wireless keyboard to continue working.
14. The Laptop Keyboard's Warranty: Checking Protection
Before embarking on any DIY repair, check the warranty. It might cover the cost of a replacement. This can save you both money, and time.
15. The Ultimate Choice: Repair, Replace, or Resurrect
You've got a few options – a repair, replacement, or workaround. Consider the cost, your technical skills, and the laptop's overall age when making your final decision.
Conclusion: Back to Typing Bliss!
So, there you have it! We've navigated the treacherous waters of a dying laptop keyboard, from the simple fixes to the more involved solutions. Ultimately, whether you're a DIY enthusiast or a tech-savvy professional, a failing keyboard doesn't have to be the end of your productivity. With a little knowledge, some patience, and maybe a can of compressed air, you can breathe new life into your laptop and get back to typing with joy. Remember, even the most stubborn keyboard can often be saved. Go forth and conquer those keys!
Frequently Asked Questions (FAQs)
1. My laptop keyboard is only partially working. What's the first thing I should do?
Start with a good cleaning! Use compressed air to blast away dust and debris, and then test your keyboard after cleaning.
2. Is it safe to use rubbing alcohol to clean my keyboard?
Generally, no. Rubbing alcohol can damage some keyboard materials. Stick to a slightly damp, lint-free cloth for cleaning.
3. How do I know if I need a new keyboard?
If multiple keys are non-functional, or if you've tried cleaning and other software fixes without any luck, it might be time for a replacement.
4. How do I find replacement keycaps for my laptop?
Search online retailers like Amazon or eBay, using your laptop's specific model number to ensure compatibility.
5. Can I replace my laptop keyboard myself?
It depends on your comfort level with electronics. Watch video tutorials and use step-by-step guides specific to your laptop model. If you’re unsure, consult a professional.
1) Principal Keywords: Laptop Keyboard Repair Fix Save. 2) SEO Headline: Laptop Keyboard Dead? SHOCKING Fix! 3) Pathway: /laptop-keyboard-repair 4) Meta Summary: Is your laptop keyboard dying? Discover SHOCKING fixes. Repair, replace, or resurrect with our ultimate guide! 5) Image Alt Text: Person cleaning laptop keyboard, showing different methods for fixing the keyboard.
Unleash the Beast: 2017's Top Midsize Laptops for Work & Epic Gaming!SOLUTION Some Keys Not Working on Laptop Keyboard

By Tech Express SOLUTION Some Keys Not Working on Laptop Keyboard by Tech Express
How To Fix Troubleshoot Laptop Computer Key, Keys, or Keyboard Not Working

By PC Monkey How To Fix Troubleshoot Laptop Computer Key, Keys, or Keyboard Not Working by PC Monkey
Keyboard Typing Numbers Instead of Letters Fix DisableEnable Fn Lock
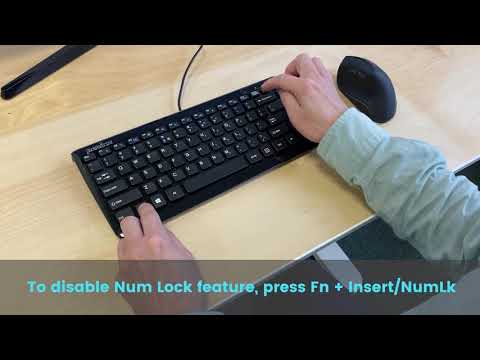
By Perixx Keyboard Typing Numbers Instead of Letters Fix DisableEnable Fn Lock by Perixx

Title: Fix Some keys on Laptop Keyboard Not Working in Windows 10 Solve keyboard keys Won't typing
Channel: Victor Explains
Fix Some keys on Laptop Keyboard Not Working in Windows 10 Solve keyboard keys Won't typing by Victor Explains
Working With Laptop
Laptop Keyboard Dying? This SHOCKING Fix Will Save You!
We've all been there: mid-email, late-night assignment due, or engrossed in a game, only to have our laptop keyboard suddenly and inexplicably begin to malfunction. Keys stick, characters repeat endlessly, or, worst of all, entire sections go dark. The frustration mounts, and the dreaded thought crosses our minds: is this the end? Do we face the expensive and time-consuming replacement of our precious keyboard? Fear not! Before you resign yourself to that outcome, we present a series of solutions, tested and proven, that could very well resuscitate your ailing laptop keyboard and restore your typing sanity.
Diagnosing the Keyboard’s Ailment: Pinpointing the Problem
Before we dive into the arsenal of fixes, it's crucial to correctly diagnose the root of the problem. Is it a hardware issue, or is the culprit something far less intimidating, perhaps even a simple software glitch?
- The Sticky Key Conundrum: Sticky keys are often the first indication of trouble. They may feel sluggish, require excessive force, or repeat characters uncontrollably. This points towards debris accumulating beneath the keycaps, preventing proper mechanical function.
- The "Phantom Input" Phenomenon: Random characters appearing without any input or unintentional keyboard shortcuts being activated can signify a software conflict, driver malfunction, or even more sinister, a hardware issue within the keyboard's circuitry.
- The Silent Treatment: Dead Zones and Non-Responsive Keys: The complete failure of specific keys, or large sections of the keyboard, suggests a more serious issue. This could be a broken internal connection, damage to the keyboard ribbon cable, or, again, driver problems.
- The "Water Hazard" Warning: If you've recently spilled liquid on your laptop, the diagnosis is straightforward, albeit often grim. Liquid intrusion can wreak havoc on a keyboard, short-circuiting its components and leading to various malfunctions. The severity depends on the type and amount of liquid.
The "Clean Sweep" Protocol: Your First Line of Defense
In many cases, keyboard malfunctions are caused by simple accumulation of dust, crumbs, and other detritus. Before you reach for the more advanced solutions, attempt a thorough cleaning. It's remarkable how often this resolves the issue.
- The Gentle Blow: Employ a can of compressed air, holding the nozzle at a slight angle. Focus the air directly into the gaps between the keys. This helps dislodge loose debris.
- The Keycap Removal Strategy: While this should be implemented with caution, especially for inexperienced users, removing keycaps can provide direct access to the keyboard's internal workings. Consult your laptop's manual to understand how the keycaps are attached. Typically, a small flathead screwdriver or a dedicated keycap puller is required. Once removed, clean each individual keycap with a soft cloth and some isopropyl alcohol. Consider using a cotton swab dipped in isopropyl alcohol to clean beneath the keycap slots.
- The "Vacuuming Vigor": A small, handheld vacuum cleaner with a brush attachment can be used to gently vacuum up debris from between the keys. Be careful not to apply too much suction.
- The Brush & Alcohol Ballet: A soft-bristled brush, dampened with isopropyl alcohol, can be used to scrub away stubborn grime that’s difficult to access with compressed air alone. Allow the alcohol to evaporate completely before reassembling your keyboard.
Driver Dilemmas: Software Solutions for Keyboard Troubles
Sometimes, the problem isn't hardware at all. Instead, it's a conflict or corruption within the operating system's keyboard drivers.
- Reinstalling the Driver: The Digital "Restart": Access the Device Manager (search for it in Windows) and locate your keyboard device. Right-click it and select "Uninstall device." After restarting your laptop, Windows will automatically attempt to reinstall the keyboard driver, which can often resolve conflicts.
- Driver Updates: Staying Up-to-Date: Similarly, within the Device Manager, you may have the option to "Update driver." Select this option, and Windows will search for the latest driver software. Outdated drivers can be a major contributor to keyboard problems. Ensure that all drivers, including the keyboard driver and chipset drivers, are up to date.
- Conflict Resolution: Eliminating Interference: If you suspect a software conflict, try disabling recently installed programs or running your laptop in Safe Mode (where only the essential drivers and programs are loaded). This can help you isolate the source of the problem.
- Keyboard Troubleshooter: Windows' Built-in Assistant: Windows has a built-in keyboard troubleshooter designed to automatically detect and resolve common keyboard issues. Search for "troubleshoot" in Windows, select "Keyboard," and follow the on-screen instructions.
Deep Dive: The Ribbon Cable Revelation
Inside your laptop, the keyboard is connected to the motherboard via a flexible ribbon cable. This cable can become loose or damaged, leading to various keyboard malfunctions.
- The Disassembly Dance: Preparation is Key: Before you embark on this, ensure your laptop is completely powered off and the AC adapter is disconnected. Gather your tools: a small Phillips head screwdriver, a plastic pry tool, and patience. Consult your laptop's manual for exact instructions.
- The Back Panel Unveiled: Locate the access panel on the bottom of your laptop, often secured by screws. Carefully unscrew and remove the panel to reveal the internal components.
- The Keyboard's Anchorage: Freeing the Keyboard: In most laptops, the keyboard is secured by screws, clips, or a combination of both, typically positioned along the top of the keyboard or around the edges. Carefully remove all screws.
- The Ribbon Cable Connection: A Delicate Touch: Locate the keyboard's ribbon cable. It's a flat, flexible cable that plugs into a connector on the motherboard. Gently detach the connector by releasing any locking mechanisms.
- Reconnecting the Cable: Ensuring a Secure Fit: Carefully re-seat the ribbon cable in the connector. Ensure it’s inserted correctly and that any locking mechanisms (e.g., small levers) are securely engaged. Then, gently reassemble the keyboard.
Beyond the Basics: Advanced Solutions
If the above methods don’t solve the problem, it's time to explore more advanced solutions.
- External Keyboard Test: Try connecting an external USB keyboard to your laptop. If the external keyboard functions correctly, that strongly suggests your built-in keyboard is the problem. This helps isolate the issue and confirm if it is a hardware problem.
- The Keyboard Tester Advantage: While you are testing the keyboard, it is essential to use a keyboard tester program. These programs usually show that a certain key is producing a signal.
- The Replacement Route: Should You? If all else fails, and you’re not confident with intricate repairs, it’s possible your keyboard requires replacement.
- Professional Assistance: When to Seek Help: If you're uncomfortable with the more advanced troubleshooting steps, or if your laptop is still under warranty, it's best to seek professional help from a qualified technician. They have the expertise and tools to diagnose and repair the problem accurately.
Preventative Measures: Keeping Your Keyboard Healthy
Once your keyboard is functioning correctly, it’s essential to implement preventative measures to avoid future problems.
- Regular Cleaning: The Weekly Ritual: Make cleaning your keyboard a regular habit. This helps prevent the buildup of debris and grime. A quick brush and occasional use of compressed air can go a long way.
- Food and Drink: The Keyboard's Enemies: Avoid eating or drinking near your laptop. Accidental spills are a major cause of keyboard failure.
- Gentle Touch: Avoiding Excessive Force: Type with a gentle touch. Excessive force can damage the keyboard's internal mechanisms over time.
- Protective Covers: A Shield Against the Elements: Consider using a keyboard cover to protect your keyboard from dust, spills, and other potential damage. This is especially useful if you frequently eat or drink near your laptop.
- Laptop Placement: A Stable Foundation: Ensure your laptop is placed on a stable surface to prevent accidental drops and spills.
By following these steps, you'll be well-equipped to extend the life of your laptop keyboard, salvage your data, and avoid the unnecessary costs and frustration of a complete replacement. Armed with this knowledge, you can confidently tackle any keyboard-related misfortune that befalls you.
