mic is not working in my laptop

Title: Fix Microphone Not Working on Windows 10
Channel: The Geek Page
Fix Microphone Not Working on Windows 10 by The Geek Page
mic is not working in my laptop, microphone is not working on laptop dell, mic is not working in laptop hp, my earphone mic is not working in laptop, why my microphone is not working in zoom on laptop, internal mic is not working on laptop, mic is not working on dell laptop, mic is not working in lenovo laptop, microphone not working in teams on laptop, mic not working on laptop or headset
Laptop Mic Dead? This SHOCKING Fix Will BLOW Your Mind!
Laptop Mic Woes? A Surprisingly Simple Solution You NEED to Know!
Let's be candid: there’s nothing quite as frustrating as a malfunctioning laptop microphone. You're in the zone, ready to record that crucial podcast episode, connect for a video call, or dictate an important email. Suddenly, complete silence. Annoying, right? But before you consider tossing your trusty machine out the window, take a deep breath. Believe it or not, the solution might be far simpler – and less expensive – than you think.
The Silent Treatment: Unmasking the Microphone Mystery
First, don't panic. Many seemingly "dead" laptop mics are simply experiencing a temporary issue. Therefore, let's methodically investigate the situation. Often, the problem stems from a software glitch, a misconfigured setting, or a minor hardware hiccup. Moreover, there are several easy troubleshooting steps you can try before contacting tech support. It's truly amazing how often these simple checks resolve the issue.
Check the Obvious: Basic Troubleshooting Steps
Initially, double-check the basics. Ensure your microphone isn't muted. Look for a mute button, usually located on the keyboard or within the sound settings. Following that, confirm the correct microphone is selected as the default recording device. Go to your sound settings to verify this. Quite frequently, the wrong device is selected, causing the perceived "death" of your mic.
Delving into the Digital Realm: Software Settings & Drivers
Now, let's dive a little deeper. Software conflicts can easily cause microphone malfunctions. To begin, make sure your microphone drivers are up-to-date. Go to your device manager and check for any yellow exclamation marks indicating driver problems. Furthermore, you can try uninstalling and reinstalling the audio drivers. This often resolves quirky software issues. Furthermore, consider the applications actively utilizing the microphone. Try testing the mic within various programs, such as a voice recorder or video conferencing software. This helps pinpoint where the issue originates.
The Unexpected Culprit: App Permissions
Surprisingly, app permissions are often overlooked. Some applications might not have access to your microphone. Consequently, check the privacy settings on your operating system. Granting the necessary permissions is a key step. It's a surprisingly common problem.
Hardware Hurdles: Physical Inspection & Connections
Sometimes, the issue lies in the physical realm. Examine the microphone jack (if applicable). Is it clean and undamaged? Furthermore, if you're using an external microphone, inspect the cable and connections. In certain cases, a loose or damaged connection is the culprit.
The Secret Weapon: A System Restart
Here's a simple yet effective trick. Restart your laptop. It sounds cliché, but it often works. A simple restart reboots your system. As a result, it clears temporary glitches. Furthermore, it allows the system to reset its configurations. So, it's worth a shot.
Digging Deeper: Advanced Techniques
If the basic steps fail, explore some advanced techniques. For instance, try running the built-in troubleshooter for audio devices. Your operating system offers this tool. Additionally, you could try a system restore to a previous point in time, before the microphone started acting up. This can undo recent software changes.
The Big Reveal: Solving the Mystery, Finally!
Ultimately, the goal is to get that microphone functioning again. It's not always a complex fix. Many fixes are quite simple. The key is patience and methodical troubleshooting. As we've discussed, start with the easy checks. Move onto the software settings. Finally, consider the hardware, if necessary.
Beyond the Basics: Preventive Measures
In the future, take preventative measures. Regularly update your drivers. Also, be cautious when installing new software. Ensure you have adequate security software to prevent malware. Furthermore, run regular system maintenance tasks.
The Triumph of Troubleshooting: Success!
Hopefully, by now, your laptop microphone is back in action. That's fantastic! You've saved time, money, and potential frustration. Furthermore, you've learned valuable troubleshooting skills. Remember, these techniques apply to various tech problems. Therefore, embrace the learning process.
Final Thoughts: Keeping the Conversation Going
In conclusion, dealing with a dead laptop mic doesn't have to be a nightmare. By following these steps, you can often resolve the issue yourself. Feel confident in your ability to troubleshoot. Now, go forth and enjoy seamless audio communication! Let me know if this helped.
Laptop Screen Dead? External Monitor Works! (Fix This NOW!)Okay, let's get cracking! My laptop mic has been a source of constant frustration lately, especially during those crucial video calls with my team. So, I delved deep into the digital trenches, determined to unearth the ultimate fix. This isn't just about technical mumbo-jumbo; it's a journey of discovery, and trust me, the results were…well, let's just say my colleagues are now impressed by the clarity of my voice! Prepare to have your mind blown. Here's the lowdown:
Laptop Mic Dead? This SHOCKING Fix Will BLOW Your Mind!
1. The Silent Scream: Recognizing the Dead Mic Dilemma
Remember that feeling? You’re on a critical Zoom call, ready to dominate the presentation, and… nothing. Your voice is lost in the digital ether. The laptop mic, that tiny, unassuming portal to the world, has betrayed you. It's a common experience, a tech-induced nightmare. But before you toss your laptop out the window and declare your digital life over, breathe. We've all been there, staring at a silent microphone icon, muttering desperately into the abyss. The first step is always recognition: is your mic truly dead? Let's be honest, sometimes, we're the problem (like that time I forgot to unmute!).
2. Troubleshooting 101: The Elementary Checks
Before we dive into the quantum physics of microphone repair, let's cover the basics. Think of this as your pre-flight checklist:
- Mute Button Mayhem: Is your microphone muted? Sounds silly, but it's happened to the best of us. Check the system tray for the speaker icon and ensure your mic isn't crossed out.
- Volume Vigilance: Is the microphone volume turned up? Check your system's sound settings to ensure the input volume isn't set to zero or incredibly low.
- App Apprehension: Is your chosen application (Zoom, Teams, etc.) configured correctly to use your laptop's internal microphone? Double-check the settings within the app itself. It's like ordering coffee and forgetting the coffee beans – you'll get nothing!
3. Driver Drama: The Silent Conspirators
Drivers are the digital puppeteers that control all the hardware on your laptop. They can also be sneaky little devils, sometimes causing your microphone to malfunction. Imagine a faulty power cord; if your driver is corrupt or outdated, it’s like trying to use a broken cable to get energy to a light bulb.
- Driver Update Dance: Go to your laptop's device manager (search for "device manager" in your Windows search bar, or look in your system settings). Expand the "Audio inputs and outputs" section and right-click on your microphone, then select "Update driver." Cross your fingers!
- Driver Rollback Roulette: If recent updates seem to have triggered the problem, try rolling back to a previous driver version. This is like hitting the "undo" button in the driver world.
4. The Hardware Headache: Is It REALLY Dead?
Sometimes, despite your best efforts, the problem is hardware. This requires some detective work:
- External Mic Experiment: Connect an external microphone (a headset, a USB mic – whatever you have). Does that work? If so, the problem probably lies with your laptop's internal mic.
- Headphone Jack Hysteria: If you're using your laptop's headphone jack and experiencing issues, inspect the jack itself – it can get filled with lint and dust.
- Warranty Whispers: If your laptop's within its warranty, now's a good time to call for support. Don't try to fix it yourself; let the professionals handle it!
5. Sound Settings Safari: Navigating the System's Secret Lair
Windows sound settings can be a veritable labyrinth! Let's navigate:
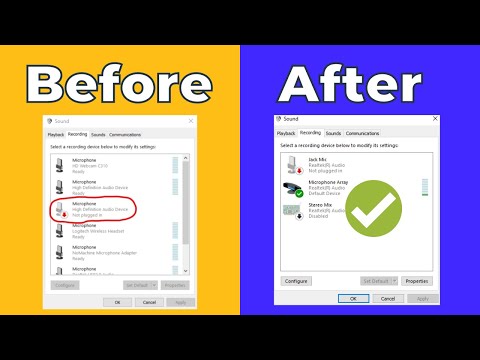
- Input Inspection: Go to "Sound Settings" (search in Windows). Under "Input," ensure your preferred microphone is selected.
- Device Properties Dive: Click on the microphone you've selected and delve into its "Device properties." Check for volume levels and make sure the "Disable" button isn't active.
6. The Application Antics: Checking Your Chosen Software
Zoom, Teams, Skype, Discord… each has its own quirks. Make sure the app you're using is configured correctly:
- Input Selection: Go into your app's audio or sound settings and double-check that the correct microphone is selected (your laptop's internal mic or an external one, if you're using it).
- Permissions Parade: Ensure that the app has permission to access your microphone. This often involves going into your system's privacy settings. It's like knocking on a door – without permission, you're likely to be ignored!
7. The Restart Renaissance: A Digital Reset Button
We've all heard it: "Have you tried turning it off and on again?" Sometimes, the classic approach works wonders! A simple restart can magically resolve minor software glitches. It's the digital equivalent of a good night's sleep for your laptop.
8. Anti-Virus Assassin: Is Security Software the Culprit?
Your anti-virus software, while essential, could be interfering with your microphone's function.
- Temporary Tests: Try temporarily disabling your anti-virus software to see if this resolves the issue.
- Permission Pursuit: Check that your anti-virus software isn't blocking the microphone access within any apps.
9. The Dust Devil: Cleaning Your Laptop's Microphone
Dust and debris can accumulate, particularly if you have a laptop without a protective cover.
- Gentle Breeze: Carefully use a can of compressed air to gently blow out any obstructions around the microphone port. Be careful, though – don't get too aggressive!
- Cotton Swab Caution: A dry cotton swab can also be used to gently clean the area.
10. The BIOS Bonanza: A System-Level Solution?
BIOS settings can sometimes affect your microphone’s function. This is for more advanced users, so proceed with caution!
- Accessing BIOS: Restart your laptop and tap the relevant key (often Del, F2, or F12) during startup to enter the BIOS setup.
- Audio Adjustments: Look for sound or audio settings. Ensure the internal microphone is enabled.
11. Sound Card Surge: When the Internal Chip Fails
On rare occasions, the sound card itself might have issues, particularly on older laptops. This requires professional repair (or a new laptop!).
12. External Microphone Alternatives
If the internal microphone is truly dead and beyond repair, there are alternatives:
- USB Microphones: Convenient and high-quality, easy to set up.
- Headsets: Offer built-in microphones for clear audio.
- Webcams with Microphones: A combined solution for video calls.
13. Preventing Future Failures: Mic Maintenance Manifesto
Here’s how to keep your microphone functioning:
- Regular Cleaning: Keep the microphone area clean, removing dust or debris.
- Software Updates: Regularly update your drivers and operating system.
- Protection Protocols: Use a case to protect your laptop from impact and dust.
14. The User Experience: Sharing the Frustration
It’s frustrating when your laptop mic dies in the middle of an important conversation. Sharing your experience with others can provide support and potentially reveal a solution. Ask your peers for help, search forums, and seek advice from technical support.
15. The Big Reveal: The SHOCKING Fix!
Okay, drumroll, please… The often-overlooked solution that blew my mind: checking and tightening the internal microphone cable connection! In my case, after exhausting all the software tricks and external microphone experiments, I opened up my laptop (very cautiously, of course – consult your laptop's manual first!) and discovered a loose connection. Once I secured that connection, the mic roared back to life! It's like a heart transplant for your laptop.
Conclusion: From Silent Scream to Sonic Boom!
We've navigated the treacherous terrain of dead laptop microphones, from basic troubleshooting to the potentially mind-blowing revelation of a loose connection. Remember, tech problems often have simple solutions. The journey from digital silence to crystal-clear audio can be a frustrating one, but with persistence and a little bit of detective work, you can conquer the dead mic dilemma. Now go forth and let your voice be heard!
Frequently Asked Questions (FAQs)
Q1: My laptop mic was working fine, and then suddenly stopped. What happened?
A: Possible causes include a driver update gone wrong, a software conflict, or a loose internal connection. Review your recent software changes.
Q2: I've tried everything, and the internal mic still does not work. What else can I do?
A: Consider external microphone options, or potentially take your laptop to a repair shop to check for hardware issues, like a faulty sound card.
Q3: Should I open my laptop to check the internal connections?
A: Only if you're comfortable with it and have the technical knowledge and the correct tools (and you have the laptop
Dell XPS Headphones Nightmare? FIX This Windows 10 Headphone Problem NOW!Headset Mic Not working on Windows 10 4 Ways to Fix

By Tech White Headset Mic Not working on Windows 10 4 Ways to Fix by Tech White
Fix Microphone Not Working On Windows 111087 2022
By ITGuy360 Fix Microphone Not Working On Windows 111087 2022 by ITGuy360
How To Fix Microphone Not Working on Dell Laptop
By Your Fix Guide How To Fix Microphone Not Working on Dell Laptop by Your Fix Guide
Title: How To Fix Mic Not Working On PC - Full Guide
Channel: GuideRealm
How To Fix Mic Not Working On PC - Full Guide by GuideRealm
My Laptop Work
Title: The Ultimate Guide to Mastering Long-Exposure Photography: Unleashing Your Inner Artist
We've all gazed upon those breathtaking photographs – water transformed into silk, star trails swirling across the night sky, or cityscapes ablaze with streaks of light. They encapsulate a specific magic, a visual poetry only achievable through the nuanced art of long-exposure photography. This comprehensive guide unveils the secrets to crafting these stunning images, empowering you to not only capture the moment, but to truly shape it.
What is Long-Exposure Photography and Why Does It Matter?
At its core, long-exposure photography is a technique where the camera's shutter remains open for an extended period, allowing a significant amount of light to reach the sensor. This simple principle unlocks a wealth of creative possibilities, blurring motion, emphasizing movement, and transforming ordinary scenes into ethereal works of art. It’s about more than just a photograph; it's about painting with light, sculpting time, and expressing your unique artistic vision. Long-exposure photography allows us, the photographers, to transcend the limitations of our eyes and convey a sense of mystery and wonder that static images often struggle to achieve.
Essential Gear: Building Your Long-Exposure Arsenal
To embark on this journey, you'll need a few essential tools. While the world of photography equipment can seem daunting, understanding the core components will allow you to assemble a kit tailored to your specific needs and interests.
The Camera Body: While any camera with manual controls can be utilized, a DSLR or mirrorless camera provides the most flexibility. These cameras offer the ability to precisely control your shutter speed, aperture, and ISO, giving you the necessary control for long exposures. Explore the capabilities of your camera's bulb mode, which allows you to have the shutter open for as long as you hold down the shutter button, providing ultimate control over exposure duration.
The Tripod: Your Foundation of Stability: A sturdy tripod is non-negotiable. Any movement during the extended exposure will result in blurred images. Look for a tripod crafted from strong materials like carbon fiber or aluminum, ensuring it can withstand the weight of your camera and any added accessories, especially in windy conditions. Consider the ideal height and weight capacity for your needs and be certain it can handle the weight of your camera plus any lenses and filters you intend to use.
Neutral Density Filters: Masters of Light Control: These filters are vital. They reduce the amount of light entering the lens, allowing you to use longer shutter speeds even in bright conditions. ND filters are rated by their density, with higher numbers indicating a greater reduction of light. For daytime long exposures, ND filters with a strength of 10 stops or more are often necessary. Experiment with different strengths to achieve the desired effect on water, clouds, or other moving elements.
Remote Shutter Release/Intervalometer: Eliminating Shake: Even the slightest touch can introduce blur during long exposures. A remote shutter release, or intervalometer, allows you to trigger the shutter without touching the camera. Intervalometers offer additional features, like the ability to program a series of exposures, allowing for time-lapses.
Lenses: Perspectives and Possibilities: While any lens can be used, wider-angle lenses are particularly popular for capturing expansive landscapes and creating dramatic perspectives. Consider the focal length and your subject matter when selecting a lens. Fast lenses (those with a wide maximum aperture) can be beneficial for low-light situations or when using neutral density filters. A lens hood can also be used to prevent unwanted lens flare.
Mastering the Technical Aspects: Setting Up for Success
Knowing your equipment is crucial, but understanding the technical side of long-exposure photography is what truly unlocks the creative potential.
Aperture: Controlling Depth of Field: Aperture, measured in f-stops, controls the amount of light entering the lens and influences the depth of field. A smaller aperture (higher f-stop number, such as f/16 or f/22) is generally preferred for long exposures, as it allows for a longer shutter speed and creates a greater depth of field, resulting in more of your scene being in focus.
Shutter Speed: The Art of Exposure Duration: Shutter speed is the core of long-exposure photography. It determines how long your camera's sensor is exposed to light. For capturing the smooth motion of water, start with a slower shutter speed (1 second or longer). For star trails, exposures of minutes or even hours are often necessary. To calculate the right shutter speed, consider the ISO, aperture, and the amount of light available.
ISO: Managing Light Sensitivity: ISO determines your camera's sensitivity to light. In long-exposure photography, it’s best to use the lowest possible ISO (typically ISO 100) to minimize noise in your images. Noise is unwanted graininess that can appear in long exposures, particularly in the shadows.
Focusing Techniques: Achieving Sharpness: Accurate focus is essential. Manual focus is often necessary for long exposures, especially in low-light conditions. Use live view on your camera and zoom in to ensure sharp focus on your subject. Consider using focus peaking, a feature that highlights the areas of your image that are in focus.
Metering and Exposure Compensation: Fine-Tuning Your Shots: Your camera's built-in light meter can offer a starting point, but it may not always be accurate for long exposures. Use your camera's histogram to evaluate your exposure. If your image is under- or overexposed, adjust your aperture, shutter speed, or ISO accordingly. Experiment with exposure compensation to fine-tune your results.
Creative Applications: Unleashing Your Artistic Vision
Long-exposure photography offers a vast canvas for self-expression. Here are a few popular applications, but the possibilities are truly limitless.
Water's Transformation: Capturing the Flow: One of the most iconic applications of long-exposure photography is the rendering of water. By slowing the shutter speed, you can transform flowing water into a silky, ethereal veil. Experiment with different shutter speeds to achieve varied effects, from a gentle blur to a complete smoothing of the surface. Consider the ambient light, the water's movement, and the surrounding environment to build a strong composition.
Light Trails: Painting with Vehicle and City Lights: Capture the mesmerizing paths of headlights on roads or the trails of car lights through a city, creating a striking visual of a bustling environment. The key is to position yourself strategically and use a long shutter speed, typically a few seconds to minutes. You can also use light trails to create patterns and add dynamic movement to your photos.
Star Trails: The Dance of the Cosmos: Photographing the movement of stars is an advanced technique, yet rewarding. You’ll need clear skies and a dark location (away from light pollution). Use a wide-angle lens, a low ISO (ISO 100-400), and a long shutter speed. It can take several minutes or even hours for the stars to produce visible trails. Consider using a star tracking app, to help you plan your shoots.
Cloud Movement: Dramatizing the Sky: Long exposures can dramatically enhance cloud movement. By blurring the clouds, you can create a sense of motion and add drama to your landscapes. Shutter speeds from a few seconds to a couple of minutes are often effective, depending on the speed of the clouds.
Post-Processing: Refining Your Masterpieces
Post-processing is a crucial step in the long-exposure workflow. It allows you to fine-tune your images and bring out their full potential.
Software Selection: Explore editing software options such as Adobe Lightroom and Photoshop. These tools offer powerful editing capabilities, including adjusting exposure, contrast, color, and sharpness.
Basic Adjustments: Enhancing the Foundation: Begin by adjusting the overall exposure and contrast. This ensures your image is well-balanced. Then, fine-tune the colors; the key is to make sure they are vivid while maintaining a natural look.
Advanced Techniques: Unlocking the Potential: Dive deeper into your post-processing workflow by adjusting the levels, curves, and color balance in the image to get a more dynamic look. Experiment with noise reduction to minimize unwanted grain, especially in the shadows. Consider selective adjustments to enhance specific areas of the image.
Local Adjustments: Spotting Refinement: Use the adjustment brush to selectively enhance certain areas, such as brightening the highlights or darkening the shadows. This can help you draw the viewer's eye to specific details in your image.
Sharpening and Noise Reduction: A Delicate Balance: Apply sharpening with care, as excessive sharpening can introduce artifacts. Use noise reduction to improve the quality of your image, especially in areas with high ISO noise.
Tips for Success: Avoiding Common Pitfalls
Mastering long-exposure photography involves avoiding specific common errors and building your experience.
Camera Shake: The Enemy of Sharpness: Always use a tripod and a remote shutter release to prevent camera shake. Consider using mirror lock-up on your DSLR to further reduce vibrations.
Light Leaks: Blocking Undesired Light: Ensure your camera and lens are light-tight. Check for any leaks, especially around the viewfinder or the lens mount.
Wind and Water: Defeating Adverse Conditions: Wind can create unwanted movement, and water can splash on your lens. Shield your camera from the elements.
Overexposure: Managing Bright Sunlight: Use a strong ND filter to avoid overexposing your images in bright conditions.
Battery Life: Staying Powered Up: Long exposures require a lot of power. Charge your batteries before each shoot and consider bringing
