laptop charger doesn't work
Title: This Laptop Won't Charge shorts pc computer pcrepair dell
Channel: Matt's Computer Services
This Laptop Won't Charge shorts pc computer pcrepair dell by Matt's Computer Services
laptop charger doesn't work on plane, laptop charger doesn't work, laptop charger won't work sometimes, asus laptop charger won't work, lenovo laptop charger won t work, dell laptop charger won't work, hp laptop charger doesn't work, laptop charger sometimes doesn't work, my laptop charger doesn t work, dell laptop charger doesn't work
Laptop Charger DEAD? This SHOCKING Trick Will FIX It!
Laptop Charger Catastrophe? A Surprisingly Simple Fix You NEED to Know!
Have you ever stared in disbelief at a blinking, useless laptop screen? Your charger, the lifeline of your digital world, has suddenly given up the ghost. It's a frustrating experience. It leaves you stranded. Fear not, friend! This isn't a eulogy for your charger, but a resurrection story. Prepare to witness a shockingly simple trick. It could breathe life back into your seemingly deceased power adapter.
The Dreaded Red Light: Decoding Charger Demise
Let's face it; laptop chargers aren't built like tanks. They endure constant plugging, unplugging, and the occasional accidental tug. Thus, they are susceptible to failure. Before you rush out to replace it, let's diagnose the problem. Oftentimes, the issue isn't terminal. It's a connection issue. A loose wire or a power surge might be the culprit. Therefore, exploring potential solutions is essential.
A Gentle Examination: Your First Line of Defense
Before declaring your charger officially deceased, conduct a thorough inspection. Start by checking the obvious. Examine the power cable for any visible damage, frays, or kinks. These are common points of failure. Gently wiggle the cable where it connects to the charger brick. You can observe any flickering or loss of power. Proceed to the plug that goes into your laptop. Gently inspect and clean it. Small debris can interrupt the charging process, too. If you spot any damage, replace the cable first. Often, this is all that’s needed to resolve the issue.
The "Reset" Revelation: A Hidden Power Reboot
Here's the secret weapon against a stubborn charger: the reset trick. This often-overlooked procedure can work wonders. Unplug your charger from both the wall outlet and your laptop. Now, here's the crucial part: While unplugged, press and hold the power button on your laptop for a full 30-60 seconds. This discharges any residual power in the system. After, you can release it. Then, plug your charger back into the wall and into your laptop. Give it a few minutes. Because sometimes, that's all it takes. Your laptop might just spring back to life.
Beyond the Basics: Troubleshooting Deeper Issues
If the reset trick fails, we must delve deeper. Furthermore, other potential culprits might be at play. Check the wall outlet itself. Try plugging your charger into a different outlet—preferably one that you know is working. This eliminates any doubt regarding the power source. You could also test your charger using a multimeter. This will measure the voltage output. However, if you're not familiar with electrical devices, it's best to find a professional.
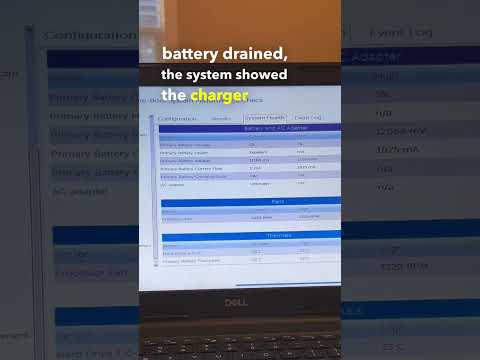
The Battery's Role: Understanding Power Dynamics
The laptop's battery itself can also be misleading. A completely depleted battery can sometimes appear to prevent charging. Let your laptop charge for a few hours, even if you don't see the charging indicator. After this, check again. The battery might be slowly replenishing. Moreover, several manufacturers allow you to remove the battery from the laptop. Then you can plug in the charger. If the laptop turns on, the battery is the issue.
When to Call in the Cavalry: Professional Assistance
Despite your best efforts, your charger might require professional attention. Moreover, if you've tried all the troubleshooting steps and still have no luck, consider these options. Contact your laptop manufacturer's customer support. They can offer specific solutions. Consider taking your charger to a reputable electronics repair shop. They can diagnose and repair it. Remember, safety first! Avoid attempting complicated repairs yourself.
Prevention is Key: Extending Charger Lifespan
Finally, let's learn from this. Proper charger care can significantly extend its lifespan. Therefore, store your charger in a safe place when not in use. Avoid bending or twisting the cable sharply. Don’t leave your charger plugged in 24/7. Unplug it when your laptop is fully charged; also, unplug it during thunderstorms. It helps prevent power surges. Implement these practices, and your charger will last longer. As a result, you will experience fewer digital emergencies.
The Ultimate Takeaway: Don't Give Up Easily!
Losing your laptop charger can be a major inconvenience. But, don't immediately assume it's beyond repair. Try these simple troubleshooting steps. Chances are, you can revive your charger and avoid the expense of a replacement. Embrace these techniques, and you'll become a true tech wizard. You will be prepared for any charging challenge.
Laptop C Key Dead? This SHOCKING Fix Will BLOW Your Mind!Laptop Charger DEAD? This SHOCKING Trick Will FIX It!
Hey tech aficionados, ever felt that gut-wrenching pang of panic when your laptop screen flickers and dies, accompanied by the ominous silence of a dead charger? We've all been there. Picture this: you're in the middle of an epic project, a crucial video call, or the final level of your favorite game, when BAM! Darkness. Your laptop charger has decided to take a permanent vacation. But before you rush out and spend a small fortune replacing it, hold your horses. We're about to dive into a surprisingly simple trick that might just resurrect your defunct power adapter from the digital graveyard. Get ready, because this could save you time, money, and a whole lot of frustration.
1. The Sudden Death of Your Digital Lifeline: Recognizing the Charger's Demise
Okay, let's be real. Laptop chargers are the unsung heroes of our digital lives. They're the tireless workhorses that keep us connected, productive, and entertained. But like all heroes, they're not invincible. So, how do you know when your charger has truly kicked the bucket? The signs can be subtle, or as dramatic as a power outage on a stormy night.
- No Lights, No Charge: This is the most obvious symptom. The charger brick, usually adorned with a little LED, remains stubbornly dark, and your laptop stubbornly refuses to acknowledge its presence.
- Intermittent Connection: The charger might work sporadically, providing power only when the cord is wiggled or positioned just right. This is a classic sign of a loose connection, either within the charger itself or at the laptop's power port.
- Overheating: A charger that gets excessively hot, even when not actively charging, is a red flag. It could be a sign of internal damage or a short circuit.
- The Smell of Burning Plastic: Uh oh. If you smell burning plastic, disconnect the charger immediately! This is a serious safety hazard and indicates a major internal failure.
These are the telltale signs. If you recognize any of them, it's time to investigate. But before you write your charger's obituary, there's a chance, a glimmer of hope, that a simple fix might be enough.
2. Before You Panic: The Simple Checks You MUST Do
Before you declare victory for the darkness, let's perform a quick triage. Sometimes the problem isn’t the charger itself, but something else entirely. Think of it like this: before you blame the engine, check the gas tank.
- The Outlet Test: Sounds obvious, but it's the first thing to check. Plug the charger into a different outlet. Maybe the outlet is the villain, not the charger!
- The Laptop's Power Port Inspection: Examine the power port on your laptop for any debris, damage, or bent pins. A clogged port can prevent a good connection. A toothpick can be your best friend here. Gently clean if necessary.
- The Adapter's Connection: Make sure the adapter is securely connected to both the wall and the laptop. Sometimes it's just a loose connection.
- The Power Cord Check: Is the cord itself damaged? Are there any visible kinks or breaks? Try a different cord, if you have one. Sometimes the cord is the culprit, not the brick.
These simple checks often reveal the true culprit. Sometimes, the fix is as easy as plugging in a different outlet or cleaning the power port. If none of these work, then and only then, we're ready for the shocker.
3. The SHOCKING Trick: Unveiling the Power of… The Reset!
Alright, here's the moment you've been waiting for. This trick is so simple, it’s almost silly. But don't underestimate its power. We're talking about a complete reset of your charger. Think of it as a digital defibrillator for your power adapter.
- The Magical Unplug: Unplug your laptop charger from the wall outlet and from your laptop. (Yes, both ends!)
- The Waiting Game: Let it sit, disconnected, for a good 20-30 minutes. This allows any residual power to dissipate and gives your charger a chance to reset. Time to grab a coffee, watch a YouTube video, or do some stretching. Anything but worry.
- The Reconnection: After the waiting period, plug the charger back into the wall outlet and then into your laptop.
- The Moment of Truth: Turn on your laptop and pray to the tech gods! Did the screen flicker back to life? Did the charging indicator ignite? If so, congratulations! You've just resurrected your charger!
Why Does This Work?
This "reset" trick works because, like many electronics, laptop chargers can sometimes experience temporary glitches or minor internal issues. Disconnecting the charger from both the power source and the laptop allows any accumulated static electricity or minor voltage fluctuations to dissipate, effectively "rebooting" the device. It's similar to restarting your computer when it malfunctions. Sometimes, a simple reset is all it takes to get things back on track.
4. Troubleshooting the Reset: When the Magic Doesn't Happen
So, you followed the reset procedure, and… nothing. Your laptop remains stubbornly dark. Don't despair! There are a few more things you can check before you resign yourself to buying a new charger.
- Test with Another Laptop: If possible, try your charger on a different laptop that uses the same type of charger. This helps you determine whether the problem lies with the charger or your laptop.
- Check the Voltage and Amperage: Make sure the charger you're using is compatible with your laptop in terms of voltage (V) and amperage (A). This information should be printed on the charger itself and on your laptop. Using the wrong charger can damage your laptop.
- Inspect the Charger's Cable: Look for any visible damage to the cable. Even small tears or breaks can affect the charger's ability to deliver power.
If these troubleshooting steps still don't yield results, it might be time to consider other options.
5. What to Do When the Trick Fails: Alternative Solutions
If the reset trick doesn't work, it's sadly time to face the music. Your charger may be beyond repair. But don't worry; there are still things you can do.
- Buy a Replacement Charger: This is the most straightforward solution. Make sure you buy a charger that's compatible with your laptop model. Check the voltage and amperage ratings to be sure.
- Universal Laptop Chargers: Considered as the best alternative to the generic charger, the universal charger eliminates compatibility issues as it fits many laptop models.
- Repair Services: Some electronics repair shops offer charger repair services. This can be a cost-effective option if the damage is relatively minor. However, it might be more trouble than it's worth, and the repaired charger might not be as reliable as a new one.
- Check Your Laptop's Warranty: Your laptop might still be under warranty. If the charger is faulty, the manufacturer might replace it for free.
6. Avoiding Charger Calamities: Proactive Prevention Strategies
We all want to avoid these moments. The best way to prevent a dead charger is to take care of it in the first place.
- Proper Storage: When not in use, store your charger in a safe place, away from extreme temperatures, moisture, and direct sunlight.
- Gentle Handling: Avoid bending or twisting the power cord sharply. This can damage the internal wiring.
- Avoid Overheating: Don't leave your laptop plugged in all the time, especially in hot environments. Excessive heat can damage the charger.
- Use a Surge Protector: A surge protector protects your charger from power surges and voltage spikes, which can damage the internal components.
- Cord Management: Use cord organizers or cable ties to keep the cable neatly bundled when not in use.
7. The Anatomy of a Charger: Understanding the Inner Workings
Understanding how a charger works can help you appreciate its importance and why it sometimes fails. It's like understanding the human body - you value good health more when you know how your body functions.
A laptop charger typically contains several key components:
- Transformer: This component converts the high-voltage AC power from the wall outlet to a lower-voltage AC power suitable for the laptop.
- Rectifier: This part converts the AC power to DC power, which is required to charge the battery.
- Voltage Regulator: This component stabilizes the voltage to ensure a consistent and safe power supply to the laptop.
- Protection Circuitry: This includes components that protect the charger and laptop from overvoltage, overcurrent, and overheating.
8. Charging Habits: Maximizing Battery Life and Charger Longevity
Did you know your charging habits impacts both the battery and the charger's lifespan?
- Avoid Overcharging: Modern laptops have smart charging systems that stop charging when 100% is reached. However, it's still a good practice to unplug your laptop once fully charged.
- Battery Calibration: Occasionally, fully discharge your battery and then fully charge it. This helps to calibrate the battery management system and ensure accurate battery life readings.
- Temperature Matters: Avoid charging your laptop in extreme temperatures, as this can damage both the battery and the charger.
How to FIX Any Laptop Not Charging while plugged in

By GMODISM How to FIX Any Laptop Not Charging while plugged in by GMODISM
What To Do If Your Laptop Is Plugged In But Not Charging
By PCMag What To Do If Your Laptop Is Plugged In But Not Charging by PCMag
Laptop charger open with petrol shortvideo

By Ihsan electric Laptop charger open with petrol shortvideo by Ihsan electric

Title: Laptop not charging Laptop charger repair
Channel: Ingkong's Creation
Laptop not charging Laptop charger repair by Ingkong's Creation
Change Wifi Settings
Laptop Charger DEAD? This SHOCKING Trick Will FIX It!
We've all been there: the heart-stopping moment when your laptop screen abruptly fades to black, and the telltale silence of a dead charger fills the air. Panic sets in. Deadlines loom. Hours of work potentially lost. But before you rush out to purchase a replacement, let's take a deep breath and explore a far more resourceful solution: the potential to resurrect that seemingly defunct charger. While replacement might be inevitable in some cases, a significant number of charger failures can be attributed to easily rectifiable issues. This article is your comprehensive guide, offering insightful techniques and troubleshooting steps designed to breathe life back into your laptop's power source.
Diagnosing the Problem: Pinpointing the Failure
The first step is to accurately diagnose the problem. Blindly replacing parts is a waste of time and money. Before resorting to drastic measures, let's systematically assess the situation. There are a few primary areas to examine.
The Power Outlet: Not Always the Culprit, But Often the Starting Point
Believe it or not, the power outlet itself—or the lack thereof—is a surprisingly common cause of perceived charger failure. Start with the basics. Ensure the outlet is functioning correctly. Test it with another device, like a lamp or a phone charger. If the other device works, proceed to step two. But if it doesn't, it's time to troubleshoot your outlet: check the circuit breaker. If it's tripped, reset it. If the outlet remains dead, you may need to call an electrician.
The Charger Cable: The Weakest Link
The charger cable, especially where it connects to the brick and the laptop, is a common point of failure. Over time, repeated bending and flexing can damage the internal wires, leading to intermittent or complete power loss. Carefully inspect the entire length of the cable for visible signs of damage: fraying, cracks, or exposed wires. Pay close attention to the connectors at both ends. Are the pins bent or corroded? A simple visual inspection can often reveal the problem. Gently wiggle the cable near the connectors while the charger is plugged in and the laptop is powered on. Does power temporarily return? If so, you've found your culprit.
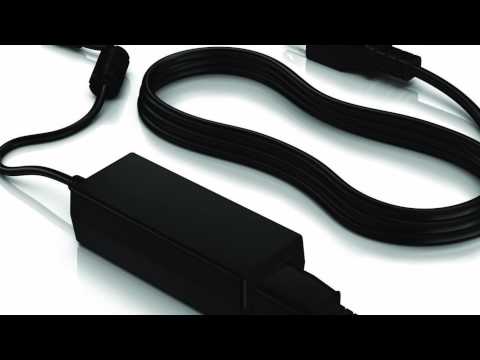
The Charger Brick: The Powerhouse Under Scrutiny
The charger brick itself houses the internal components responsible for converting AC power from the outlet into the DC power your laptop requires. While less susceptible than cables, the brick is still vulnerable to damage. Look for physical signs of distress: overheating, swelling, or a burning smell. If any of these are present, immediately unplug the charger and discontinue use. In addition, check the outlet of the brick. Is it secured and in good condition? Now, try the trick shown later in this article.
The Laptop's Charging Port: Assessing Internal Health
The charging port on your laptop is another potential trouble spot. Dust, debris, or corrosion can interfere with the connection, preventing the laptop from receiving power. Carefully examine the port. There should be no obstructions. Use a flashlight to ensure you can see the internal pins; they should all be straight and clean. A small, non-conductive tool (like a wooden toothpick) can be used to gently remove any visible debris. Be extremely careful not to bend or damage any of the internal pins.
The SHOCKING Trick: Reviving the Charger
This is the moment we've all been waiting for. A simple trick, often overlooked, could restore your charger to its former glory. What is the trick?
The Cable Connection: A Little Extra Pressure
If you’ve determined the cable is the likely problem, try this: When the charger is plugged in, apply gentle pressure to the cable at either end (where it connects to the brick or the laptop). Try different angles and pressures. If the power momentarily returns, you've confirmed a poor connection. In this case, you can use some tape to make the connection better.
The Brick: The Reset Process
The internal components of a charger can sometimes experience a "lock-up" or malfunction due to power surges or other minor electrical issues. The trick here involves an attempt to force a "reset" of the charger.
- Unplug Everything: Disconnect the charger from the wall outlet and your laptop.
- Wait a Minute: Let the charger sit, unplugged, for a full minute. This allows any residual energy to dissipate.
- The Reversal: Plug the charger back into the wall outlet without connecting it to your laptop.
- Check the LED: Some chargers have an LED indicator light. If it illuminates, it suggests the charger is at least partially functioning. If it still doesn't light up, try the next step.
- The Final Test: Plug the charger back into your laptop and observe the charging indicator. Did it work?
This "reset" process is often successful, particularly with chargers experiencing temporary glitches. If your laptop does not have an LED, simply try to turn it on. Even though this is a shot in the dark, it can be very effective.
Advanced Troubleshooting and Prevention
If the initial steps don't work, don't despair. There are other avenues to explore.
Using a Multimeter (For the Experienced)
For more advanced users, a multimeter can provide valuable diagnostic information. A multimeter can measure voltage and continuity. Place the multimeter’s probes on the charger's output contacts. Check for the voltage output. If the voltage is significantly lower than specified on the charger’s label or there’s no reading at all, the charger is likely faulty. Important safety warning: If you're not comfortable working with electricity, do not attempt this. Consult a qualified technician.
Cleanliness and Care: Extending the Lifespan
Prevention is always better than cure. Here are some tips to extend the life of your charger:
- Avoid Bending: Minimize bending the cable, particularly near the connectors.
- Proper Storage: Always store the charger in a cool, dry place when not in use.
- Dust and Debris: Regularly clean the laptop's charging port to prevent debris buildup.
- Power Surges: Use a surge protector to protect your charger (and your laptop) from damaging power fluctuations.
- Genuine Replacements: When a replacement is needed, opt for a charger specifically designed for your laptop model to ensure compatibility and minimize the risk of damage.
When to Seek Professional Help
Sometimes, despite our best efforts, the problem persists. In these cases, it's time to seek professional assistance.
- Persistent Failure: If all troubleshooting steps have failed and the charger remains unresponsive.
- Visible Damage: Evidence of significant physical damage, such as a cracked brick or frayed wires.
- Safety Concerns: Any signs of overheating, swelling, or a burning smell.
A qualified technician has the expertise and equipment to accurately diagnose the problem and offer appropriate repair or replacement solutions. Don't hesitate to seek professional help. Your laptop and your safety are important. It’s often better to be safe than sorry.
Conclusion: Powering Up Your Success
A dead laptop charger can be a major inconvenience, but it doesn't have to be a disaster. By systematically troubleshooting the problem, you can often identify and resolve the issue, saving yourself time, money, and stress. From checking the outlet to employing this SHOCKING trick and advanced techniques, this guide has equipped you with the knowledge to diagnose and address most charger failures. Remember, with a little patience and perseverance, you can often breathe life back into your laptop's power source, keeping you productive and connected.
