water spilled on laptop keyboard some keys not working

Title: SOLUTION Some Keys Not Working on Laptop Keyboard
Channel: Tech Express
SOLUTION Some Keys Not Working on Laptop Keyboard by Tech Express
water spilled on laptop keyboard some keys not working, spilled water on laptop keyboard some keys not working reddit, spilled water on lenovo laptop keyboard some keys not working, spilled water on laptop keyboard not working, spilled water on keyboard keys not working
Laptop Disaster! Spilled Drink? Keys Not Working? FIX IT NOW!
Laptop SOS: Rescuing Your Tech from the Brink of Disaster
The dreaded moment arrives. A rogue wave of liquid crashes onto your keyboard. Or perhaps, phantom keys start acting up. Your laptop, once a trusty companion, now hangs precariously in the balance. Breathe. Don't panic. This isn't the end. In fact, you can likely save your digital life!
The Spill: Immediate Action is Key
First things first: time is of the essence. Immediately disconnect the power source. Turn off the laptop. You need to stop the flow of electricity. Every second counts. Next, gently turn your laptop upside down. This allows any liquid to drain. Be patient. Let gravity work its magic. However, you can't leave it there forever.
Consider removing the battery, if possible. This further reduces the risk of short-circuiting. If the spill was significant, and you're comfortable, disassemble the laptop. This isn't for the faint of heart. Remember, take photos along the way! This method helps you put everything back together.
Understanding the Damage: Assessing the Situation
Now, assess the damage. Water, coffee, or soda? Each poses a different threat. Water is generally the least damaging. Coffee and sugary drinks, however, are far more problematic. These leave sticky residue. That residue can corrode components. It can even attract dust, leading to further issues.
Also, what keys aren't working? Are they all in a certain area? Or are they random? Furthermore, did the spill reach internal components? The answers to these questions guide your next steps.
Drying and Cleaning: The Recovery Process
Once you've assessed the damage, it's time for cleaning. You've got a few options here. First, let the laptop air dry completely. Place it in a well-ventilated area. Avoid direct sunlight. This process could take several days. In the meantime, resist the urge to turn it on.
After drying, use isopropyl alcohol (at least 90% concentration). Apply it sparingly. Use a cotton swab. This removes any residue left from sugary drinks. Clean the keyboard. Clean the internal components carefully. This process requires patience.
Also, inspect the keyboard. Are any keys sticky? If so, remove them carefully. Clean underneath. Ensure the contacts are clear. If the keys are damaged, replacements are usually available.
The Keyboard Conundrum: Troubleshooting Key Issues
Sometimes, the keyboard is the only casualty. This is good news. If some keys don't work, it might be a simple software issue. Try restarting your laptop. Update your keyboard drivers. These are easy solutions.
If restarting doesn't work, try cleaning your keyboard. Compressed air blasts away debris. You can usually find these products in any electronics store. Carefully spray between the keys. This often solves the blockage.
If cleaning fails, there might be physical damage. Inspect the keyboard for obvious problems. Check for loose connections. Then, consider replacing the keyboard. This is often a straightforward repair. Therefore, find the right part for your laptop model.
Beyond the Basics: Professional Help
Sometimes, the damage is too extensive. Or you might be uncomfortable with DIY repairs. This is perfectly okay. Don't hesitate to seek professional help. Contact a reputable laptop repair shop. Explain the situation. They will diagnose the problem. They will offer solutions.
Moreover, they have the expertise. They also have the tools. They can potentially save your data. It is a priceless commodity. It's always better than losing everything because of a mistake.
Prevention is a Virtue: Safeguarding Your Laptop
The best defense is a good offense. Prevent future incidents. A few simple steps go a long way. Invest in a spill-resistant keyboard cover. Especially if you eat or drink near your laptop.
Secondly, place your laptop on a stable surface. Avoid crowded areas. Also, back up your data regularly! This prevents data loss, even with the best recovery efforts. Furthermore, purchase a laptop case to carry your device.
Finally, be mindful of its surroundings. These precautions will protect it. Be vigilant. These actions will improve its longevity.
Returning to Normal: Post-Recovery Steps
Once your laptop is functional, test everything. Check all the keys. Verify all ports. Ensure that the sound works. Confirm that the display is clear.
If any problems persist, revisit earlier troubleshooting steps. Also, consider updating all your software. Now that the crisis is over, celebrate your success. You've overcome the digital disaster. Enjoy your recovered laptop. You accomplished the impossible!
Laptop Gestures DEAD? This SHOCKING Fix Works!Laptop Disaster! Spilled Drink? Keys Not Working? FIX IT NOW!
Oh, the heart-stopping moment! You're cruising through your day, maybe finishing a crucial document, enjoying a virtual get-together, or just generally ruling the digital world, when BAM! Disaster strikes. A rogue coffee cup takes aim, a rogue soda can explodes, or maybe, just maybe, your keyboard decides to stage a revolt of its own. Your laptop, that trusty digital sidekick, is now staring back at you, a potential victim of a watery grave or a silent keyboard protest. But before you spiral into a tech-induced panic, take a deep breath. We've all been there, and trust me, there's often light at the end of the tunnel. This is your survival guide, your digital emergency kit, your ticket to peace of mind when your laptop goes sideways.
1. The Initial Panic: Recognizing the Severity of the Situation
Let's be honest, the first reaction is pure, unadulterated panic. Your mind races. Is this the end? Will I lose everything? It’s like watching a slow-motion train wreck. But before you succumb to the urge to throw your hands up in the air, let's assess the damage. The type of spill, the extent of the keyboard malfunction, and the speed with which you react are all crucial factors in determining the outcome. Think of it like a fire – the quicker you act, the better your chances of containing the damage.
2. The Spill! Immediate Actions After a Liquid Assault
Okay, so you've got a liquid-related laptop catastrophe. This is where speed and decisiveness become your best friends. Every second counts.
- Unplug and Power Down Immediately: This is the absolute priority. Disconnect the power cord and, if possible, remove the battery (if it's easily accessible and safe to do so). Electricity and liquids are a terrible combination, and you want to avoid a short circuit at all costs. Think of it as pulling the plug on the villain before they can do any more damage.
- The Inversion Technique: Flip that laptop upside down immediately. Imagine you're trying to drain a miniature ocean. Gravity is your ally here. Let that questionable liquid (coffee, juice, whatever!) escape before it seeps deeper into the delicate electronics. Think of waterfalls, but inside your laptop.
- The Dry-Off Brigade: Grab a soft, absorbent cloth (a microfiber towel is ideal) and carefully wipe down the surface, paying close attention to the keyboard, trackpad, and any ports. Avoid using paper towels as they can leave behind lint. Gently is key, remember we are rescuing, not destroying.
3. Keyboard Commotion: Addressing Non-Liquid Keyboard Issues
Sometimes, the keyboard goes rogue on its own. And we've all been there! That sinking feeling when you go to type out an important email, and you are met with a flurry of random letters or, worse, complete silence is frustrating.
- The Simple Reboot: Sounds simple, right? But remarkably, a simple restart can solve a surprising number of keyboard glitches. Sometimes, a software hiccup is all it takes. Think of it as a digital reset button, clearing out the cobwebs.
- External Keyboard Salvation: If the problem persists, and you have one, plug in an external keyboard. This will help you determine if the problem is the internal keyboard or a more complex issue. If the external keyboard works, then the internal keyboard is the problem. If both keyboards have issues, then there's more work to do.
- Driver Diagnosis: Go into your device manager and check if your keyboard driver is properly installed and functioning. Sometimes, an outdated driver can be the culprit. Think of it like updating your software.
- Key Cap Capers: If individual keys are not working, carefully remove the keycaps (most laptops allow you to do this gently with a small tool or even just your fingernail). Clean around the key switches with compressed air or a soft brush. Sometimes, a little dust or debris is all it takes to cause a problem.
4. Internal Inspection: Should I Open My Laptop?
Now, we're getting into potentially riskier territory. Opening your laptop is not the right choice for everyone. It really depends on your level of technical expertise and the age of your laptop. If you’re comfortable with electronics, have the right tools, and are prepared to take your time, it might be an option. Otherwise, skip ahead to section 6.
- Power Down (Again): Make absolutely sure the laptop is unplugged and the battery is removed. This can't be stressed enough.
- Research, Research, Research: Find a service manual or a good video tutorial for your specific laptop model. Disassembly processes can vary greatly. This is a must-do.
- Gentle Dissection: Use the correct tools (usually small Phillips head screwdrivers) and work slowly, keeping track of every screw and where it goes. Take pictures as you go so you have a guide to reassemble things with.
- The Air Assault: Use compressed air to gently blow out any remaining liquid or debris from the keyboard area and around the motherboard. Be careful not to use too much pressure, as you could damage sensitive components.
5. Drying, Drying, Drying: The Patience Game
Whether you’ve opened your laptop or not, this is crucial. The key is time.
- The Rice Myth (Mostly): The rice trick is often touted as a miracle cure, and it can help absorb moisture. However, rice is not the best option because residue can do more damage. Instead, and if you can't get anything else do this. Place the laptop (or components) in an airtight container with desiccant packets (those little silica gel packets you find in new shoes or electronics). Replace the packets every day or two.
- Patience, Grasshopper: Let your laptop dry completely. This could take anywhere from 24 hours to several days, depending on the severity of the spill and the environment. If you rush this process, you risk causing corrosion or short circuits.
6. When to Seek Professional Help
There’s a point where DIY just isn't enough. Don't be afraid to admit defeat and call in the experts.
- The Smell of Burning: If you smell burning plastic or see any smoke, shut everything down immediately and take it to a professional.
- Persistent Problems: If your keyboard still isn’t working, or if you're experiencing other major issues after you've tried all the steps, it’s time to call in the pros.
- Warranty Worries: If your laptop is still under warranty, opening it yourself might void the warranty. Check your warranty terms before you start tinkering to prevent future issues.
7. Protecting Your Tech: Prevention is Key
Once the crisis is averted, let's create a security blanket!
- Drink Placement 101: Keep drinks away from your laptop. Simple, yet effective.
- Keyboard Covers: Invest in a keyboard cover. They’re inexpensive and can save your keyboard from a world of hurt.
- Regular Cleaning: Clean your keyboard regularly to remove dust and debris.
- Backups, Backups, Backups: Back up your important data regularly. This is the ultimate lifesaver. Think of it as your digital insurance policy. Cloud storage, external hard drives – the more, the merrier.
8. Data Recovery: If the Worst Has Happened
If your laptop is toast, the most important thing is your data.
- Professional Help: Data recovery services can often save your precious files, even if the laptop itself is beyond repair.
- Act Fast: The sooner you act, the better the chances of a successful recovery.
9. The Keyboard Chronicles: Specific Key Malfunctions
Let's focus in on some key specific keyboard malfunctions and how to address them.
- Stuck Keys: If a key is stuck, try cleaning around it, as described earlier. If that doesn't work, you may need to replace the key switch.
- Ghost Typing: If your keyboard is typing random characters that you are not inserting, the problem is either a short circuit or driver related. This is a tricky problem to handle.
- Key Replacement: If a keycap is broken or a key switch is damaged, you may need to replace the key or the entire keyboard.
10. The Motherboard's Role: Assessing and Protecting
The motherboard is the heart of your laptop, and it's incredibly vulnerable to liquid damage.
- Visual Inspection: Check for any signs of corrosion or damage.
- Professional Repair: Motherboard repair is usually best left to professionals.
11. The trackpad Troubles: Diagnosing and Fixing
A malfunctioning trackpad is another potential problem.
- Driver Issues: Make sure your trackpad drivers are updated.
- Hardware Damage: Liquid can damage the trackpad.
12. The Power Supply Predicament: Checking and Problems
The power supply can be another area of concern.
- Testing: Ensure the power supply is working correctly.
13. Water Damage: What to Expect After the Spill
The effects of water damage can be long-lasting.
- Corrosion: Corrosion can slowly eat
How to repair the keyboard of a laptop after a water spillageflood

By Val How to repair the keyboard of a laptop after a water spillageflood by Val
Laptop keyboard water damage, not working solved laptopkeyboard
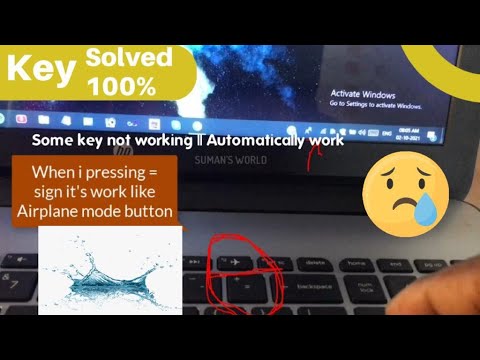
By SUMAN'S WORLD Laptop keyboard water damage, not working solved laptopkeyboard by SUMAN'S WORLD
This Logitech Keyboard became a BATH Can I fix a water damaged keyboard Fix it Friday

By Kip Hakes This Logitech Keyboard became a BATH Can I fix a water damaged keyboard Fix it Friday by Kip Hakes

Title: I spilled something on my Laptop
Channel: TheThorns TheThorns
I spilled something on my Laptop by TheThorns TheThorns
Wifi On Laptop
Laptop Disaster! Spilled Drink? Keys Not Working? FIX IT NOW!
We've all been there. The heart-stopping moment. The agonizing slow-motion realization. That cascading wave of liquid – coffee, soda, water, perhaps something worse – heading directly for the open maw of your beloved laptop. Or, maybe the keys have mysteriously ceased responding, rendering your digital workspace a frustrating paperweight. Fear not! We, the repair navigators, are here to guide you through the treacherous waters of laptop disasters, equipping you with actionable steps to reclaim your digital life. Let’s get your machine back on track and ensure that all hope isn't lost.
Immediate Action: The Crucial First Moments
The speed with which you act in the immediate aftermath of a spill or key malfunction is paramount. Every second counts. Hesitation can solidify damage and transform a potentially minor inconvenience into a catastrophic system failure.
The Liquid Spill: A Race Against Time
- Power Down IMMEDIATELY: This is the absolute priority. Press and hold the power button until the laptop completely shuts down. Do not attempt to save anything, do not try to close programs gracefully. The mission is to cut the power supply to prevent short circuits.
- Unplug and Remove the Battery (if possible): Disconnect the power adapter immediately. If your laptop has a removable battery, take it out. This further minimizes the risk of electrical damage. If you're unsure how to remove the battery, consult your laptop's manual or search online for instructions specific to your model.
- Invert and Drain: Carefully turn your laptop upside down, ideally with the screen open. This allows gravity to assist in removing the liquid. Position the laptop over a clean, absorbent surface (like a thick towel or several layers of paper towels). Let the liquid drain.
- External Drying (The Initial Phase): Use absorbent materials to soak up any visible liquid. Gently blot the surface, especially around the keyboard, trackpad, and ports. Avoid rubbing, which can force liquid deeper into the device. Focus on the exterior for the first 30 minutes to an hour.
Key Malfunction: Diagnosing the Root Cause
A non-responsive keyboard can be caused by several factors, not all of which are related to liquid damage. Let’s determine the issue quickly:
- External Keyboard Test: Connect an external keyboard. If the external keyboard works, the issue resides within your laptop's internal keyboard. If the external keyboard also fails, the problem may be broader than just the keyboard.
- Restart in Safe Mode: Restart your laptop in Safe Mode. This loads a bare-bones version of the operating system without many drivers or third-party software. If the keys function in Safe Mode, it indicates a software conflict or driver issue. If the keys still don't work, the problem is likely hardware-related.
- Driver Check: Access your device manager and check for keyboard driver issues. Update the keyboard driver if needed. Roll back the driver if you suspect a recent update caused the problem.
Deep Dive: Cleaning and Resurrecting Your Machine
Once you've performed the initial emergency actions, the more detailed recovery process begins. Patience and meticulousness are your allies now.
Liquid Damage: The Interior Inspection and Cleaning
- Disassembly (If You're Comfortable): This step is not for the faint of heart, but it's necessary for thorough cleaning. If you are comfortable with basic computer repair, it offers the best chance of a full recovery. Begin by:
- Consulting Your Manual: Before doing anything, find the service manual for your laptop model. These manuals provide detailed instructions on disassembly and reassembly. Search online for "[Your Laptop Model] service manual" (e.g., "Dell XPS 13 service manual").
- Gathering Tools: You'll need a small Phillips head screwdriver, possibly a spudger or plastic opening tools, and an anti-static wrist strap to prevent electrical damage.
- Taking Pictures: Take pictures during disassembly. This will be invaluable during reassembly. Photograph each stage of the process.
- Documenting Screws: Keep track of where each screw goes. Label small bags or use a tray with compartments.
- Cleaning the Components: Once inside:
- Remove the Battery (Again): Even if you removed it initially, do so again for safety.
- Identify Affected Areas: Pay close attention to areas where liquid may have reached, like the keyboard, motherboard, and trackpad.
- Isopropyl Alcohol (90% or higher): This is your cleaning agent. It evaporates quickly and is safe for electronics. Apply it liberally, but avoid pouring directly onto components. Use cotton swabs, soft brushes, and lint-free cloths.
- Keyboard Cleaning: Remove the keyboard (usually screws or clips). Clean the underside and the key switches. Use isopropyl alcohol and a small brush. In extreme cases, you'll require disassembly of the keyboard to clean individual keys.
- Motherboard Cleaning: Gently dry the motherboard. Use a soft brush to remove any residue from the components.
- Component Examination: Scrutinize all of the components for corrosion. If there is, clean the component using a brush, isopropyl alcohol, and cotton swabs until you remove the remnants.
- Thorough Drying: After cleaning, let all components dry completely. This can take anywhere from 24-72 hours, depending on the amount of liquid and the environment. Place components in a well-ventilated space. A desiccant packet can assist and is a worthwhile investment.
Key Malfunction: Deeper Troubleshooting and Repair
- Keyboard Replacement: If your internal keyboard is damaged beyond repair, the most straightforward solution may be replacement. Search online for a replacement keyboard specifically designed for your laptop mode.
- Key Removal and Cleaning: If only a few keys are not working, try removing the keycaps carefully (often with a small flathead screwdriver or a special keycap puller tool). Clean underneath the keycap and clean the switch with isopropyl alcohol and a cotton swab. Reassemble.
- Software Solutions: If the problem originates from software, consider the following:
- Driver Reinstallation: Uninstall and reinstall the keyboard driver.
- Operating System Reinstallation: As a last resort, reinstall your operating system. Back up your files before doing this.
Preventative Measures: Protecting Your Laptop for the Future
Once you’ve nursed your laptop back to health, take preventative measures so you can prevent future incidents.
- Use a Laptop Sleeve or Case: A protective case shields your laptop from accidental spills and scratches.
- Location, Location, Location: Avoid eating or drinking near your laptop. It's just a matter of time before an accident occurs. Keep liquids away from your workspace.
- Keyboard Protector: A silicone keyboard cover is a simple and effective way to prevent liquid from entering the keyboard.
- Data Backup: Regular data backups are essential. Store important files on an external hard drive, in the cloud, or using a combination of both. This ensures that you can recover your files after a disaster. Set up an automatic backup schedule.
- Consider Extended Warranty: If feasible, an extended warranty can protect against repair costs in case future issues surface. Ensure your coverage.
When to Seek Professional Help
While many issues can be resolved with the methods we’ve described, there are times when professional intervention is necessary:
- Major Component Damage: If a critical component (motherboard, CPU, hard drive) is damaged, professional repair may be required.
- Severe Corrosion: Extensive corrosion can be difficult to clean thoroughly and may require specialized equipment.
- Lack of Confidence: If you’re not comfortable disassembling your laptop or lack the necessary tools, seek help from a qualified technician.
- Water Intrusion Beyond Your Skill Set: If liquid has reached the critical components, professional cleaning and repair is the safest option.
Laptop disasters are stressful, but they don’t have to spell the end for your device. By acting quickly, understanding the recovery process, and implementing preventative measures, you can significantly increase the odds of saving your laptop and, more importantly, your work and data. Remember, knowledge is power. By understanding the steps involved and having the right tools, you’ll be well on your way to a full recovery.
