how to repair laptop keyboard keys not working

Title: How to Fix Some Keys Not Working on Laptop Keyboard Keyboard Not Working
Channel: Tech White
How to Fix Some Keys Not Working on Laptop Keyboard Keyboard Not Working by Tech White
how to repair laptop keyboard keys not working, how to fix laptop keyboard keys not working, how to fix laptop keyboard keys not working after water spill, how to fix laptop keyboard keys not working lenovo, how to fix laptop keyboard keys not working windows 11, how to fix laptop keyboard keys not working chromebook, how to fix laptop keyboard keys not working windows 7, how to fix laptop keyboard keys not working windows 10, how to fix laptop keyboard keys not working dell, how to fix laptop keyboard keys not working hp
Laptop Keyboard Dying? FIX It NOW! (Easy Steps!)
My Laptop Keyboard is on the Brink! SOS! (Don't Panic!)
It’s a familiar, heart-stopping moment. You’re typing away, lost in your digital world and then… disaster strikes. Your laptop keyboard starts acting up, keys sticking, or worse, completely ignoring your frantic taps. Before you start envisioning a costly repair or a brand-new machine, hold tight! There is hope. This isn't the end of your laptop's typing days. Actually, help is here. I’m here to guide you through some easy, often surprisingly effective fixes.
Troubleshooting Time: Unmasking the Keyboard Culprit
First, stop and breathe. Panicking will get you nowhere. Instead, let's diagnose the problem. Is it just one or two rogue keys, or has the entire keyboard gone rogue? What's happening is key to finding the proper solution. If only specific keys are affected, it usually points to a localized issue. However, if everything is failing, its more likely a more general problem. Therefore, we should start by ruling out the obvious.
Step 1: The Simple Solutions – Because Sometimes, It’s That Easy!
Sometimes, the simplest fixes work miracles. So, let's start with the easiest ones. First, give your laptop a good reboot. This simple action may restart your system, including the keyboard driver. Then, a simple restart can resolve minor glitches. After that, try a different user profile. If the keyboard works in another profile, the issue is likely user-specific. Also, be sure to check your sticky keys settings. These can sometimes interfere.
Step 2: The Dust Bunny Dilemma: Cleaning Your Keyboard
Dust, crumbs, and other debris are the sworn enemies of laptop keyboards. Over time, this detritus can accumulate beneath the keys, wreaking havoc. Thankfully, cleaning is often the answer. First, power down your laptop and unplug it. Then, grab a can of compressed air. Aim the nozzle at the base of each key, and give them a good blast. Be sure to move around to clean every part. After that, turn the laptop upside down and gently tap it to shake out dislodged particles. Also, if you have keys that still are problematic, consider removing the keycaps. Use a small spudger or flathead screwdriver to gently pry them off. However, make sure you take a picture first. This is to remember the order. You can clean under the keycaps more thoroughly and reattach them.
Step 3: Diving Deeper into Driver Issues
Sometimes, the problem isn't physical; it's software. Specifically, it may be a driver issue. Luckily, also, it is often fixable without external assistance. Also, you should ensure that your keyboard driver is up to date. To do this, go to your device manager (search for it in the Windows search bar). Look for "Keyboards" and expand the category. Right-click on your keyboard, select "Update driver, and follow the instructions. Furthermore, if the driver update doesn't work, you can also try uninstalling and reinstalling the driver. This may help fix issues.
Step 4: The External Keyboard Test (A Crucial Diagnostic)
Here's a diagnostic test that can save you a lot of time and headache. Connect an external USB keyboard to your laptop. If the external keyboard works perfectly, the problem is most definitely with your laptop's built-in keyboard. If the external keyboard also malfunctions, the issue might be more complex. It could be a system-wide software problem or a motherboard issue.
Step 5: Liquid Damage? Now What?
Oops! Spilled liquid on your keyboard? Act fast. Immediately shut down your laptop. Unplug it, and turn it upside down (to drain the liquid). Also, remove the battery if possible. Let the laptop dry completely for at least 24-48 hours. Then, you can try turning it back on and see if it works. There's no guarantee, but quick action can greatly improve the chances of survival.
Step 6: When All Else Fails: The Hardware Repair Option
If you've tried everything and your keyboard still isn’t cooperating, it might be time for professional help. You can consider taking your laptop to a reputable repair shop. Additionally, they can diagnose and fix more complex hardware problems. Actually, depending on the issue, replacing the keyboard might be a viable option. Another option, is buying a replacement keyboard.
Preventative Measures: Keeping Your Keyboard Happy
Prevention is always better than cure. Therefore, take these steps to make your keyboard last longer. First, avoid eating or drinking near your laptop. Second, use a keyboard cover to protect from spills and debris. Clean your keyboard regularly with compressed air. Also, treat your laptop with care. Lastly, use a good quality laptop case for additional protection.
Wrapping Up: Typing Towards a Solution
Experiencing keyboard trouble can be incredibly frustrating. However, with these steps, you are well-equipped to handle the problem. Remember to stay calm, diagnose the issue, and try the solutions patiently. Furthermore, a little troubleshooting goes a long way. In most cases, you can get your laptop typing again. So, take a deep breath, grab your tools, and get ready to fix your keyboard and reclaim your digital life. Good luck, and happy typing!
Dell Laptop DEAD After Yesterday? (FIX THIS NOW!)Laptop Keyboard Dying? FIX It NOW! (Easy Steps!)
Hey everyone! Ever feel that heart-stopping moment when your laptop keyboard starts acting up? You know, the keys that stick, repeat characters, or just flat-out refuse to work? Yeah, we've all been there. It's like your trusty digital companion is suddenly developing a serious case of the Mondays. But don't panic! Before you start envisioning a costly repair bill or a brand-new laptop, let’s dive into some simple (and often surprisingly effective) solutions. Think of this as your keyboard's digital CPR. We’re going to breathe some life back into those little plastic warriors and get you back to clicking and clacking in no time.
1. Recognizing the SOS: Identifying the Symptoms of a Keyboard Crisis
First things first: let's diagnose the problem. Just like a doctor needs to understand your symptoms, we need to pinpoint what exactly is going wrong with your keyboard. Are specific keys not working, or is the whole thing a digital graveyard? Is it a sticky situation, with keys clinging together like jealous lovers? Or perhaps, are you getting rogue characters popping up uninvited? These clues will guide us to the best solution.
- Key Not Working: This could be anything from dust and debris to a more serious internal issue.
- Sticky Keys: Often a sign that something has gotten inside, like crumbs or spilled liquids.
- Repeating Characters: A common issue often linked to software glitches or sticky keys.
- Unresponsive Keyboard: The keyboard simply doesn't respond. A more serious problem, but sometimes easily fixed!
2. The Dust Bunny Dilemma: Cleaning Your Keyboard – The First Line of Defense
This is where we start with the easy stuff. Think of your keyboard as a well-traveled road, and dust bunnies, crumbs, and pet hair are the pot holes. A good cleaning is often all it takes to get things running smoothly again. We're talking about the digital equivalent of a spring cleaning, but for your keyboard!
Here's what you’ll need:
- A can of compressed air (your weapon of choice)
- A soft-bristled brush (like an old toothbrush, minus the toothpaste, ideally)
- A microfiber cloth (for wiping down the exterior)
The Cleaning Ritual:
- Unplug or Shut Down: Safety first! Unplug your laptop or shut it down completely. You don't want to send any errant commands while you are working.
- Angle and Blast: Hold your laptop at a 45-degree angle. This helps dislodge debris. Use the compressed air to blast between the keys. Aim at different angles, getting all the nooks and crannies. Don’t be shy!
- Gentle Brushing: Use the soft-bristled brush to gently sweep away any remaining particles.
- Wipe Down: Wipe down the surface of your keyboard with the microfiber cloth. Remove any smudges or residue.
3. The Sticky Situation: Dealing with Spills and Stuck Keys
Oh no! Did coffee or soda find their way onto your beloved keyboard? Accidents happen! Don't fret, fixing this is often doable.
- Act Fast! The quicker you respond, the better. Immediately unplug your laptop and turn it upside down to drain any liquid.
- The Drying Process: Let your laptop sit upside down for at least 24-48 hours to allow it to dry completely. You can also use a fan to speed up the process. Patience is key here!
- Cleaning the Keys: If the keys are still sticky, you can try removing them individually (carefully!) and cleaning them with rubbing alcohol. (Again, be careful! and consult your laptop's manual for instructions if you’re unsure).
4. Software Shenanigans: Troubleshooting Keyboard Glitches
Sometimes the problem isn't hardware; it's software. Think of it like a traffic jam on the digital highway. Let's see how to clear the congestion.
- Restart Your Laptop: This is the classic, go-to solution. It often magically fixes a myriad of problems.
- Check Your Drivers: Outdated or corrupted drivers can cause keyboard issues. Go to your Device Manager (search for it in your Windows search bar). Look for any keyboard-related devices and update their drivers.
- Run the Troubleshooter: Windows has a built-in troubleshooter for hardware and devices. Search for "Troubleshooting settings" and run it. It might just find the problem.
5. The External Solution: Using an External Keyboard
Sometimes, the best solution is a temporary workaround. If you can't get your built-in keyboard working immediately, an external keyboard can save the day!
- Plug It In: Simply plug a USB keyboard into your laptop. It should be recognized instantly.
- Consider It a Test: If the external keyboard works perfectly, you can confidently rule out software issues. This narrows down the problem to your laptop's internal keyboard.
6. The Keys to the Kingdom: Replacing a Single Key
If just one or two keys are dead, you might be able to replace just those. This is like doing dental work, one tooth at a time.
- Identify the Key Type: Research your laptop model to determine the key type (scissor, membrane, etc.).
- Order Replacement Keys: You can usually find replacement keys online.
- Careful Removal and Installation: Follow the replacement key's instructions for removal and installation. YouTube tutorials are fantastic here!
7. The "Sticky" Situation, Part 2: Cleaning Under the Keys
We touched on sticky keys before, but sometimes a deeper clean is necessary. This is like going behind the scenes to your digital keyboard.
- Turn Off and Unplug: ALWAYS, always follow this step first!
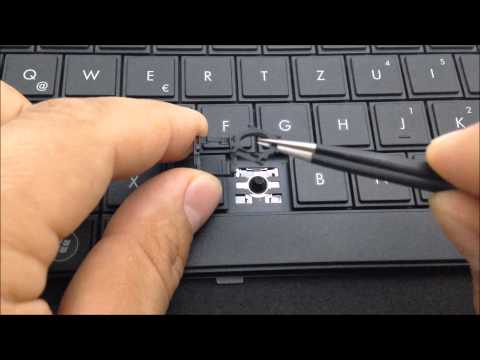
- Key Cap Removal: Use a keycap puller (you can buy these cheaply online) or a small flathead screwdriver to gently pry off the keycaps. Start with the stubborn keys or those that feel sticky. Be very careful not to break the small plastic clips that hold the keycaps.
- Deep Cleaning: Once the keycaps are removed, you can use a cotton swab dipped in isopropyl alcohol to clean the area beneath the keycaps. Try to remove any spilled liquids or debris.
- Let Dry: Let everything dry completely before reassembling. Reattach the keycaps, making sure they snap back into place.
8. Diagnosing the Dead: When the Keyboard is Truly Gone
If none of the above solutions work, you may be facing a hardware failure. This is less fun.
- Test in BIOS: Restart your laptop and access the BIOS setup (the key you press to do this varies by manufacturer, but the start screen will usually display the necessary key, often Delete, F2, or F12). Try using your keyboard in the BIOS environment. If it still doesn’t work, it’s likely a hardware issue.
- Professional Help: At this point, it’s time to consider taking your laptop to a repair shop or contacting the manufacturer's support. There might be internal damage that requires specialized tools and expertise.
9. Avoiding Future Keyboard Troubles: Prevention is Key!
Now that we've fixed the problem, let's create a game plan to stop this from happening again. Prevention is always easier than cure.
- Eat and Drink Wisely: Keep food and drinks away from your laptop.
- Regular Cleaning: Make cleaning your keyboard part of your regular computer maintenance routine.
- Gentle Touch: Avoid slamming the keys.
- Laptop Bags for Protection: Transport your laptop in a protective bag.
10. Beyond the Basics: Advanced Troubleshooting Tips
Alright, for the tech-savvy amongst us.
- Check for Physical Damage: Inspect the keyboard ribbon cable (inside the laptop) for any signs of damage if you are comfortable opening up your laptop. This requires caution and a basic understanding of computer hardware.
- Consider a Factory Reset: As a last resort (but only if you have a backup of your important files!), a factory reset can sometimes fix software-related keyboard issues. But be warned: this will erase everything on your hard drive.
11. The Hidden Contaminants: Microscopic Culprits
Sometimes, the issues are not easily visible. Small particles can hinder performance.
- Use a Magnifying Glass: Inspect the keys with a magnifying glass to detect tiny particles.
- Specialized Cleaners: Consider using specialized keyboard cleaning kits that include compressed air and small brushes.
12. Identifying the Culprit: Software vs. Hardware
Distinguishing between software and hardware issues can save you time and money.
- External Keyboard Test: If an external keyboard works flawlessly, it’s a hardware issue.
- Driver Updates: Try updating or rolling back the keyboard drivers.
- System Restore: (Windows) Restore your system to a previous point in time.
13. The DIY Dilemma: When to Seek Professional Help
Knowing when to throw in the towel and call in the professionals is as important as the how-to guides.
- If You’re Uncomfortable: If you're not comfortable opening your laptop, don't do it. It’s better to be safe than
SOLUTION Some Keys Not Working on Laptop Keyboard

By Tech Express SOLUTION Some Keys Not Working on Laptop Keyboard by Tech Express
How to Individual Laptop Keyboard Keys Fix Repair Installation Guide HP Compaq Pavilion HD
By Tech Profis How to Individual Laptop Keyboard Keys Fix Repair Installation Guide HP Compaq Pavilion HD by Tech Profis
How to Solve Keyboard Keys Not Working shorts keyboard pc

By TonaziTube How to Solve Keyboard Keys Not Working shorts keyboard pc by TonaziTube

Title: How to Remove Laptop Key to Repair Lenovo Laptop Keyboard Cleaning and Repairing Keyboard Fix
Channel: News N View
How to Remove Laptop Key to Repair Lenovo Laptop Keyboard Cleaning and Repairing Keyboard Fix by News N View
Laptop Working
Laptop Keyboard Dying? FIX It NOW! (Easy Steps!)
The dreaded moment arrives: your laptop keyboard begins to betray you. That responsive click, the satisfying bounce of keys beneath your fingertips, vanishes. Letters go missing. Commands fail. Productivity grinds to a halt. Before you resign yourself to the expense of a new keyboard or, worse, a whole new device, take a deep breath. In many cases, the demise of your laptop keyboard is not a terminal illness but a manageable inconvenience. Let’s explore the common culprits and, more importantly, how you can restore your keyboard to its former glory, often with minimal effort and expense.
Diagnosing the Keyboard's Ailments: Pinpointing the Problem
The first step in any repair endeavor is accurate diagnosis. Is the keyboard completely unresponsive? Are only certain keys acting up? Understanding the specific symptoms will guide your repair efforts. Here's a breakdown of common keyboard problems and what they typically indicate:
- Complete Keyboard Failure: If the entire keyboard is dead, the issue is likely a more significant problem. This could be a loose connection, a driver conflict, or even a hardware malfunction of the keyboard itself or a problem with the laptop’s motherboard.
- Sticky or Unresponsive Keys: Sticky keys are usually caused by debris: crumbs, dust, hair, or spilled liquids that have found their way beneath the keycaps. Unresponsive keys can stem from the same issue or from damage to the underlying switch mechanism.
- Repeated Key Presses (Ghosting): This frustrating behavior, where a single keypress registers multiple times, can result from software conflicts, or damaged switches, which may require a deep clean.
- Incorrect Key Mapping: If your "A" now types a "Z," and your "P" becomes a question mark, the problem is most likely a software-related issue, such as an incorrect keyboard layout setting, driver problems, or a virus infection, that can be easily fixed.
- Intermittent Key Failure: This suggests a loose connection, a damaged switch, or a build-up of debris that intermittently interferes with the key's function.
First Responders: The Essential Keyboard Cleaning Regime
Before diving into more complex solutions, a thorough cleaning is often the most effective and easiest first step. Gather your supplies:
- Canned Air: This is your primary weapon for removing loose debris. Opt for a can with a thin straw attachment for precise targeting.
- Microfiber Cloth: Soft and lint-free, these are excellent for wiping down the keycaps.
- Isopropyl Alcohol (70% or higher): This is a safe and effective solvent for removing sticky residue.
- Cotton Swabs: These are ideal for applying alcohol and cleaning tight spaces.
- Small Brush (Fine-Bristled): A toothbrush or a specialized keyboard brush can dislodge stubborn debris.
- Tweezers: Useful for retrieving larger particles.
The Cleaning Process:
- Power Down and Unplug: Always shut down your laptop and disconnect the power adapter before cleaning.
- Invert and Tap: Gently invert your laptop and tap the back to dislodge loose debris.
- Canned Air Assault: Use the canned air to blast between the keys, focusing on the affected areas. Direct the airflow at an angle, sweeping across the keyboard.
- Keycap Wipe-Down: Dampen the microfiber cloth with a small amount of isopropyl alcohol and wipe down the keycaps. Avoid excessive moisture.
- Swab Deployment: Dip a cotton swab in the isopropyl alcohol and carefully clean around the individual key switches, focusing on the areas where the keys are sticking or unresponsive.
- Brush Attack: Use the small brush to gently scrub around the keys, loosening any remaining debris.
- Tweezers Rescue: If you see larger particles, use the tweezers to carefully remove them.
- Final Air Blast: Give the keyboard a final blast with canned air to remove any remaining residue.
- Let it Dry: Allow the keyboard to air dry completely before powering on your laptop.
Deep Dive: Keycap Removal and Switch Cleaning
If the above steps don't bring your keyboard back to life, it's time for a deeper clean. Proceed with caution, and only if you feel comfortable with minor disassembly.
Tools Needed:
- Small Flathead Screwdriver or Keycap Puller: A keycap puller is ideal, but a carefully used screwdriver will do.
- Isopropyl Alcohol (70% or higher)
- Cotton Swabs
- Small Brush
The Removal Procedure:
- Identify the Problem Keys: Focus on the keys that are malfunctioning.
- Keycap Removal: Gently insert the screwdriver (or keycap puller) under the edge of the keycap. Apply gentle upward pressure until the keycap pops off. Be very careful not to break the plastic clips that hold the keycap in place.
- Clean the Switch: Once the keycap is removed, you'll see the switch underneath. Use the cotton swabs dipped in isopropyl alcohol to clean around the switch. Pay attention to the edges and corners. Use the small brush to scrub lightly.
- Clean the Keycap: Wipe down the underside of the keycap with a microfiber cloth dampened with isopropyl alcohol.
- Reassemble: Align the keycap with the switch and press firmly until it clicks back into place.
Important Note: Some laptop keyboards use different keycap attachment mechanisms. Research your specific laptop model online before attempting to remove keycaps. Search for videos or guides specific to your laptop model, and watch the ones that are available to learn what challenges you'll have.
Software Solutions and Driver Troubleshooting
Sometimes, the fault doesn't lie in the hardware. Software glitches or driver issues can also cause keyboard problems. Here’s how to address potential software-related issues:
- Restart Your Laptop: A simple restart can often resolve temporary software conflicts.
- Update Your Keyboard Drivers: Go to Device Manager (search for it in the Windows search bar). Expand "Keyboards," right-click on your keyboard, and select "Update driver." Choose "Search automatically for drivers."
- Roll Back Driver: If a recent driver update coincided with the keyboard problems, try rolling back to a previous version. In Device Manager, right-click on your keyboard, select "Properties," go to the "Driver" tab, and click "Roll Back Driver."
- Check Keyboard Layout Settings: Make sure your keyboard layout is set correctly. In Windows, go to Settings > Time & Language > Language. Verify that the correct language and keyboard layout are selected.
- Run the Windows Troubleshooter: Windows has a built-in keyboard troubleshooter. Go to Settings > System > Troubleshoot > Other troubleshooters, and run the "Keyboard" troubleshooter.
- Scan for Malware: Malware can sometimes interfere with keyboard functionality. Run a full scan with your antivirus software.
Hardware Evaluation: When to Consider Replacement
If the above steps haven't resolved your keyboard issues, it may be time to consider the possibility of hardware failure. Here are some signs that a new keyboard or even a laptop repair is in order:
- Water Damage: Spills are a common enemy of laptop keyboards. If liquid has penetrated the keyboard, corrosion can damage the internal circuitry. A new keyboard is likely the best solution even if the keyboard seems to work now.
- Significant Physical Damage: Cracking or damage to the keyboard frame may reduce function.
- Persistent Unresponsiveness: If the keyboard remains unresponsive after exhaustive cleaning and software troubleshooting, the keyboard itself may be faulty.
- Repeated Key Failures: The keyboard’s internal components may be too worn out to function properly.
In this scenario, you have a few options:
- External Keyboard: As a temporary (or even permanent) solution, connect an external USB keyboard.
- Keyboard Replacement: If you're comfortable with it, you can replace the keyboard yourself. Find a replacement keyboard online, then research a tutorial for your laptop model.
- Professional Repair: Take your laptop to a qualified repair shop. This is often the best option if you're not comfortable with DIY repairs or if the problem is more complex.
Preventative Measures: Keeping Your Keyboard Healthy
Prevention is always better than cure. Here are a few simple habits that will help prolong the life of your laptop keyboard:
- Eat and Drink Away from Your Laptop: This seems obvious, but it's crucial. Crumbs and spills are the enemy.
- Clean Regularly: Wipe down your keycaps with a microfiber cloth on a regular basis.
- Invest in a Laptop Sleeve or Case: When transporting your laptop, protect it from dust and debris.
- Use a Keyboard Cover: If you anticipate a lot of dust, crumbs, or potential spills, consider a silicone keyboard cover.
- Handle with Care: Avoid excessive pressure on the keyboard and avoid dropping your laptop.
By following these steps, you'll be well-equipped to diagnose, troubleshoot, and repair (or at least temporarily alleviate) any keyboard issues that may plague your laptop. Remember that with some care and patience, you can often bring your keyboard back from the brink.
