after installind displaylink driver windows 10 laptop display stopped working

Title: 1 Minute FIX HID Compliant Touch Screen Driver Missing on Windows 10 or 11
Channel: Glitch Guru
1 Minute FIX HID Compliant Touch Screen Driver Missing on Windows 10 or 11 by Glitch Guru
Laptop Screen Dead After DisplayLink? FIX IT NOW!
Laptop Screen Blackout Blues: DisplayLink to the Rescue!
Have you ever stared blankly at your laptop, heart sinking, as a lifeless black screen stared back? It’s a digital tragedy we've all likely encountered. Your DisplayLink dock, seemingly the hero, is now the potential villain! It's a frustrating situation, but breathe. We can navigate this together. Let's get that screen shining again!
Decoding the DisplayLink Dilemma
So, your laptop's screen is toast. But your external monitors might be working. That’s the first clue: DisplayLink. It's a clever piece of tech. It projects your screen onto external monitors. DisplayLink utilizes USB to transmit video signals. Consequently, it bypasses your laptop's graphics card. Thus, the culprit is often the DisplayLink setup itself. Your laptop's built-in display might be temporarily disabled.
Ruling Out the Obvious: Quick Fixes First
Before diving into deep technical waters, perform a few basic checks. First, reboot everything! Restart your laptop, your DisplayLink dock, and any connected external monitors. It’s a simple step, yet surprisingly effective. Additionally, ensure all cables are securely connected. Unplug and replug them! This includes the USB cable connecting your laptop to the dock. Sometimes, the simplest solutions work wonderfully. Moreover, give your laptop's USB ports a good look. There may be some lint or debris blocking a good connection.
Driver Drama: The Root of the Problem?
Driver issues are extremely common. DisplayLink relies on drivers. These drivers must communicate seamlessly with your operating system. Outdated or corrupted drivers can lead to display failure. Now, how do we address this? You'll need to update them! Go to the DisplayLink website. Download the latest drivers for your specific dock model and operating system. Install them and restart your laptop. This simple update can often work wonders.
Unveiling Hidden Conflicts
Sometimes, conflicts arise within the software. Other applications might interfere. Antivirus software, in particular, can sometimes cause problems. Temporarily disable and test. Then, try disconnecting any unnecessary peripherals. The less clutter, the better! Reduce potential interference.
Troubleshooting the External Monitor
Sometimes the issue isn't the laptop itself. The external monitor is the problem. First, verify the monitor's power. Does it have power? Next, check the video cable connections. Ensure the cable connects correctly to both monitors and the dock. If you have another monitor, test it! This helps you determine if the issue is with the original monitor.
Deep Dive: Advanced Troubleshooting
If the basic checks don't work, we have to dig deeper. First, uninstall and reinstall the DisplayLink drivers. Completely remove them from your system. Then, download and install the latest drivers again. This fresh start can often resolve underlying issues.
Booting into Safe Mode
Safe mode is a diagnostic tool. It loads Windows with minimal drivers and services. Try booting your laptop into safe mode. If the internal screen works in safe mode, the problem is almost certainly a driver conflict. Then, uninstall any recently added drivers. Restart your laptop normally.
Display Settings Mayhem
Sometimes, the display settings themselves are to blame. Right-click on your desktop. Select "Display settings." Make sure the internal display is enabled. You may have accidentally disabled it. Also, check the "Multiple displays" setting. Ensure it's set to "Extend these displays" or "Duplicate these displays."
Power Management Predicaments
Power management can sometimes cause display problems. It may cause the internal display to turn off! Access your power plan settings. Adjust settings to prevent your laptop from dimming or turning off the display. Ensure the display remains active.
The Power of a Reset
If all else fails, consider resetting your laptop. Back up your important files first! A system reset restores your laptop to its original settings. Therefore, it resolves many underlying software conflicts. This should only be a last resort.
Reaching Out: When to Seek Professional Help
If nothing here works, it's time to seek professional help. Contact laptop or DisplayLink support. Explain the steps you've taken. Provide details about your model and operating system. They have additional diagnostic tools. Remember, your screen is not permanently broken! Now, it should be shining again.
Kids' i-Ready Laptop: The ULTIMATE Guide to Top Picks!Laptop Screen Dead After DisplayLink? FIX IT NOW!
Hey tech enthusiasts, fellow travelers of the digital realm! Ever stared at a lifeless laptop screen, the digital equivalent of a black hole sucking in all your hopes of productivity (and maybe your favorite cat videos)? We’ve all been there. And if you're reading this, chances are you're wrestling with the dreaded "laptop screen dead after DisplayLink" scenario. Don’t worry, we’re in this together. Think of me as your slightly tech-savvy friend who’s been there, troubleshooting in the wee hours, fueled by copious amounts of coffee and sheer stubbornness! Let's dive in and bring your screen back to life.
1. The Plot Thickens: Understanding the DisplayLink Curse
First things first, let's get acquainted with the villain of our story: DisplayLink. It's a clever piece of technology, essentially allowing your laptop to connect to multiple monitors via USB, a docking station, or even a single adapter. Pretty nifty stuff, right? Until it goes haywire, transforming your sleek setup into a digital desert. When your laptop screen goes black after a DisplayLink connection, it’s like the technology has decided to take a permanent nap. It's like your laptop screen is a canvas, and DisplayLink has unexpectedly smeared black paint across it, leaving the pristine art of your digital life buried beneath the darkness. This often stems from driver issues, conflicts, or sometimes, just plain quirks.
2. The Usual Suspects: Common Culprits and Their Underhanded Tactics
Before we charge headfirst into fixes, let's identify the usual suspects. We're talking about the usual driver gremlins, the occasional hardware hiccups, and sometimes, the simple act of a bad connection. Think of it like a detective novel: we need to identify the suspects to find the perpetrator.
- Outdated or Corrupted Drivers: The most common culprit, like a faulty fuse in your metaphorical electrical circuit.
- Connection Complications: A loose USB cable, a dodgy dock, or a monitor that's decided to take a day off.
- Software Conflicts: Other programs or apps can sometimes clash with how DisplayLink operates.
- Hardware Issues: Though less frequent, sometimes it's a hardware malfunction, like a failing DisplayLink adapter.
3. Step One: The Reboot – The Digital Reset Button
Okay, let's hit 'Ctrl + Alt + Del' of the digital world, or its equivalent. A simple restart often works wonders. It's the IT equivalent of "turning it off and on again." It clears out temporary files, refreshes the system, and gives everything a chance to breathe. In the case of a DisplayLink issue, it may be just what your screen needs to reboot itself.
4. Driver Dilemma: Updating or Reinstalling Your DisplayLink Drivers
Now, the moment of truth! More often than not, the solution to your dead-screen woes lies in drivers. Here's how to troubleshoot the driver dilemma:
- Update Drivers: Go to the DisplayLink website or the manufacturer's website for your docking station. Download the latest driver version. Run the installer and follow the prompts.
- Roll Back Drivers: If you recently updated your drivers and the issues began immediately after, you might need to roll back to a previous version. This option is often available in the Device Manager. Think of this as a digital time machine!
- Reinstall Drivers: If updating & rolling back doesn't work, try a fresh install. Uninstall the driver completely (again, through Device Manager), restart your computer, and then install the latest version.
5. Connection Checks: The Unsung Heroes of a Functional Setup
Don't underestimate the power of a good connection! It's like making sure all the wires are plugged in properly. A loose connection can be the root of many problems.
- USB Cable Inspection: Ensure your USB cable is securely plugged into both your laptop and the DisplayLink device (docking station or adapter). Try a different USB port or a different cable.
- Monitor Check: Ensure your external monitors are properly connected and powered on.
- Docking Station Dance: If using a docking station, check that all the cables connected to it are secure.
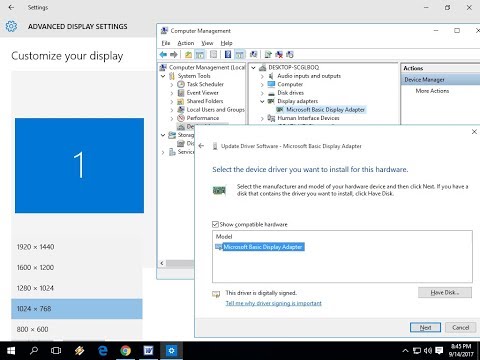
6. The Device Manager Detective: Unveiling Hidden Conflicts
Device Manager is your digital detective, helping you spot any conflicts or issues with your devices. Here’s how to use it:
- Open Device Manager: Search for "Device Manager" in your Windows search bar.
- Expand Display Adapters: Look for your DisplayLink device, which may appear under "Display adapters."
- Check for Errors: Look for any yellow exclamation marks or red crosses, indicating a problem. Right-click on the device and troubleshoot.
7. Software Showdown: Identify and Eliminate Conflicts
Sometimes, another piece of software is causing chaos in the matrix. Try these steps:
- Close Unnecessary Programs: Close down any programs that might be interfering with the DisplayLink drivers.
- Check Task Manager: Use Ctrl + Shift + Esc to open Task Manager and monitor system processes. Identify any processes using excessive resources that might be impacting DisplayLink.
8. Hardware Hurdle: Addressing Physical Deficiencies
While less common, hardware issues can occur. Here are the steps to troubleshoot:
- Test External Monitors: Connect a different monitor to your DisplayLink device to see if the problem is within the device itself.
- Try Different Ports: If you are using USB, try another port on your laptop.
9. Display Settings Diagnosis: Fine-Tuning the Visual Experience
Sometimes, the settings on your laptop may cause problems with your external displays.
- Duplicate, Extend, or Project: Play with the display settings and configurations to ensure proper monitor detection.
10. DisplayLink Diagnostic Tool: Let the Professionals Do the Work
DisplayLink provides its diagnostic tools. This tool can analyze your system and identify potential problems. It's like having a digital doctor diagnose the issues!
11. The Docking Station Drill Down: Isolating the Hub's Role
If you're using a docking station, the culprit might be the hub itself.
- Test Without Docking Station: Connect a single monitor directly to your laptop (bypassing the docking station) to see if it works. If it does, the docking station is likely the problem.
12. Windows Updates Waltz: Keeping Your OS in Sync
Make sure your operating system is up-to-date! Windows updates often include driver improvements and bug fixes that can resolve DisplayLink issues.
13. The Ultimate Clean Install: A Fresh Start for Your DisplayLink
If all else fails, a clean install of the DisplayLink drivers might be the ticket. It is the digital equivalent of a complete system reset.
14. Backup Plan: Preparing for the Worst-Case Scenario
Always have a backup plan ready.
- Create a System Restore Point: Before making any major changes, create a system restore point so you can revert to a previous working state if needed.
15. Seek Professional Help: When Expertise is Paramount
When all troubleshooting attempts have failed, it is time to seek professional help. Contact the DisplayLink support team or consult with a computer repair expert.
So, there you have it: a comprehensive guide to tackling the dreaded "laptop screen dead after DisplayLink" predicament. Remember, take a deep breath, follow these steps methodically, and don't be afraid to experiment. Think of it as a digital puzzle; with patience and persistence, you'll bring that screen back to life!
Frequently Asked Questions (FAQs)
- Q: My laptop screen goes black only when I connect a specific monitor. What's the problem?
- A: The issue likely lies with the monitor itself or its compatibility with the DisplayLink setup. Test other monitors or look for driver updates for the monitor.
- Q: My DisplayLink adapter is heating up. Is this normal?
- A: Some heat is normal, but excessive heat can indicate hardware issues. Ensure proper ventilation around the adapter and docking station. If it's persistently hot, consider replacing it.
- Q: How do I know if my DisplayLink driver is up-to-date?
- A: Visit the DisplayLink website or the support page for your docking station/adapter. Check the latest available driver and compare it to the version installed on your computer (visible in the Device Manager).
- Q: I can see my external monitors, but my laptop screen is black. What do I do?
- A: The issue is likely with your laptop's display settings. Try pressing the Windows key + P and select "Extend" to use both screens. If the screen is still black, update or reinstall your DisplayLink device.
- Q: My docking station isn't working, and nothing seems to solve the problem. What should I do?
- A: Check all connections. If it still does not work, contact the manufacturer for support or replacement.
Principal Keywords: DisplayLink Dead Screen Fix
SEO Headline: DisplayLink Dead Screen? Quick Fixes Inside!
Pathway: Fix DisplayLink Screen
Meta Summary: Laptop screen dead after DisplayLink? Don't panic! This guide provides easy,
Airtel Hotspot Nightmare? Fix Your Laptop Connection NOW!Troubleshoot Dual Monitor Setup Windows 1110 Not Detecting Second Monitor 2023

By EasyTechGeek Troubleshoot Dual Monitor Setup Windows 1110 Not Detecting Second Monitor 2023 by EasyTechGeek
How to fix black screen after updating to the Microsoft Basic Display Adapter - WITHOUT SafeMode

By Liam L How to fix black screen after updating to the Microsoft Basic Display Adapter - WITHOUT SafeMode by Liam L
How to FIX Windows 10 Not Detecting Second Monitor in 60 seconds

By Juri Fab How to FIX Windows 10 Not Detecting Second Monitor in 60 seconds by Juri Fab
Title: Easily Install Display Driver for your LaptopPC Windows 108.17
Channel: MJ Tube
Easily Install Display Driver for your LaptopPC Windows 108.17 by MJ Tube
Laptop Wifi Hotspot
Title: Unveiling the Secrets of Sustainable Urban Gardening: A Comprehensive Guide to Cultivating Green Havens
Imagine a world where vibrant green spaces flourish amidst the steel and concrete of our cities, where the taste of freshly harvested produce is a daily delight, and where the simple act of gardening connects us to nature's rhythms. This isn't a utopian fantasy; it's the achievable reality of sustainable urban gardening. For years, we have refined our methods, learned from countless experiments, and witnessed firsthand the transformative power of cultivating green havens within the urban landscape. This guide is not just a collection of tips; it's a pathway to building a thriving, resilient urban garden that benefits both you and the environment.
Understanding the Foundation: The Principles of Sustainable Urban Gardening
Sustainable urban gardening goes beyond the conventional practice of growing plants; it's a holistic approach centered on environmental responsibility, resource conservation, and community building. This foundation rests upon several core principles that guide our practices.
Soil Health is Paramount: We prioritize building rich, fertile soil. This isn't simply about adding fertilizer; it’s about creating a living ecosystem teeming with beneficial microbes, earthworms, and other organisms. We achieve this through composting, using organic amendments like well-rotted manure and leaf mold, and employing cover cropping to enrich the soil and prevent erosion. Healthy soil holds water better, reduces the need for chemical inputs, and produces plants that are remarkably resilient.
Water Conservation Through Smart Practices: Water is a precious resource, especially in urban environments. Our approach focuses on water conservation. We meticulously select drought-tolerant plant varieties whenever possible. We employ efficient irrigation methods such as drip irrigation and soaker hoses, ensuring water is delivered directly to the roots, minimizing waste through evaporation. We also implement rainwater harvesting systems to collect and store water for irrigation.
Embracing Organic Practices & Avoiding Synthetic Chemicals: We believe in the power of nature. Our gardens are free from synthetic pesticides, herbicides, and fertilizers. We opt for organic methods, using natural pest repellents such as companion planting, introducing beneficial insects, and hand-picking pests when necessary. For fertilizing, we rely on compost, compost tea, and organic amendments that nourish plants and preserve soil health.
Maximizing Space and Yield: Vertical Gardening and Intensive Planting Techniques: Urban gardening often involves limited space. We master techniques to maximize yields in small areas. We utilize vertical gardening structures like trellises, hanging baskets, and green walls to cultivate plants upwards, saving precious ground space. We employ intensive planting strategies, such as succession planting and intercropping, to ensure a constant supply of fresh produce throughout the growing season.
Building Community: Gardening with Your Neighbors and Sharing Knowledge: Gardening is not merely an individual endeavor; it is a community-building activity. We actively share our knowledge and experience with neighbors, participate in community gardens, and encourage collaboration. We believe that by sharing resources, expertise, and produce, we can create vibrant and supportive green spaces that benefit everyone.
Choosing the Right Plants for Your Urban Garden
Selecting the appropriate plants is crucial to the success of your urban garden. We will provide guidance with how to select plants that thrive in urban conditions.
Assessing Your Microclimate: Sunlight, Shade, and Wind: Before selecting any plants, we assess your specific microclimate. How much sunlight does your space receive? Is it exposed to strong winds? Understanding these factors will help you choose plants which thrive in your environment. Remember, a sunny south-facing balcony differs significantly from a shady courtyard.
Selecting Varieties That Thrive in Containers: Container gardening is an excellent option for urban environments. We have identified numerous productive, space-saving, and visually appealing species well-suited for pots, planters, and raised beds. Dwarf varieties of tomatoes, peppers, and eggplants are ideal choices. Herbs like basil, mint, and chives flourish in containers, as do strawberries and compact bush beans.
Prioritizing Edible and Ornamental Varieties in Your Garden: The most rewarding urban gardens blend functionality and beauty. We skillfully combine delicious edibles and stunning ornamentals. We recommend prioritizing fruits, vegetables, and herbs appropriate to your space, while also incorporating flowers to attract pollinators. Pairing edible plants with ornamental flowers creates a visually appealing and biodiverse garden.
Understanding Growing Seasons and Planting Schedules: Successful gardening follows the seasons. We understand the critical importance of planting at the right time to give each plant the best chance of thrive. We meticulously consult local planting calendars. We use this as part of the planning for the growing season. We carefully factor in the length of the growing season, the last frost date, and the specific light and temperature requirements of each plant.
Building Your Urban Garden: Practical Advice
Turning your urban space into a thriving garden requires some practical steps.
Preparing the Soil: The Key to Plant Success: Preparing the soil is paramount. We recommend starting with a soil test to determine its existing nutrient levels and pH. Based on results, we then amend the soil with organic matter. For container gardens, we use a quality potting mix made from a blend of compost, peat moss, and perlite. We also build raised beds to elevate garden soil.
Choosing the Right Containers and Structures: From Balconies to Rooftops: We choose from several styles of containers with options to meet the requirements. Choose containers made of durable, weather-resistant materials such as terracotta, wood, or recycled plastic. Ensure containers have adequate drainage holes. We construct vertical gardening structures, such as trellises and stacked planters. Always design the space to maximize yields and aesthetic appeal.
Watering Techniques for Optimal Hydration: Proper watering is essential, especially in urban settings with limited rainfall. We recommend watering deeply and less frequently, encouraging deep root growth. We use drip irrigation systems, which deliver water directly to the root zone. We harvest rainwater using rain barrels.
Effective Pest and Disease Control: Organic Approaches: Pest and disease management are necessary. We prioritize organic methods to maintain a healthy ecosystem. We introduce beneficial insects like ladybugs and lacewings. We use insecticidal soap and neem oil. We also know how to use companion planting to deter pests.
Maintaining Your Urban Garden: Ongoing Care and Success
Creating a flourishing urban garden is only the first step; ongoing care ensures its sustained success.
Regular Watering and Nutrient Replenishment: Consistent watering is crucial. We replenish nutrients, usually by using compost tea or liquid organic fertilizers. We observe plants for signs of stress, which can indicate either under or overwatering.
Weeding, Pruning, and Harvesting: Regular weeding prevents competition for resources. Pruning encourages healthier growth and increased yields. Harvesting at the peak of ripeness ensures the best flavor and nutritional value.
Extending the Growing Season: Season Extension Technologies: We use season-extension techniques to extend the harvest window. We use row covers to protect plants from frost. We use cold frames to create miniature greenhouses. We cover the growth on plants with these as needed.
Preserving Your Harvest: Making the Most of Your Bounty: We maximize the bounty from our gardens by preserving the harvest for later use. We can preserve our harvest through canning, freezing, drying, and pickling.
Conclusion: Cultivating a Greener Future, One Garden at a Time
Sustainable urban gardening is more than a trend; it's a movement. It's a powerful way to connect with nature, improve our health, and build stronger communities. By embracing these principles and techniques, you can transform your urban space into a vibrant green haven, contributing to a more sustainable and resilient future. We invite you to start your urban gardening journey today. We hope you have fun, and remember knowledge grows with every harvest.
