how to check if mic is working on laptop
Title: how to test a microphone working or not, sound recording or not
Channel: Shabd Tech Support
how to test a microphone working or not, sound recording or not by Shabd Tech Support
how to check if mic is working on laptop, how to check your microphone is working on laptop, how to check if your mic is working on laptop, how to check if my mic is working on laptop, how to check if microphone is working on lenovo laptop, how to check if microphone is working on hp laptop, how to check if microphone is working on dell laptop, how to check whether microphone is working or not in laptop, how to check your mic on laptop, how to check for microphone on laptop
Is Your Laptop Mic DEAD? (Quick Fix!)
Laptop Microphone Woes? Don't Panic!
Is your laptop's microphone suddenly gone silent? Has your voice vanished into the digital ether, leaving you frustrated? Well, breathe easy! Before you resign yourself to expensive repairs or replacements, let's troubleshoot. We'll get your microphone working again. This is crucial for video calls, voice recordings, and online meetings, right?
Initial Checks: A Quick Scan
First things first, let's do some basic checks. Ensure your microphone isn't muted. Many laptops have physical mute buttons. They also have software controls. Find the mute icon, usually on the taskbar. Is it crossed out or highlighted? If so, click it to unmute. Often, that's all it takes.
Next, check the volume levels. Navigate to your sound settings. You can usually access this by right-clicking on the speaker icon. Then, check the playback and recording devices. Make sure your microphone is selected as the default and the volume isn't set incredibly low or even muted. Are you using an external microphone? Confirm it’s connected properly. Also, check its power source, if applicable.
Diving into the Settings: Deeper Exploration
If the initial checks don't solve the problem, let’s delve deeper into your system’s settings. The exact steps will vary slightly depending on your operating system (Windows or macOS). We'll cover both. But don't worry! It's usually straightforward.
Windows Whisperer: Troubleshooting on Windows
For Windows users, accessing sound settings is easy. Right-click the speaker icon in the system tray. Select "Open Sound settings." From there, click "Sound Control Panel." This will open a new window. On the "Recording" tab, you’ll see all connected microphones. Is your microphone listed? If so, is there a green checkmark next to it? It should be. If not, right-click your microphone and select "Enable."
Furthermore, right-click your microphone again. Select "Properties." Go to the "Levels" tab. Make sure the microphone volume isn’t too low. Adjust as needed. Also, ensure that “Microphone Boost” isn’t set excessively high. It can introduce unwanted noise. Subsequently, test your microphone. Speak into it and look at the meter. Does it register any sound? If not, it's time to explore further.
macOS Maverick: Navigating the Apple Ecosystem
For macOS users, the process is similarly simple. Click the Apple menu in the top left corner. Then, select "System Preferences" (or "System Settings" on newer versions). Navigate to "Sound." Click the "Input" tab. Select your microphone from the list. Ensure the input volume slider isn't set to zero or muted.
After that, check the "Input" volume meter. Does it react when you speak? Is the correct microphone even selected? Sometimes, if you’ve connected multiple microphones or headsets, macOS can default to the wrong one. Thus, double-check these settings.
App Specific Issues: Pinpointing the Culprit
Sometimes, the issue isn't with your system-wide settings. It might be specific to a particular application. Before you assume your microphone is completely dead, test it in different applications. Use your built-in voice recorder, a video conferencing app, and any other program that utilizes your microphone. Does it work in some but not in others?
If you're having problems within a specific app, check its settings. Most applications have audio input settings. Make sure your microphone is selected as the input device. Also, check for any mute buttons or volume controls within that application.
Driver Drama? Updating the Software
Outdated or corrupted drivers can also cause microphone problems. To resolve this, you'll need to update your audio drivers.
On Windows: Search for "Device Manager" in the Windows search bar. Expand the "Sound, video and game controllers" section. Right-click on your audio device (which should be your microphone or the device your microphone is connected to). Select "Update driver." Choose to search automatically for updated drivers. This can solve many problems.
On macOS: macOS usually handles driver updates automatically. However, check for software updates in "System Preferences" (or "System Settings") under "Software Update." Ensure your system is fully updated.
Hardware Hurdles: Physical Connections & Damage
Is your microphone physically damaged? Examine it closely. Look for any visible damage to the microphone itself, the cable (if applicable), and the port. If the connection is loose, try wiggling the cable to see if you get any audio. If it is a USB microphone, try a different USB port.
Unfortunately, if the microphone itself is damaged, you may need to replace it.
Final Thoughts: Success or Still Silent?
By following these steps, you should be able to get your laptop microphone working again. Hopefully, you've solved the issue! If you've tried all these solutions and your microphone remains stubbornly silent, it might be a hardware problem. In that case, consider seeking professional repair. But don't worry! Many issues are easily fixable. The most important factor is to remain calm and patient. Good luck!
DELL Laptop Keyboard Disaster! (Solved!)Is Your Laptop Mic DEAD? (Quick Fix!)
Ever been in the middle of a crucial video call, a thrilling online game, or perhaps just trying to record a voice memo, only to be met with… silence? We've all been there. That dreaded realization: "Is my laptop mic dead?" Don't panic! We're diving deep into this frustrating tech hurdle, offering a roadmap filled with practical solutions, quick fixes, and a bit of tech-therapy to get your voice back online. Think of it as a digital lung transplant for your laptop – we're here to help you breathe life (and sound) back into it.
1. The Sound of Silence: Recognizing the Mic's Demise
Before we start wrenching on our digital gadgets, let's pinpoint exactly what's going wrong. Is your laptop microphone truly deceased, or is it simply… on a vacation? This is where careful observation comes into play.
- No Input Detected: Are you seeing absolutely nothing registering when you speak into your mic? No little bars moving, no indication of even the faintest sound? That’s a red flag.
- Distorted Audio: Maybe you can hear something, but it's a garbled mess – crackling, echoing, or sounding like you're talking through a tin can.
- Complete Audio Failure: Is the microphone completely silent? Can other people not hear you at all in calls, or is your recording software picking up no sound whatsoever?
These are the signs that we need to roll up our sleeves and get to work. Consider your laptop microphone as akin to a delicate instrument. Like a violin string, it can be easily affected by the smallest detail. So, we'll dissect these issues and try to pinpoint the problem.
2. Basic Checks: Quick Wins Before We Get Serious
Before you start tearing your hair out, let's cover the easy stuff. Sometimes, the simplest solutions are the most effective (and also save you a whole lot of time).
- Check the Mute Button: This is the most embarrassing, but also the most common culprit! Ensure your microphone isn’t accidentally muted, either on your laptop itself (look for a mute button on the keyboard or a dedicated mute switch) or within the specific application you're using (Zoom, Skype, etc.). Trust me, we’ve all done it.
- Volume Levels: Are your microphone’s volume levels turned way down? Head into your sound settings (more on how to do that later) and make sure the input volume is adequate. Think of it as giving your microphone its daily dose of audio vitamins.
- Application Permissions: Some applications need permission from your operating system to access your microphone. Make sure the app you're using has the necessary permissions granted. It's like giving it a key to the audio kingdom.
3. Diving into Device Manager: The Tech Detective's First Stop
Now, let's dig a little deeper. Device Manager is your laptop's backstage pass to understanding its hardware. It’s where you can see the status of your microphone (and other devices) and troubleshoot potential driver issues.
- Accessing Device Manager: Locate Device Manager. On Windows, you can usually find it by typing "Device Manager" into the search bar. On macOS, the process is less straightforward. You'll go to System Information, select "Hardware," then choose "Audio."
- Locate Your Microphone: In Device Manager (Windows) or the System Information (macOS), find your microphone listed under "Sound, video and game controllers" or "Audio Inputs and Outputs." Look for any yellow exclamation marks or red crosses – these indicate a problem. It's like a digital "Wanted" poster for a malfunctioning device.
- Update Device Drivers: Right-click on your microphone device and, if available, select "Update driver." This will prompt your computer to search for the latest drivers online and install them. Drivers are like the translators for your hardware and software. When they are old, the communication breaks down.
- Uninstall and Reinstall Drivers: If updating doesn't work, try uninstalling the driver and then restarting your computer. Windows will try to automatically reinstall the driver. This is like giving your microphone a fresh start.
4. Sound Settings Symphony: Tuning Your Audio
Your operating system's sound settings are the control panel for all of your audio input and output. This is where you'll configure your microphone settings and make sure everything is configured correctly.
- Accessing Sound Settings: Right-click the sound icon in your system tray (usually in the bottom right corner of your screen) and select "Sounds" or "Open Sound settings."
- Input Device Selection: Make sure your desired microphone is selected as the default input device. Your laptop might have multiple microphones (built-in, external, etc.), so choose the one you want to use.
- Input Volume Adjustment: Adjust the input volume slider to a level that works well.
- Troubleshooting: Try running the built-in troubleshooting tools in your sound settings. These often identify common problems and offer solutions. Think of them as the helpful digital handymen.
5. External Microphone Intervention: The Easy Bypass
Sometimes, the internal mic on your laptop just isn’t up to snuff, or perhaps it’s a hardware failure. If you have an external microphone (a headset, a USB mic, etc.), try it.
- Plug and Play: Simply connect your external microphone to your laptop (via USB, audio jack, or Bluetooth) and test it.
- Select the External Mic: In your sound settings, make sure the external microphone is selected as your default input device.
- If the External Mic Works: This suggests the internal microphone in your laptop has suffered a misfortune.
6. Hardware Assessment: Inspecting the Physical Components
Let's get physical. Sometimes, a hardware problem is the root cause.
- Inspect the Microphone Opening: Is the small hole for the microphone clear of debris? Does it look like some dust or dirt is obstructing the sound? Sometimes a gentle puff of air or a small amount of rubbing alcohol on a swab can clear it.
- Check for Physical Damage: Look for any visible signs of damage to the microphone or the surrounding area. Were there any recent spills or drops?
- Professional Inspection: If you suspect a hardware problem (and especially if your laptop is still under warranty), it’s best to consult a professional or the manufacturer. It's like calling the paramedics for your laptop.
7. Software Conflicts: The Audio Saboteurs
Sometimes, the villain of our story is a software conflict. It's like having two singers trying to occupy the same stage at the same time.
- Close Unnecessary Applications: Close any other applications that might be using the microphone (e.g., video conferencing software, voice recording software). If several apps are vying for the microphone's attention, things can get confused.
- Check for Background Processes: Use your Task Manager (Windows) or Activity Monitor (macOS) to see if any background processes are hogging your microphone.
- Restart Your Computer: A simple restart can often resolve software conflicts.
8. Driver Rollback: Going Back in Time
If you recently updated your audio drivers and the microphone stopped working afterward, it's possible the new drivers are the problem.
- Device Manager's Rollback Option: In Device Manager, right-click on your microphone device, select "Properties," then go to the "Driver" tab. Look for a "Roll Back Driver" option.
- Selecting a Previous Version: Windows will then install a previous version of the driver. It's like rewinding a movie to see the scene played out differently.
9. BIOS/UEFI Tweaks: The Deep Dive (Use with Caution!)
BIOS or UEFI settings control your laptop's initial boot-up. While this is not commonly needed, there are rare cases where sound settings can be messed up at this level.
- Accessing BIOS/UEFI: You'll need to restart your laptop and press a specific key (often Del, F2, F12, or Esc) during startup to access the BIOS/UEFI settings.
- Audio Configuration: Look for an audio or sound section in the BIOS/UEFI settings and ensure the internal microphone is enabled. This is a setting for advanced users and should be approached with caution.
- Caution: Incorrect BIOS changes can cause problems.
10. Resetting Your Operating System: The Nuclear Option
If all else fails, a system reset might be your last resort (before calling for professional help).
- Windows Reset: In Windows, navigate to "Settings" > "Update & Security" > "Recovery" and choose "Reset this PC." You can choose to keep your files or wipe everything.
- macOS Reinstall: On macOS, you can reinstall the operating system from the Recovery partition.
- Data Backup: Always back up your important data before performing a system reset! Think of it as giving your computer a complete overhaul.
11. Software Updates: Keeping Your Tech Fresh
Ensure your operating system and any sound-related software are up to date.
- Operating System Updates: Install the latest updates for Windows or macOS. These updates often include driver and software patches.
- Audio Software Updates: Check for updates to any audio recording,
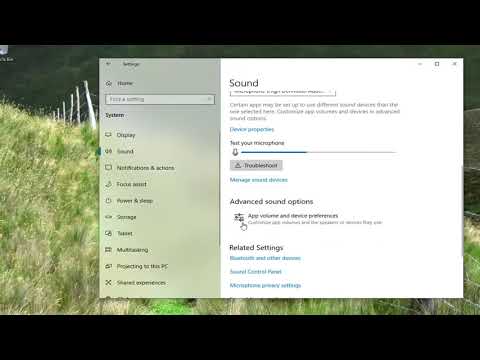
Fix Microphone Not Working on Windows 10

By The Geek Page Fix Microphone Not Working on Windows 10 by The Geek Page
How To Fix Mic Not Working On PC - Full Guide
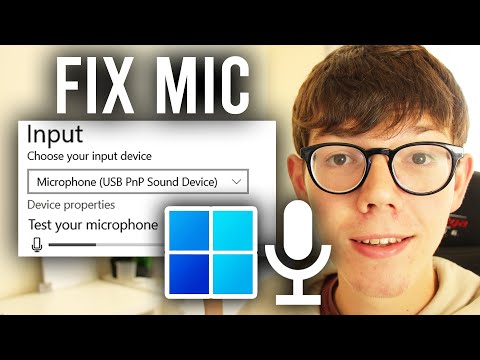
By GuideRealm How To Fix Mic Not Working On PC - Full Guide by GuideRealm
How to use earphones as mic on pc windows 10
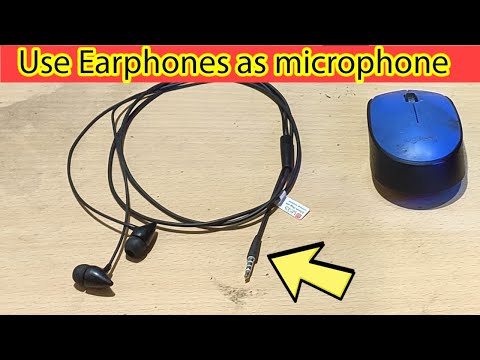
By IT Magics How to use earphones as mic on pc windows 10 by IT Magics
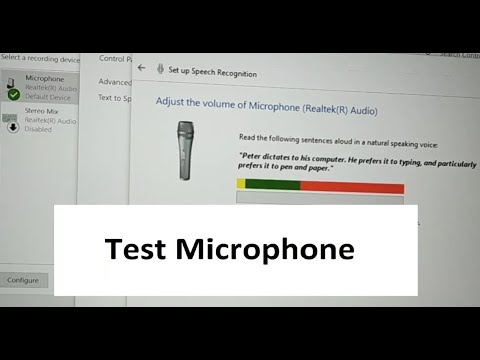
Title: How to Set up and Test a Microphone on Windows 10 Tutorial
Channel: MDTechVideos
How to Set up and Test a Microphone on Windows 10 Tutorial by MDTechVideos
Laptop Wifi Connect
Is Your Laptop Mic DEAD? (Quick Fix!)
We've all been there. You're in a crucial video call, about to deliver a presentation, or recording that all-important podcast episode, and suddenly… silence. Your laptop microphone, the unsung hero of digital communication, has seemingly vanished. Don't panic! Before you resign yourself to buying a new microphone or, worse, missing that critical opportunity, let's dive into the troubleshooting trenches. We'll explore a systematic approach to revive your laptop's microphone, empowering you to reclaim your voice in the digital world.
Initial Diagnostic: Is It Really Dead, or Just Sleeping?
Before jumping into complex solutions, let's perform a quick triage. First, confirm the obvious. Is the microphone physically connected? If you're using an external microphone, ensure it's securely plugged into the correct port. Check for any loose connections or frayed wires. If the external mic utilizes a USB connection, try a different USB port, as sometimes a faulty port can be the culprit. Similarly, a Bluetooth microphone should be properly paired and powered on.
Next, let's rule out the most common cause: simple user error. Double-check the software you're using. Is the microphone muted within the application? Most video conferencing software (Zoom, Microsoft Teams, Google Meet, etc.) and recording programs have dedicated mute buttons. Accidentally clicking it is a frequent occurrence. Also, ensure the correct microphone is selected as the input device within the program’s audio settings. Many laptops have built-in microphones, and if you’ve plugged another one in, then the built-in may have been selected by default. You may need to switch the audio input.
Finally, let's test the mic itself. Launch your operating system's sound recording application. (Windows has "Voice Recorder," macOS has "Voice Memos.") Attempt to record a short audio clip. If you hear nothing during playback, that confirms a problem. If the recording playback is faint, distorted, or crackly, the microphone might be functioning, but it could need significant adjustment.
Unearthing the Source: Diving Deep into Software Settings
Assuming the initial checks proved unfruitful, it's time to delve into the operating system's audio settings. These settings are the command center for your microphone, and often, the solution to your audio woes lies within them.
For Windows Users:
- Access the Sound Settings: Right-click on the speaker icon in the system tray (usually located in the bottom-right corner of your screen). Select "Open Sound settings."
- Navigate to Input Devices: In the Sound settings window, locate the "Input" section. This section displays the currently connected microphones. Ensure your laptop mic (or the external mic) is listed here. If it isn't, the system may not recognize it, and a driver issue could very well exist (see below).
- Selecting the Correct Input: If multiple microphones are listed, choose the one you intend to use. Use the dropdown menu to select your desired device.
- Adjusting Input Volume: Click on "Device properties" beneath the selected microphone. This opens a window where you can adjust the input volume. Ensure the volume slider is at an appropriate level. A low volume setting can result in your voice being inaudible.
- Troubleshooting: Within the device properties settings, you may find troubleshooting options that can automatically diagnose and fix some common microphone problems.
For macOS Users:
- Access Sound Preferences: Click the Apple menu in the top-left corner of your screen and select "System Preferences."
- Navigate to Sound: In System Preferences, click on "Sound."
- Select the Input Tab: Click on the "Input" tab. Here, you'll see a list of available microphones.
- Choosing Your Microphone: Select the microphone you want to use.
- Adjusting Input Volume: Adjust the input volume slider to ensure your voice is being heard. There's also a visual input level meter will rise and fall as you speak near the microphone. This visual indication will help you determine whether your microphone is recognizing your voice.
- Testing the Microphone: To test the microphone, try speaking to it while the input level meter displays activity; if not, there may be a problem.
Driver Dilemmas: The Silent Architects of Sound
Drivers are software programs that allow your operating system to communicate with your hardware. If your microphone drivers are outdated or corrupted, it will not function correctly. Fortunately, updating or reinstalling drivers is a relatively straightforward process.
Updating Microphone Drivers (Windows):
- Open Device Manager: Right-click the Windows Start button and select "Device Manager."
- Locate Audio Inputs and Outputs: Expand the "Audio inputs and outputs" section.
- Locate Your Microphone: Right-click on your laptop microphone (it might be listed as "Microphone Array" or something similar).
- Update Driver: Select "Update driver." Choose "Search automatically for drivers" to allow Windows to find and install the latest driver.
- Restart Your Computer: Once the driver installation is complete, restart your computer.
Reinstalling Microphone Drivers (Windows):
If updating the driver doesn't work, it's time to reinstall.
- Follow Steps 1-3 Above.
- Uninstall Driver: Right-click on your microphone and select "Uninstall device."
- Restart Your Computer: Restarting your computer is essential after uninstalling. Windows will typically attempt to reinstall the correct driver automatically during restart.
- Check for Updates (Optional): After the restart, revisit Device Manager and check for driver updates again.
Driver Management (macOS):
macOS generally manages drivers automatically; updates occur with system updates. However, you should update macOS:
- Click the Apple Icon: Click on the Apple icon in the top left corner of your screen.
- Select System Settings: Select "System Settings" from the dropdown.
- Click General: Click on "General."
- Software Update: Click "Software Update."
- Install if available: See if software updates are available. If so, install them.
Permissions Paradox: Granting Access to Your Voice
Modern operating systems have robust security features that control which applications can access your microphone. If the program you’re using hasn't been granted permission, it can't use your microphone.
Checking Microphone Permissions (Windows):
- Open Settings: Press the Windows key + I to open the Settings app.
- Navigate to Privacy & Security: Click "Privacy & security."
- Choose Microphone: Select "Microphone" from the list.
- Enable Microphone Access: Ensure that "Microphone access" is turned on. If it's turned off, toggle it to on.
- App Permissions: Scroll down and ensure that the specific applications you want to use the microphone (e.g., Zoom, Teams, etc.) have permission to access it.
Checking Microphone Permissions (macOS):
- Open System Preferences: Click the Apple menu and select "System Preferences."
- Navigate to "Security & Privacy": Click on "Security & Privacy."
- Select "Microphone": Click on "Microphone" on the left-hand side.
- Grant Access: You'll see a list of applications that have requested microphone access. Ensure the checkbox next to the application you want to use is selected.
Physical Checks: Examination of the Hardware
While software issues are often the culprit, we must not overlook the physical aspects.
Laptop Microphone Location:
Determine the location of the microphone on your specific laptop model. It might be located near the webcam, the keyboard, or the side of your laptop's chassis. Covering the microphone accidentally is a frequent occurrence.
Clean the Microphone:
Gently clean the microphone with a soft, dry cloth. Dust or debris can sometimes muffle the sound.
External Microphone Issues:
If using an external microphone, you must check that the wiring is not faulty. Also, check the microphone for any visible damage.
The Nuclear Option: Factory Reset (Use with Caution!)
If all else fails, a factory reset is the ultimate troubleshooting step. This will erase all your data and reinstall the operating system, effectively starting from scratch. This should be considered a last resort.
Before a Factory Reset:
- Back up all your essential data: Documents, photos, videos, and any other critical files.
- Note down your software licenses and product keys; you might need them to reinstall your programs.
- Ensure you have a stable internet connection.
Performing a Factory Reset (Windows):
- Open Settings: Press the Windows key + I.
- Navigate to "Update & Security": Click "Update & Security."
- Select "Recovery": Choose "Recovery" from the left-hand menu.
- Reset This PC: Under "Reset this PC," click "Get started."
- Choose Your Option: You'll be given two options: "Keep my files" or "Remove everything." Choose "Remove everything" if you did a backup, and the problem is not resolved. Be certain that you've backed up
