fans on laptop not working

Title: DO THIS IF YOUR LAPTOP COOLING FAN IS NOT WORKING PROPERLY laptops chidonotips
Channel: Chidono Tech Hub
DO THIS IF YOUR LAPTOP COOLING FAN IS NOT WORKING PROPERLY laptops chidonotips by Chidono Tech Hub
fans on laptop not working, cooling fan on laptop not working, fan on dell laptop not working, laptop fans stopped working
Laptop Fans Died? 😱 Fix It NOW!
Laptop Fans: When Silence Screams – A Tech SOS!
The dreaded silence. That unsettling hush that descends when your laptop’s cooling fans bid adieu. Suddenly, your trusty digital companion feels less like a performance machine and more like a tiny, potentially explosive inferno. Fear not, fellow tech traveler! You’re not alone. Because we've all been there. Therefore, let’s dive deep into this issue and get your machine purring like a contented kitten again.
The Tell-Tale Signs: Decoding the Desktop’s Distress Signals
Before we jump into repairs, recognizing the symptoms is crucial. For instance, does your laptop feel like it’s attempting to melt your desk? Moreover, is it sluggish, struggling to perform even basic tasks it used to breeze through? Consequently, you might hear the ominous sound of internal components struggling. Similarly, look for visual cues, too. Are pixels flickering? Also, are programs crashing unexpectedly? Thus, these are all potential indicators your fan has taken a powder.
Dissecting the Culprits: What Kills a Cooling Fan?
What has caused your computer to malfunction? Identifying the root cause is the first step. Unfortunately, laptop fans face a hostile environment. Dust, the bane of all electronics, is a major enemy. This dust buildup acts as insulation. As a result, it traps heat. Subsequently, the fan works harder and fails sooner. Besides, extended periods of heavy use can push fans to their limits. Furthermore, if you're a gamer, you’re likely stressing that fan on the regular! Also, consider mechanical failures: bearings wear out. Accordingly, they become noisy before finally seizing.
Operation: Fan Revival – DIY & Pro Options
Don't panic; there is hope. Reviving your laptop’s cooling system often involves a few key steps. First, always prioritize safety. Consequently, unplug your laptop and remove the battery (if possible). Then, gather your supplies. In fact, you'll need a small Phillips head screwdriver. Also, compressed air is your new best friend. Finally, also consider thermal paste, essential for effective heat transfer.
The DIY Approach: Dusting, Disassembly, and Deep Cleaning
Ready to get your hands dirty? Therefore, let's roll up our sleeves! Begin by carefully opening your laptop. Locate the access panel for your fan (consult your laptop's manual). Afterwards, use the compressed air to blast away dust. Then, take extra care around the fan blades. Likewise, you can use a soft brush if necessary. Remember, be gentle! If the fan is easily accessible, also consider removing it for a more thorough cleaning. Next, check for obstructions like hair or debris. If you're comfortable doing so, apply fresh thermal paste to the CPU and GPU. Finally, reassemble everything carefully.
Seeking Professional Help: When To Call in the Cavalry
Sometimes, the DIY route isn't enough. Indeed, some repairs are simply beyond the average user's skill. Does the fan still hum? Hence, seek professional assistance if you aren't comfortable disassembling your laptop. Importantly, a trained technician can diagnose the problem accurately. Because, they have the tools and expertise to perform more complex repairs. Furthermore, they can replace a faulty fan with a suitable alternative. Additionally, they can also identify underlying issues. Ultimately, this can prevent future problems.
Preventative Measures: Protecting Your Precious Portable
Prevention is always better than cure. You can take several steps to extend your fan's lifespan. Therefore, regularly clean your laptop. Besides, avoid using your laptop on soft surfaces like beds or blankets. Because, these can block airflow. Moreover, consider using a cooling pad. Consequently, these external fans provide extra cooling support. Furthermore, keep the vents clear of obstructions. Also, avoid overclocking your laptop unless necessary. In other words, treat your machine with kindness, and it will return the favor.
The Aftermath: Ensuring Continued Cooling Comfort
Congratulations! Hopefully, you've successfully resurrected your cooling system. Now, monitor your laptop's temperature. In fact, there are several free programs available for this purpose. Similarly, check your CPU and GPU temperatures regularly. By doing so, you can confirm the fix was successful. Therefore, ensure consistent performance. Then, continue practicing the preventative measures discussed earlier. Ultimately, this will help keep your laptop running smoothly. Likewise, it will keep it from becoming a personal furnace.
Final Thoughts: Breathe Easy, Tech Savvy!
Laptop fan failure is inconvenient, but it's often a solvable problem. Whether you embrace the DIY approach or seek professional help, don't let the silence persist. Your digital life depends on a cool, collected machine. Consequently, by understanding the causes and solutions, you can confidently overcome this tech hurdle. Therefore, go forth and conquer!
Lenovo Keyboard Laptop Nightmare? FIX IT NOW!Laptop Fans Died? 😱 Fix It NOW!
Hey everyone! Ever felt that icy dread wash over you when your laptop suddenly sounds like a jet engine taking off…or worse, goes completely silent, followed by the unnerving realization that it's too silent? Yeah, we've all been there. That sinking feeling you get when you suspect your laptop fan has kicked the bucket. Believe me, I've panicked more times than I care to admit. But fear not, because a dead laptop fan doesn't automatically spell the end of your digital life. It just means it’s time to roll up our sleeves (figuratively, of course – nobody wants to shock themselves!) and get to work. Let's dive in and get that fan back to spinning!
Why Your Laptop Fan is Your Best Friend (And What Happens When It Fails)
Think of your laptop's fan as its personal air conditioner. It’s the unsung hero, working tirelessly to keep those delicate internal components – your processor, graphics card, and even the hard drive – from overheating and melting into a puddle of silicon and regret. Without the fan, things get hot… literally. Imagine trying to run a marathon in a sauna. Your laptop feels the same! Overheating can lead to all sorts of nasty problems, from frustrating performance slowdowns to complete system crashes and, in the worst-case scenario, permanent damage. It's a bit like a car engine: without proper cooling, you're headed for trouble, and fast.
Symptoms: How to Spot a Dying Fan
Okay, so how do you know your fan is having a bad day? Here's the lowdown:
- The Jet Engine Effect: That familiar, high-pitched whine that sounds like a tiny airplane trapped inside your laptop. It’s a sign your fan is working overtime, struggling to keep up with the heat. It's the equivalent of your laptop screaming for help!
- Complete Silence: Uh oh. If your laptop used to be a bit noisy and now is eerily quiet, that silence could be the sound of a dead fan. This is the red flag you can’t ignore!
- Random Shut Downs: Overheating can cause your laptop to shut down unexpectedly to protect itself. This is a critical sign – your laptop is essentially saying, "I can't take it anymore!"
- Sluggish Performance: Is everything running slower than usual? Overheating can cause your laptop to "throttle" its performance to reduce heat, making everything feel sluggish. Imagine trying to work when you're constantly fighting a fever – not fun!
- Hot to the Touch: If your laptop feels exceptionally hot, particularly around the vents or the keyboard, your fan isn’t doing its job.
Troubleshooting 101: Before You Panic (And Crack Open That Wallet)
Alright, before you start mentally budgeting for a new laptop (or replacement parts), let’s try a few simple fixes. Think of this as the pre-inspection before heading to the repair shop.
- The Great Restart: Sometimes, all it takes is a good, old-fashioned restart. It's the digital equivalent of pressing the reset button.
- Check for Obstructing Dust Bunnies: Dust is enemy number one. Grab a can of compressed air (seriously, it’s a lifesaver!) and gently blow it into the vents. You might be surprised by what comes out. Think of it like a spring cleaning for your laptop.
- Run a System Scan: Malware can hog resources and cause your laptop to overheat. Run a scan with your antivirus software to make sure nothing nasty is lurking in the background.
- Close Unnecessary Programs: The more applications you have open, the harder your fan has to work. Close down any programs you aren't actively using. It's like giving your fan a breather.
- Update Your Drivers: Outdated drivers can sometimes cause performance issues that lead to overheating. Make sure your drivers, especially for your graphics card, are up to date.
Dust Busters: The Art of Laptop Vent Cleaning (Safely!)
Cleaning your laptop vents is crucial, but doing it wrong can cause more harm than good. Here’s how to do it right:
- Power Down and Unplug: Safety first! Make sure your laptop is completely turned off and unplugged from any power source.
- The Right Tools: A can of compressed air is your best friend. Avoid using a vacuum cleaner, as it can generate static electricity and potentially damage components.
- Target the Vents: Locate the vents (usually on the sides, back, or bottom of your laptop).
- Short Bursts: Use short bursts of compressed air, holding the can upright. Avoid prolonged blasts, which can push dust further in.
- Repeat as Needed: You might need to repeat this process a few times to get rid of all the dust.
Deeper Dive: Checking Your CPU and GPU Temperatures
Want to be absolutely sure your laptop is overheating? Use software to monitor your CPU and GPU temperatures. There are tons of free programs available, like Core Temp or HWMonitor. If your temperatures are consistently above 90°C (194°F) under normal load, you definitely have a problem. It’s like taking your laptop’s temperature – and finding out it has a serious fever!
The Dreaded Fan Replacement: When You Have to Get Your Hands Dirty
If the troubleshooting steps haven’t helped, it’s possible your fan needs to be replaced. This can be a bit daunting, but with the right tools and a little patience, it's doable (sometimes). It does depend on your level of comfort with technology, as it might require taking apart your laptop.
- Research Your Laptop Model: Before you do anything, find out the exact model of your laptop and the specific fan it requires.
- Gather Your Tools: You'll need a small Phillips head screwdriver, possibly a spudger or plastic opening tools (to pry open the case), and a good work surface.
- Consult a Guide: Search online for a teardown guide or video for your specific laptop model. YouTube is your friend here!
- Take Your Time: This is not a race. Go slowly and carefully, keeping track of all the screws and parts. Take pictures as you go to help you remember how everything fits back together.
- Disconnect and Replace: Carefully disconnect the old fan and replace it with the new one.
- Reassemble and Test: Put everything back together and power up your laptop. Hopefully, the sweet sound of a working fan will fill the air!
Laptop Cooling Pads: An External Solution
If you’re not comfortable replacing the fan, or if you want an extra layer of protection, consider a laptop cooling pad. These pads sit underneath your laptop and use fans to blow cool air, helping to reduce heat buildup. Think of it like a portable desk fan for your laptop. They are perfect if you work from home and also use your laptop on your bed.
Preventative Measures: Keeping Your Fan Alive
Prevention is always better than cure. Here’s how to keep your fan happy and healthy for as long as possible:
- Regular Cleaning: Dust your vents regularly (as mentioned above!).
- Proper Ventilation: Don't use your laptop on soft surfaces like beds or couches, as they can block the vents and trap heat. Always use your laptop on a firm, flat surface.
- Monitor Your Usage: Avoid running processor-intensive tasks for extended periods.
- Ambient Temperature: Try to use your laptop is a climate-controlled environment.
When to Call in the Professionals:
There comes a time when DIY is not the best option. If you're not comfortable with the steps outlined above, or if you've tried everything and your fan is still dead, it's time to consider getting professional help. A qualified technician can diagnose the problem, replace the fan (or other components), and get your laptop back up and running.
Choosing the Right Fan Replacement: A Quick Guide
Finding the right replacement fan is essential. Here’s what to consider:
- Compatibility: Ensure the fan is specifically designed for your laptop model.
- Specs: Check the voltage, amperage, and connector type.
- Brand Reputation: Opt for reputable brands to ensure quality and reliability.
- Reviews: Read reviews from other users to gauge performance and longevity.
Understanding the Tech Speak: RPM, CFM, and Decibels
Ever wondered what all those numbers mean when you're looking at fan specs? Here's a quick breakdown:
- RPM (Revolutions Per Minute): Indicates how fast the fan spins. Higher RPMs generally mean more airflow and cooling but can also mean more noise.
- CFM (Cubic Feet Per Minute): Measures the volume of air the fan moves per minute. Higher CFM = more cooling potential.
- Decibels (dB): Measures the loudness of the fan. Lower dB = quieter operation.
Laptop Overheating FAQs
I've gotten questions from friends, family, and even people online about this topic. Here are some common questions:
- Q: Can a dead fan damage my laptop? A: Yes, absolutely. Overheating can lead to component failure and shorten the lifespan of your laptop.
- **Q: How long does a
Laptop Computer PC Fan Not Spinning Not Turning Overheat Overheating Grease Lubricate Repair Fix

By It's Binh Been Repaired & Everything Reviewed Laptop Computer PC Fan Not Spinning Not Turning Overheat Overheating Grease Lubricate Repair Fix by It's Binh Been Repaired & Everything Reviewed
How to solve a overheating issue when the fan is good but not spinning
By Electronics Repair School How to solve a overheating issue when the fan is good but not spinning by Electronics Repair School
Dell E6410 Laptop Fan Not Spin CaseStudy Fan Not Working. LivePractical
By DCIT TECH Dell E6410 Laptop Fan Not Spin CaseStudy Fan Not Working. LivePractical by DCIT TECH
Title: Hp Laptop Fan not Working l Mini Vlog l Day 537 shorts vlog minivlog
Channel: RaghuveerCV
Hp Laptop Fan not Working l Mini Vlog l Day 537 shorts vlog minivlog by RaghuveerCV
Wifi Not Found
Laptop Fans Died? 😱 Fix It NOW!
We've all been there. The hum of your trusty laptop, a familiar comfort, suddenly vanishes, replaced by an ominous silence. Then, the dreaded heat. Your palms begin to perspire as the underside of your machine becomes a searing inferno. You know it: your laptop fans have died. And the consequences of ignoring this digital emergency can be dire. This isn't just about inconvenience; it's about protecting your investment, preserving your data, and saving yourself a mountain of potential headaches. This comprehensive guide will equip you with the knowledge and practical steps to diagnose, troubleshoot, and, most importantly, fix your laptop fan issues, ensuring your device runs cool, quiet, and continues to perform optimally.
Identifying the Culprit: Recognizing the Symptoms of Fan Failure
Before you dive into repairs, you must accurately identify the problem. While the most obvious symptom is the complete absence of fan noise, several other telltale signs will point you in the right direction.
- Overheating: This is the most immediate and critical indicator. If your laptop's base is uncomfortably hot to the touch, especially after periods of use, you've likely got a cooling issue. Feel the vents; are they belching out hot air? If not, your fan is failing to do its job.
- Sudden Shutdowns: Overheating triggers built-in protection mechanisms that automatically shut down your laptop to prevent permanent damage to the CPU and other sensitive components. Frequent, unexpected shutdowns are a strong signal of a cooling problem.
- Performance Degradation: When the CPU is overheating, it "throttles" its performance to prevent damage. This means your laptop will run significantly slower than usual. Applications may freeze, lag, or crash altogether. Gaming becomes a frustrating slideshow.
- Unusual Noises (or Lack Thereof): A healthy laptop fan usually produces a consistent, low hum. When it starts failing, you might hear grinding, clicking, or a whirring sound that comes and goes. Ultimately it may simply go silent.
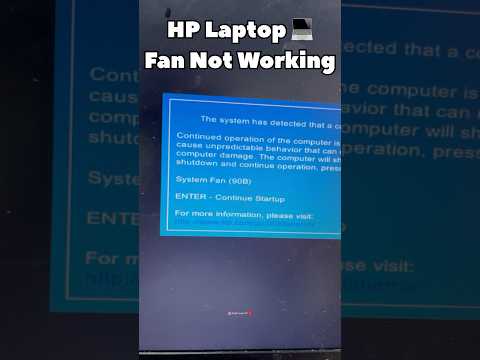
- Error Messages: In some cases, the BIOS (Basic Input/Output System) upon startup may display an error message related to fan failure. These can vary, but they generally alert you to a serious cooling problem.
The Preliminary Procedures: Initial Troubleshooting Steps
Before you start taking your laptop apart, execute a few basic troubleshooting steps. These can sometimes resolve simple issues and prevent unnecessary disassembly.
- External Inspection:
- Dust Buildup: Dust is a fan's worst enemy. Inspect the vents (typically located on the sides or bottom of your laptop) for significant dust accumulation. Use a can of compressed air to carefully blow out the debris. Make sure your laptop is powered off as you do this. Don't use a vacuum cleaner; it can generate static electricity which is the bane of electronics.
- Obstructions: Check for anything blocking the vents, such as fabric, paper, or other objects.
- Software Checks:
- Resource-Intensive Programs: Close any applications that are aggressively consuming CPU resources. Use the Task Manager (Windows) or Activity Monitor (macOS) to identify processes hogging processing power. A program running in the background, unknowingly, could be the problem.
- Driver Updates: Outdated or corrupt drivers can sometimes cause fan issues. Update your graphics card and chipset drivers from the manufacturer's website or through your operating system's update utility.
- BIOS Settings: Some BIOS settings control fan behavior. Consult your laptop's manual to ensure the fan is not set to a "low power" mode or that performance isn't limited.
- Restart and Monitor: After performing these initial checks, restart your laptop and carefully monitor the fan's behavior and the temperature of the device. Observe fan activity during the boot process.
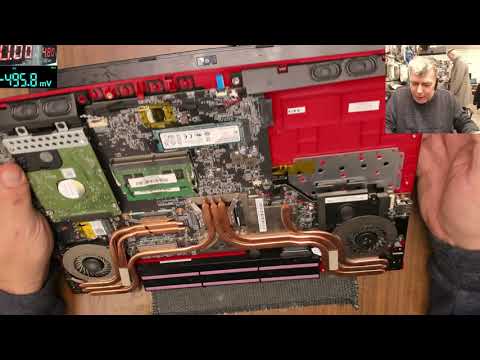
Deep Dive: Disassembly and Inspection of Your Laptop Fans
If the preliminary steps don't solve the problem, it's time to get serious. Be aware that opening your laptop may void your warranty. Only proceed if you're comfortable with this risk.
- Gather Your Supplies: You will need these items:
- A suitable workspace: Select a clean, well-lit area with plenty of space.
- A small Phillips head screwdriver set: Many laptops use specialized screws, so a comprehensive set is recommended.
- Anti-static wrist strap: Essential to prevent static discharge, which can damage delicate electronic components.
- Compressed air: For cleaning the fan and surrounding components.
- A microfiber cloth: For wiping down components.
- Optional: Thermal paste: You may need to reapply thermal paste to the CPU.
- A small plastic pry tool: helpful for separating the cover.
- Small containers: Keep track of screws.
- Power Down and Disconnect Everything: Completely shut down your laptop. Disconnect the power adapter and remove the battery. This is a necessary safety precaution.
- Locate the Access Panel: Refer to your laptop's service manual (available online) to find out how to access the fan assembly. This may involve removing the bottom panel, keyboard, or other components.
- Carefully Remove the Screws: Use your screwdriver set to carefully remove the screws securing the access panel. Keep track of these screws; label them or put them in a small container to avoid confusion during reassembly.
- Detach the Panel: Gently use the plastic pry tool to separate the access panel. Work slowly and carefully to avoid damaging any clips or connections.
- Inspect the Fan Assembly:
- Visual Inspection: Examine the fan and its surrounding components for any obvious signs of damage, like broken fan blades or frayed wires.
- Dust Buildup (Again): Use the compressed air to thoroughly clean the fan and heat sink. Focus on removing dust and debris from the fan blades, the heat sink fins, and any vents.
- Fan Blade Inspection: check the blade for any damage.
- Fan Rotation: Gently try to spin the fan blades with your finger. If the fan feels stiff, hard to move, or makes a grinding noise, it's likely the fan motor has failed and needs replacement.
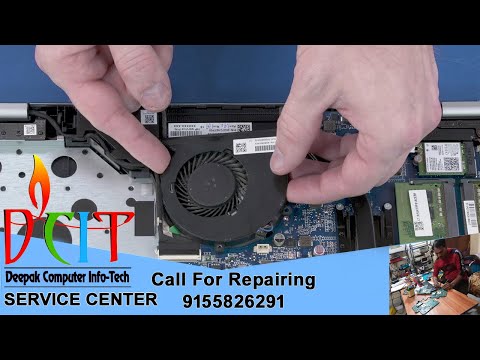
- Detach the Fan:
- Disconnect the Fan Cable: Locate the fan cable, which connects the fan to the motherboard. Gently unplug the connector. Be careful not to pull on the wires.
- Remove the Fan Mounting Screws: Unscrew the screws holding the fan in place.
- Remove the Fan: Carefully lift the fan assembly out of the laptop.
Fan Replacement and Thermal Paste Application
If the inspection confirms that your fan is the problem, you'll need to replace it.
- Find a Replacement Fan:
- Identify the Part Number: The fan usually has a part number printed on it. Use this to search for a replacement online.
- Compatibility: Ensure the replacement fan is compatible with your laptop model.
- Purchase from a Reputable Source: Buy from a reliable vendor to guarantee quality and avoid counterfeit parts.
- Replace the Fan:
- Install the New Fan: Place the new fan in the same location as the old one.
- Secure the Fan: Screw the fan in place, using the original screws.
- Reconnect the Fan Cable: Securely plug the fan cable back into the motherboard.
- Thermal Paste Application (Optional but Recommended):
- Why Thermal Paste? Old thermal paste can dry out over time, reducing the efficiency of heat transfer between the CPU (or GPU) and the heat sink. Replacing the thermal paste can significantly improve cooling performance.
- Remove the Heat Sink: If you have not previously disconnected the heat sink, carefully remove it. Some laptops have their heat sink directly attached to the CPU, so be extra careful.
- Clean the Surfaces: Using a microfiber cloth and isopropyl alcohol, carefully clean the old thermal paste from the CPU (or GPU) and the heat sink. Ensure the surfaces are completely clean and dry.
- Apply the New Thermal Paste: Apply a small amount of thermal paste (around the size of a grain of rice, or a pea) to the center of the CPU (or GPU). The paste should be of high quality.
- Reattach the Heat Sink: Carefully place the heat sink back on top of the CPU. Make sure to align it correctly. Screw it back into place.
- Reassemble the Laptop:
- Replace the Access Panel: Carefully replace the access panel.
- Secure the Screws: Refasten the screws that secure the access panel.
Final Steps: Testing and Prevention
Once you've replaced the fan and reassembled your laptop, it's time to test your work.
- Reinstall the Battery and Power Adapter: Connect the power adapter.
- Power On and Monitor: Power up your laptop and observe the fan's behavior. Listen for the gentle hum.
- Monitor Temperatures: Run your laptop for an extended period. Monitor the temperature using software like HWMonitor or Core Temp. The CPU and GPU temperatures should remain within acceptable ranges.
- Stress Test (Optional): To further test the cooling system,
