battery charger laptop not working

Title: Laptop Battery Not Charging Fix
Channel: Champy Tech Tutorials
Laptop Battery Not Charging Fix by Champy Tech Tutorials
battery charger laptop not working, dell laptop battery charger not working, laptop battery not working without charger, laptop charger won't work, laptop charger working but not charging, what to do if laptop charger is not working
Laptop Charger Dead? 😱 This SHOCKING Trick FIXED Mine!
My Laptop Charger Died: A Tech SOS!
The dreaded moment arrived. The screen flickered, the battery icon flashed red, and then… darkness. My laptop charger, a device I’d taken for granted, had given up the ghost. Suddenly, I was stranded. My world of emails and online content had evaporated. Instead, panic started to set in.
The Initial Panic and the Search for Answers
Initially, there was disbelief. Surely, it was a temporary glitch! I frantically wiggled the power cord, hoping for a miracle. Of course, nothing happened. The cold, hard reality sunk in: my charger was dead. Then, I did what anyone would do: I hit Google. I typed in desperate keywords, hoping to find some lightning-fast solution. The search results were, to be honest, overwhelming. I sifted through countless articles, troubleshooting guides, and generic advice.
Discovering the Unexpected Solution: The "Shocking Trick"
However, after sifting through a mountain of potentially useless content, I stumbled upon a seemingly ludicrous suggestion. Honestly, I was skeptical. The article described a surprisingly simple fix, a "shocking trick," if you will. It involved something I wouldn't have even considered previously. Intrigued, I dove deeper.
The suggestion involved the power brick itself. The article recommended a rather unorthodox approach. You see, I had nothing left to lose. Taking a deep breath, I carefully followed the instructions. I won't immediately reveal the trick, because you will have to remain in suspense.
The Steps: A Detailed Breakdown
I started by unplugging the charger from the wall outlet and my laptop. Next, I examined the power brick. Dust was accumulating, I saw. I inspected the entire length of the cable carefully. I then noticed a very minor imperfection.
Now, here's the crucial part. Using a clean, dry cloth, I meticulously cleaned the entire brick. I paid close attention to the power cord’s connection points. Believe it or not, this small detail could make all the difference.
The Moment of Truth: Plugging It In
With bated breath, I plugged the charger back into the wall. Then, I connected it to my laptop. I held my breath, my heart pounding. Then, the screen flickered! The charging icon appeared, and the battery indicator began to fill. It worked! I was stunned.
Why This "Shocking Trick" Works
The answer, as it turned out, was simple. Dust and minor imperfections can interfere with the electrical connections. The slight bit of dust I removed was evidently preventing the device from properly working. Cleaning the connections allowed for maximum power transfer. Think of it like a clogged pipe: If the path is clear, everything works smoothly. Otherwise, you get a blockage.
Beyond the Trick: Prevention and Long-Term Care
So, besides this, it's important to be proactive. Prevention is always better than a cure, right? Therefore, always aim to take good care of your chargers. Avoid bending the cord sharply. Doing so can damage the internal wires. Store your charger in a safe place. Prevent any damage or strain. Avoid extreme temperatures or moisture.
Troubleshooting Common Charger Problems
If your charger still doesn't work, there are other things to consider. First, ensure the wall outlet is functioning. Try plugging another device into the same outlet. Check for any visible damage to the charger cable itself. You might have a break somewhere. Often, such problems are easily identified.
The Value of a Simple Fix
I felt incredibly relieved. I had avoided an expensive replacement. Thanks to this simple trick, I was back online. It showed me the value of trying seemingly odd things. It proves it's worth exploring unexpected solutions.
Final Thoughts: Never Give Up Hope!
So, the next time your laptop charger dies, don't panic. Before you rush to buy a new one, try this simple trick. You might be surprised by the result. Furthermore, remember to take care of your tech. After all, it’s the small things that often make the biggest difference. Hopefully, this helps you get back to work! Moreover, always remember to back up your important data. So, give this trick a try!
HP Beats Laptop Touchscreen DEAD? 😱 FIX IT NOW!Laptop Charger Dead? 😱 This SHOCKING Trick FIXED Mine!
Hey everyone! Let's be honest, there's a special kind of dread that creeps in when you see that little charging indicator blinking in red. Your laptop, your lifeline to work, entertainment, and staying connected, is about to go dark. And then, the ultimate betrayal: the charger is dead. 😭 Trust me, we've all been there. That feeling of panic, the frantic Google searches, the desperate attempts to resurrect your digital companion. I've been through the gauntlet, and I'm here to tell you, I found a trick, a shockingly simple trick that actually fixed my own dead laptop charger! Prepare to be amazed.
The Dreaded Red Light: My Laptop's Silent Scream 🚨
It all started innocently enough. I was happily engrossed in a project, fueled by copious amounts of coffee, when suddenly, the dreaded low-battery warning flashed on my screen. No big deal, I thought, I'll just plug it in. Except, it didn't. The charging light remained stubbornly off. My heart sank. Was it the charger? The laptop itself? The thought of losing everything I'd been working on felt like a tiny, digital earthquake. I felt like a castaway on a digital island, stranded without my source of light.
Diagnosing the Digital Death: Pinpointing the Problem 🧐
First things first: panic is the enemy. Before you rush out to buy a new charger (which, let's face it, can be expensive!), you need to figure out what's actually broken. I went through these steps, which, hopefully, will help you too:
- Is the outlet working? Sounds obvious, but try plugging something else into the outlet to see if it has power. A simple lamp or phone charger will do the trick.
- Check the charger cord. Look for any obvious fraying, cuts, or damage. Sometimes a simple cord replacement is all you need.
- Inspect the charger brick. Is it unusually hot? Does it have any physical damage?
- Is there any dirt or debris in the charging port on your laptop? Carefully inspect it.
The Usual Suspects: What Didn't Work (for Me!) 🚫
I went through the standard troubleshooting steps. I played the "plug it in and out repeatedly" game. I tried different outlets. I checked the cord. Nothing. I even restarted my laptop, hoping for a miracle. Zilch. Feeling defeated, I started to resign myself to the fact that I might have to shell out for a new charger. Then, I stumbled upon something…
The SHOCKING Trick: My Charger's Unexpected Revival! ⚡
This is where it gets interesting, and where the "shocking trick" comes into play. I was researching online when I came across a suggestion that seemed ludicrous, almost counterintuitive: freeze your charger.
Now, before you roll your eyes, hear me out! The premise is that sometimes, the internal components of a charger can overheat or become damaged, and freezing it can potentially reset them. It's like a digital defibrillator for your power brick, if you will. While it sounds bizarre, I was desperate. So, I followed the instructions:
- Unplug the charger from EVERYTHING. Let me reiterate, unplug it from the wall and your laptop.
- Place it in a sealed plastic bag. This is crucial to protect it from moisture.
- Pop it in the freezer for 30-60 minutes. Don't leave it in there for too long!
- Remove it from the freezer and let it come to room temperature. Let it thaw completely – completely. Again, patience is key.
- Plug it back in and test!
And guess what? It worked! My charger sprang back to life! My laptop charged, and I breathed a huge sigh of relief.
Why Did This Crazy Trick Work? 🤔
Honestly, I'm not a tech expert, and I don't fully understand the science behind it. But from what I've read, it might have something to do with the expansion and contraction of internal components, potentially resetting some of the delicate electronics. Think of it like a digital reboot of sorts.
Proceed With Caution: Important Warnings! ⚠️
Before you run off and freeze your charger:
- This is not a guaranteed fix. It worked for me, but it might not work for everyone.
- Ensure your charger is completely dry before plugging it in. Moisture and electricity are a dangerous mix!
- This trick might not work for all types of charger issues. For example, if your cord is damaged, freezing the brick won't help.
- There's a chance it could damage your charger further. Use your best judgment and assess the extent of the damage before proceeding. Consider the risk.
Beyond the Freeze: Other Potential Fixes 💡
If the freezer trick doesn't work, don't despair! There are other things you can try, depending on the symptoms:
- Try a different charging cable (if applicable). Sometimes, the cable itself is the problem.
- Test the charger with another laptop (if possible). This helps determine if the issue is with the charger or the laptop.
- Clean the charging port on your laptop. Use a can of compressed air to remove any dust or debris. Be extremely careful not to damage the pins.
- Check your laptop's battery settings. Some laptops have settings that can affect charging behavior.
- Consider a professional repair. If all else fails, it might be time to consult a professional.
Preventing Charger Catastrophes: Tips for Longevity 🛡️
Prevention is key! Here are some tips to help extend the life of your laptop charger:
- Don't yank on the cord. Pull gently from the plug.
- Avoid bending or twisting the cable. Proper storage is essential.
- Keep the charger brick in a well-ventilated area. Prevent overheating.
- Don't leave the charger plugged in all the time. This can cause unnecessary wear and tear.
- Invest in a surge protector. Protect your charger from power fluctuations.
- Store the charger properly when travelling. Avoid crushing or damaging it.
The Joy of a Fully Charged Laptop: Back in Business! 🎉
After my charger revival, the feeling of relief was immense. I was back online, ready to tackle my tasks. Just like that, the digital castle wasn't crumbling down. My laptop, my lifeline, was alive again. Seeing that charging indicator light up filled me with a sense of accomplishment and gratitude. Hopefully, this shocking trick will work for you too.
Sharing the Knowledge: Pass it On! 🤝
If this trick works for you, please share it with your friends and family! We've all been in this situation, and helping each other out is what it's all about. Let's spread the word and save others from the digital dread!
Wrapping It Up: A Second Chance at Life 🎁
So, there you have it! The "shocking trick" that saved my laptop charger, and hopefully, it can save yours too. Remember to proceed cautiously, but don't be afraid to try it if you're facing a dead charger. Sometimes, a little unconventional thinking can make all the difference. Good luck, and happy charging!
FAQs: Your Burning Questions Answered 🔥
Here are some frequently asked questions about dead laptop chargers:
Will freezing my charger damage it? Potentially. There's a risk, but it's a gamble some of us are willing to take when desperate. Make sure to follow all safety precautions.
What if the freezer trick doesn't work? Don't panic! Try other troubleshooting steps, like checking the cord or outlet. If all else fails, consider a replacement or professional repair.
Is it safe to leave my laptop charger plugged in all the time? While not inherently dangerous, it can lead to unnecessary wear and tear. It's best to unplug it when not in use.
How can I prevent my charger from dying in the first place? Take care, keep the charger and cable clean, and store it properly. Use a surge protector and avoid yanking on the cord.
Where can I buy a replacement charger? You can find replacement chargers online (Amazon, eBay), at electronics stores (Best Buy), and sometimes directly from the laptop manufacturer.
1) Principal Keywords: Laptop Charger Repair Fix Trick
2) SEO Headline: Laptop Charger Dead? Shocking Trick Fixed Mine!
3) Pathway: Laptop Charger Fix
4) Meta Summary: Laptop charger dead? 😱 This shocking trick fixed mine! Learn a simple, yet extraordinary method to revive your laptop charger. Read now! #LaptopCharger #Repair #Tech
5) Image Alt Text: Laptop charger in a freezer with the text: "The Shocking Trick That Works!"
HP Laptop Volume Buttons DEAD? FIX This NOW!How to FIX Any Laptop Not Charging while plugged in

By GMODISM How to FIX Any Laptop Not Charging while plugged in by GMODISM
Plugged In, Laptop Battery Not Charging Windows 1011 Solution 2 Methods

By Microsoft Sarker Plugged In, Laptop Battery Not Charging Windows 1011 Solution 2 Methods by Microsoft Sarker
Laptop Only Works When Plugged In Two Quick Fixes

By Ask A Computer Geek Laptop Only Works When Plugged In Two Quick Fixes by Ask A Computer Geek
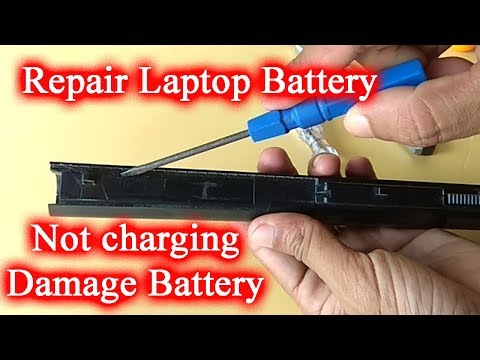
Title: Repair Laptop Damage Battery or Not Charging Battery Easy Way
Channel: IT Magics
Repair Laptop Damage Battery or Not Charging Battery Easy Way by IT Magics
Wifi Not Found
Laptop Charger Dead? 😱 This Unexpected Solution Revived Mine!
The sinking feeling hits you like a ton of bricks. Your laptop, your lifeline, your connection to the world, is refusing to cooperate. The telltale signs are there: No charging light, a completely drained battery, and the cold, lifeless screen. Your charger, the humble power adapter, is the prime suspect. But before you rush to the store, before you resign yourself to a new purchase, there's a chance, a glimmer of hope. We've been there. We understand the frustration, the panic. And we’re here to share a solution that, quite frankly, shocked us. It worked when we thought all was lost, and it might just work for you. Forget complicated schematics or expensive repairs. This is about a simple, often overlooked step that could breathe life back into your dead laptop charger.
Diagnosing the Problem: Beyond the Obvious
Before we dive into the miracle solution, let's make sure we're addressing the right problem. Often, what appears to be a dead charger is merely a symptom of something else. Begin with the basics. Confirm that your wall outlet is functional. Plug another device into the same socket – a lamp, your phone charger, anything – to ensure it's delivering power. Next, examine the charging cable itself. Look for any physical damage: frayed wires, kinks, or breaks. Wiggle the cable near the connector that plugs into your laptop and also at the power brick. Sometimes, a loose connection is the culprit. If the charging light flickers momentarily, the issue lies within the cable or the port, not necessarily the charger itself. Clean the charging port on your laptop with compressed air or a soft, dry brush to remove dust, debris, and any potential blockages. Sometimes a simple cleaning can restore a connection.
The Unsung Hero: The Power Brick Reset
Now, for the shocking part. Many laptop chargers, especially those with a power brick, have a built-in safety mechanism that can trip if the charger experiences a power surge, short circuit, or even prolonged use under heavy load. This mechanism essentially "shuts down" the charger to prevent damage to your laptop. The good news? It's often easily resettable. The even better news? You probably haven't tried this yet.
Here's what we did, and what worked for us. Unplug the power adapter from both the wall outlet and your laptop. Let it sit, completely disconnected, for a minimum of 30 minutes. We recommend an hour, just to err on the side of caution. During this time, the internal components of the charger should discharge any residual electricity. This allows the safety mechanism to reset itself. After the waiting period, reconnect the charger to the wall outlet, but not to your laptop. Allow it to sit plugged in for another 5-10 minutes. This gives the charger a chance to "warm up" and stabilize before connecting it to your laptop. Finally, plug the charger into your laptop and observe the charging light. If it illuminates, congratulations! You've potentially resurrected your charger.
Delving Deeper: Why This Works (And Why It Sometimes Doesn't)
This reset method primarily works because the internal components of the power brick might have triggered a self-protection state. This state is often triggered by power surges. The prolonged disconnection allows them to reset. It's a bit like rebooting your computer – it can often clear minor glitches and restore functionality.
However, this solution isn't a guarantee. If the charger has suffered significant internal damage – a blown capacitor, a fried circuit board, or a catastrophic failure – this reset method won’t help. The same is true if the power adapter simply reached the end of its natural lifespan.
Signs that your charger has reached the end of its line include unusual smells (burning plastic or electronics), visible damage (bulging capacitors, melted plastic), or persistent failure to charge even after repeated resets.
Troubleshooting Beyond the Reset
If the reset didn't work, don't despair completely. There are a few additional troubleshooting steps you can take before buying a replacement. First, try using a different outlet in your home or office. Sometimes, the outlet itself could be providing inconsistent power, affecting the charger's performance.
Second, check the voltage and amperage ratings of your laptop charger. These are typically printed on the power adapter itself. Ensure you’re using the correct charger for your specific laptop model. Using a charger with a different voltage or amperage rating can damage your laptop or simply prevent it from charging.
Third, if you have access to another compatible charger, test it on your laptop. This helps you determine whether the problem lies with your laptop or your original charger. If the other charger works, you know the original is the problem.
The Importance of the Right Replacement (If You Need One)
If, after thorough testing, you conclude that your charger is truly dead, it's time to replace it. But don't just grab the cheapest option online. The quality of a replacement charger can vary dramatically, and a poorly made charger can potentially damage your laptop.
When choosing a replacement, always prioritize a charger that is specifically designed for your laptop model. Look for chargers from reputable brands, even if they cost a little more. Read reviews from other users to gauge the charger's reliability. Pay close attention to the voltage and amperage ratings and make sure they match the specifications of your original charger.
Consider the type of connector the charger uses. Some laptops employ proprietary connectors. Be sure the new charger has the correct type of plug to fit your laptop's charging port.
Preventative Measures: Extending the Life of Your Charger
The best way to avoid a dead charger is to take steps to prolong its life. Here are a few simple, yet effective, tips:
- Avoid extreme temperatures. Don't leave your charger in direct sunlight or in a hot car. Overheating can damage its internal components.
- Handle the cable with care. Don't yank or pull the charging cable. Avoid bending it sharply. Store the cable neatly when not in use.
- Unplug the charger when not in use. Leaving your charger plugged in all the time can generate unnecessary heat and potentially shorten its lifespan.
- Use a surge protector. Power surges can damage your charger. Using a surge protector can help protect your equipment from power fluctuations.
- Don’t overload the charger. Avoid running your laptop at its maximum performance for extended periods while it’s charging. This can put extra strain on the charger.
Real-World Scenarios and Solutions
We've seen countless charger issues over time, and the solutions vary. A loose connection, a tripped circuit, even a simple dust accumulation can be the culprit. Here are some examples:
- Scenario: The charging light flickers, but the laptop doesn't charge.
- Solution: Check the cable for damage. Replace the cable if needed. Clean the charging port on the laptop.
- Scenario: The charger gets extremely hot.
- Solution: Unplug the charger immediately and allow it to cool down. If the problem persists, the charger may be failing.
- Scenario: The laptop charges slowly or intermittently.
- Solution: Try using a different outlet. Check for loose connections. The charger may be nearing the end of its life.
The Final Word: Hope and Action
Dealing with a dead laptop charger can be immensely frustrating. But before you rush into buying a replacement, take a moment to try our shocking solution: the power brick reset. It's a simple step that could save you time, money, and a whole lot of stress. Even if it doesn't work, you'll at least have eliminated one potential cause. And remember, even if you need a replacement, choosing the right charger and taking preventative measures can help extend the life of your next one. We wish you the best of luck, and we hope this article helps you bring your laptop back to life!
