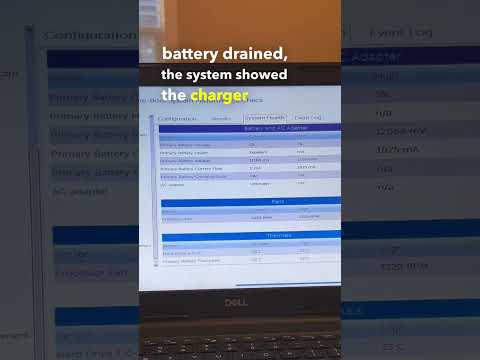
brand new laptop charger not working
Title: This Laptop Won't Charge shorts pc computer pcrepair dell
Channel: Matt's Computer Services
This Laptop Won't Charge shorts pc computer pcrepair dell by Matt's Computer Services
brand new laptop charger not working, why is my new laptop charger not working, laptop not charging with new charger, why is my laptop charger not working
NEW Laptop Charger DEAD? This SHOCKING Fix WORKS!
Laptop Charger Troubles? A Lifeline You Won't Believe!
It happened to me. That sinking feeling. My laptop, my lifeline, was refusing to cooperate. The screen flickered, then surrendered to the black abyss. A dead charger. Panic set in. But, before you resign yourself to a tech-induced breakdown, there’s hope. This isn’t your typical troubleshooting guide. Instead, consider it a story—a rescue mission—and trust me, it works.
The Dreaded Black Screen:
Picture this. You're in the middle of something crucial. Perhaps you're crafting an email, working on a project, or binge-watching your favorite show. Then, without warning, the power cuts. That little charging light? It remains stubbornly dark. Your heart plummets. Your laptop, that essential extension of yourself, is gone. What now? Well, you need a charger. However, you could be stuck.
Diagnosis: Beyond the Obvious:
First, before you even think of replacing anything, take a deep breath. Don't just assume the charger is dead. You need to confirm the culprit. So, plug the charger into a different outlet. Sometimes, it’s the simplest solutions that escape us. If that doesn’t work, inspect the cable. Look closely for any signs of damage. A frayed wire is a certain death sentence for your charger. Also, gently wiggle the charging cable where it connects to your laptop. Does the light blink? Does it flicker? That could indicate a loose connection. If nothing happens, the charger is the obvious next target.
Unveiling the Surprisingly Simple Fix:
Now, here is where the story takes an interesting turn. You might believe a replacement is your only hope. Actually, hold that thought. This solution is about a little savvy. It's about reclaiming your power from the situation. The secret? Sometimes, it’s not about replacing the charger. It’s about understanding what the charger isn't doing. In many cases, the charger itself is fine. It’s merely “stuck.” Furthermore, the laptop itself could be the issue.
The Power Cycle Revelation:
Here's the core of your rescue plan. First, unplug the charger from the wall. Then, disconnect it from your laptop. Next, you'll need to "power cycle" your laptop. This ensures all residual power drains. The process varies slightly depending on your laptop's make and model. However, a general method exists.
For most laptops: Remove the battery. Press and hold the power button for at least 30 seconds. This drains any remaining electricity from the system. Then, reinsert the battery.
For laptops with internal batteries: This is where it gets tricky. As such, you will likely need to find a reset button. Usually, the reset is a tiny hole. This hole is accessible with a straightened paper clip. Consult your laptop's manual online for its location. Press this button for about 30 seconds.
Reconnect and Rebirth:
Once you've completed the power cycle, plug the charger back into the laptop and the wall. Leave it charging for at least 15 minutes. This allows the laptop to begin receiving a current again. After this time, try turning the laptop on. Now, cross your fingers.
Troubleshooting Further if It Didn't Work:
If the laptop still refuses to start, don't fret. There's still more that you can do. You may need to invest in a new charger. Fortunately, replacements are easily found. In addition, ensure you are getting the correct wattage. You can usually find this information printed on the old charging brick. Buying an incorrect charger can damage your computer.
Beyond the Black Screen:
Beyond simply fixing a dead charger, this process highlights a crucial lesson. It's about approaching problems with a bit of ingenuity. Also, it emphasizes the power of observation and resourcefulness. So, the next time your laptop’s screen goes black, remember this rescue story. It's more than fixing a charger; it’s reclaiming control. Moreover, you also can save money.
Preventative Measures for a Long Life:
Finally, remember to care for your charger. Avoid bending the cable sharply. Also, store it in a cool, dry place. Also, be careful not to let it overheat. With a little care, your charger will provide faithful service. It will reliably keep your laptop powered. So, you are prepared when the inevitable happens.
Laptop WiFi Dead? Fix Your Wireless Card NOW!NEW Laptop Charger DEAD? This SHOCKING Fix WORKS!
Hey there, fellow tech travelers! Ever felt that gut-wrenching lurch of panic when you plug in your brand-new laptop, expecting that comforting charging light, only to be met with… nothing? Yeah, we've all been there. That "new charger dead" scenario is a digital nightmare, a silent scream in a gadget graveyard. But before you resign yourself to a frantic search for a replacement or a frantic call to tech support, breathe. We're diving deep into the frustrating reality of a dead laptop charger and, more importantly, sharing a fix that might just shock you (in a good way, of course!).
1. The Frustration Frenzy: Why Your Brand-New Charger Betrayed You
Let's be honest, there's nothing quite like the sinking feeling of a dead charger, especially a new one. You unbox it, thrilled about that fresh battery life glow awaiting you, only to find… crickets. This is often accompanied by a surge of questions: Did I do something wrong? Is my laptop on the fritz? Is this a sign of a bigger tech catastrophe? The answer, in most cases, is likely a simple, fixable glitch. Think of your charger as a delicate musical instrument; occasionally, it needs a little tweaking to hit the right notes.
2. Pinpointing the Culprit: Common Causes of Charger Capriciousness
Before we unleash the magic fix, let's understand the enemy. What's actually causing your charger to be a dud? Here are the usual suspects:
- Loose Connections: The power brick, the cable, the wall outlet – any of these can be the source of a disrupted power flow. Think of it like a tangled garden hose; the water (power) flow gets blocked.
- Faulty Outlet: Sometimes, the issue isn't your charger at all. That wall outlet might be the culprit. Try a different outlet and see if that jumpstarts your charger.
- Cable Damage: A frayed or damaged cable is a recipe for disaster. Think of it as a short circuit waiting to happen.
- Internal Problems: Sometimes, the charger itself has a manufacturing defect. Every product has a small percentage with issues. This is where the repair comes in handy.
3. The Elementary Test: Diagnose Before You Panic
Before you start throwing your charger across the room in a fit of digital despair, let's run a few basic diagnosis tests. These are quick, easy, and can often save you a trip to a tech repair shop:
- Visual Inspection: Carefully examine the charger cable for any visible damage, such as kinks, cuts, or exposed wires.
- Outlet Swap: Plug the charger into a different wall outlet to rule out the possibility of a faulty outlet.
- Connection Check: Unplug and re-plug the charger at both ends (the outlet and the laptop). Ensure all connections are snug.
- Laptop Test: If you have access to a different laptop charger (preferably one that matches your laptop's specifications), try it to see if your laptop charges. This will tell you if the issue lies with the charger or the laptop itself.
Consider these tests like checking the patient's vital signs before administering surgery. It helps to understand where the real problem is.
4. The SHOCKING Fix! (Prepare for the "Wait, What?!" Moment)
Alright, here's the moment you've been waiting for: the fix that might just resurrect your seemingly dead charger. Now, brace yourselves; this may appear counterintuitive.
- The Freezer Trick: Yes, you read that right. The freezer. Seriously. Place your charger – the power brick – into the freezer for about 30-60 minutes.
- Why Freezing? This method capitalizes on the science of thermal expansion and contraction. Sometimes, components inside the charger, particularly the solder joints, might have loosened during shipping or due to heat exposure. Cooling them down can cause them to contract, potentially re-establishing connection. Think of it as a digital defibrillator!
Important Note: Ensure your charger is completely dry. Moisture and electricity have a disastrous relationship.
5. The Post-Freezer Procedure: Bringing Your Charger Back to Life
After the chilling interlude, retrieve your charger from the freezer. Let it warm up for at least 15-30 minutes to avoid condensation. Then, plug it in and test it on your laptop.
6. If the Fix Worked (Hallelujah!): Celebrate & Learn From the Experience
If, by some digital miracle, your charger now works, let out a triumphant cheer! You've successfully resurrected your tech from the brink of despair. Now, let's learn from this experience:
- Preventative Measures: Consider using a surge protector. These handy devices act as a digital shield against power surges, which can fry your charger (and your laptop!).
- Proper Storage: Avoid storing your charger in extreme temperatures (heat or cold). Also, be sure that you are not wrapping your power cord too tightly as it can cause the internal wires to get damaged.
- Respect the Cord: Don't yank the cord when unplugging it.
7. When to Seek Professional Help: Knowing Your Limits
If the freezer trick doesn't work – and sadly, it doesn't work for every charger malfunction – it's time to call in the professionals.
- Signs of Serious Damage: If you see smoke, smell burning, or hear crackling sounds, unplug the charger immediately and seek expert assistance. These are symptoms of dangerous electrical issues.
- Warranty Check: If your charger is still under warranty, contact the manufacturer for a replacement.
- Tech Repair Shop: Local repair shops can often diagnose and repair charger issues.
- When in Doubt, Call Expert: It's always wise to ask a qualified technician if you are not comfortable or do not know how to deal with the situation.
8. The Importance of High-Quality Chargers
Let's talk about quality. Buying a cheap, knock-off charger might save you some money up front, but it could end up costing you more in the long run.
- Safety First: High-quality chargers are built with safety features that protect your laptop from power surges and other electrical hazards.
- Longevity: They are built to last, so you won't have to replace them as often. Quality chargers usually provide a stable power current, which is essential for your laptop's health.
- Brand Reputation: You pay for what you get – cheaper chargers often lack the same level of quality control, which is always a risk.
9. Avoiding Charger Burnout: Simple Habits for Charger Care
Just like your car, the charger needs some care for longevity. Here are some simple and effective habits you can develop:
- Avoid Overheating. Many chargers have ventilation grills. Don't block these.
- Unplug When Not in Use. This saves energy and reduces wear and tear on the charger.
- Store Safely. Don't place heavy objects on the cord.
10. Charger Compatibility: Decoding the Specs
Understanding charger specifications is vital. Always make sure the charger you use is compatible with your laptop.
- Voltage and Amperage: These must match your laptop's requirements. Incorrect voltage can damage your laptop.
- Connector Type: Different laptops use different connector types. Make sure you get the right one.
- Wattage: It needs to match or exceed your laptop's requirements.
11. The Battery's Best Friend: Tips for Optimal Battery Health
Your charger and battery are like inseparable pals. Here are tips for maximizing the battery's lifespan:
- Avoid Full Drains: Don't let your battery drain completely before recharging it.
- Moderate Temperature Conditions: Extreme heat or cold can damage batteries.
- Calibrate Your Battery: Some batteries benefit from periodic calibration (fully charge, fully drain).
12. The Eco-Friendly Charger: Making a Green Choice
We can make environmentally conscious choices! There are chargers that will help the planet:
- Energy-Efficient Chargers: These use less power.
- Sustainable Materials: Chargers are increasingly made from recycled materials.
13. Troubleshooting Beyond the Charger: Other Potential Culprits
If the fix does not work, look beyond the charger:
- Laptop’s Charging Port: Make sure it functions correctly.
- Check the Motherboard: Seek expert help if needed.
14. The Future of Charging: Emerging Trends
The charging world is always changing. Here's what's coming up:
- Wireless charging.
- USB-C.
15. From Dead to Dynamo: A Recap of the Resurrection
We've journeyed from the frustration of a dead charger to the potential for a shocking fix!
- Pinpoint the problem: Determine a diagnosis.
- The freezer trick.
- Seek expert help.
Closing Thoughts: Empowered in the Digital Age
Well, there you have it! Hopefully, the "freezer fix" worked its magic, and your laptop is now purring with power. Remember, tech challenges are an inevitable part of the digital age; knowledge is power. By understanding the common culprits behind charger failures and learning a few simple troubleshooting
Laptop Closed? This Dell Docking Station Still Works! (Magic!)Plugged In, Laptop Battery Not Charging Windows 1011 Solution 2 Methods

By Microsoft Sarker Plugged In, Laptop Battery Not Charging Windows 1011 Solution 2 Methods by Microsoft Sarker
How to Repair Laptop Charger Plugged In not charging charger Reboot problem solved laptop diy
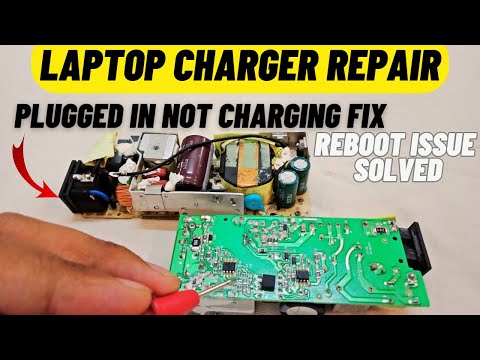
By Electricquantism How to Repair Laptop Charger Plugged In not charging charger Reboot problem solved laptop diy by Electricquantism
Dell charger not charging after cable change solved
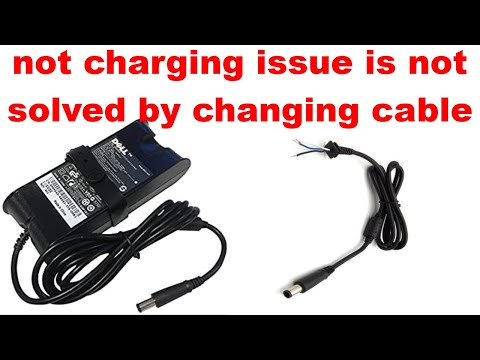
By DIGITAL MAINTENANCE HELPER Dell charger not charging after cable change solved by DIGITAL MAINTENANCE HELPER

Title: hp pavilion 15 laptop not turning on charging light not working dead laptop repair no display
Channel: info topic
hp pavilion 15 laptop not turning on charging light not working dead laptop repair no display by info topic
Laptop Wifi Hotspot
NEW Laptop Charger DEAD? This SHOCKING Fix WORKS!
Have you ever been gripped by the icy dread of a dead laptop charger? That moment when the screen flickers, the lifeline of your digital world suddenly fading? The frantic scramble to salvage your unsaved work, the panicked realization of impending disconnection – it’s a familiar horror for many. But before you resign yourself to a costly new charger, or the inconvenience of a prolonged offline period, stop. There's a chance, a surprisingly good chance, that your seemingly defunct charger can be resurrected. This guide unveils a series of methodical checks and, crucially, a unique and often overlooked repair strategy that could breathe life back into your laptop's essential power source. Forget the generic troubleshooting tips. This is about real, actionable solutions.
Identifying the Culprit: A Deep Dive into Charger Failure
Before diving into repairs, we must first thoroughly diagnose the problem. Assuming the wall outlet is functioning correctly (a simple test with another appliance will confirm this), the issue likely stems from one of several common failure points within the charger itself.
Visual Inspection: The First Line of Defense: Begin with a meticulous visual examination. Look for any obvious signs of damage. Examine the entire length of the power cord, meticulously feeling for kinks, bends, or abrasions. These are often the first indicators of internal wire damage. Pay close attention to the areas near the power brick (the heavy, rectangular component) and the connector that plugs into your laptop. Cracks in the plastic casing, or bulging sections on the power brick, are immediate red flags, signaling potential internal component failure, often from heat buildup or over-voltage scenarios. Observe the connector itself. Are the pins bent or corroded? Any discoloration signifies a deeper problem.
The Connector's Tale: The DC Jack and its Vulnerabilities: The laptop's DC jack, the point where the charger plugs in, is a frequent source of problems. Wiggling the connector while the charger is plugged in can reveal a loose connection, intermittent power delivery, or sparking. This is a sign of a damaged DC jack, loose wiring, or potentially a bad solder joint. If the jack feels wobbly, or if the charging indicator on your laptop flickers erratically, focus your investigation on this area.
Power Brick Diagnostics: The Heart of the Matter: If the cord and connector appear intact, focus on the power brick itself. Many chargers incorporate a small LED indicator light. This light, when functioning, signals that the charger is receiving power and attempting to supply it. If the light is off, it suggests an internal fault within the power brick. Carefully smell the brick. A distinct burning odor indicates that an internal component has likely shorted out. In such cases, immediate disconnection is necessary to prevent further damage.
The Multimeter's Revelation: Precision Voltage Testing: The ultimate diagnostic tool is a multimeter. Using the multimeter, you can precisely test the voltage output of the charger. Set the multimeter to DC voltage and select a range slightly higher than your charger's rated output voltage, typically 19V or 20V for most laptops. Carefully insert the multimeter probes into the output connector, matching the polarity (positive and negative) to the correct pins. If the multimeter reads a significantly lower voltage, zero volts, or an erratic value, it indicates a fault within the charger. A stable, correct voltage suggests the problem might lie with the laptop itself.
The Unexpected Fix: Reanimating a Disconnected Connection
This is where the conventional troubleshooting often ends. But we can go further. Many charger failures stem from a break in a wire, or a failure in the solder joints within the charger. The method described here often resolves the most common failures:
Safety First: Disconnection and Disassembly: Absolutely, positively disconnect the charger from any power source and your laptop. This cannot be stressed enough. Next, carefully disassemble the power brick. Most are sealed with adhesive and may require careful prying with a thin, non-conductive tool, like a plastic spudger or a flat-headed screwdriver. Take your time, and be patient, to avoid damaging the casing. Once open, document the internal layout using photos or drawings.
The Solder Joint Saga: Identifying Potential Failure Points. Inspect all solder joints, especially those connecting the wires to the circuit board and the output connector. These joints are vulnerable to cracking due to heat cycling and vibration. Use a magnifying glass to carefully examine each joint. Look for hairline cracks or any discoloration, which indicates the solder may have failed.
The Unseen Wound: Wire Integrity and the Hidden Break: If the solder joints appear intact, examine the wires themselves. Gently bend and flex the wires near the connector and where they enter the power brick. A break in the internal wiring can cause an intermittent connection. Many times the wire will break near the point where it enters the power brick.
The Moment of Truth: The Continuity Test and the Digital Multimeter. Set the multimeter to the continuity setting, which uses a small current to test if the circuit is continuous, and therefore allows current to flow. Position the probes on the connector ends of the wires; if the meter does not beep, or show continuity, then a break exists. Repeat this test on all wires.
The Operation and the Solder Iron: This is where you become the surgeon of circuits. Having identified the faulty connection (broken wire, bad solder joint or both), you must execute the repair. If a wire is broken, carefully strip the insulation from both ends of the wire, exposing a small amount of bare copper (use wire strippers designed for small gauge wires). If soldering is needed, use a soldering iron that is rated for electronics and appropriate to the size of the parts. Secure the two wire ends using a solder. If the broken connection is at a solder joint, then carefully heat using a solder and then add a fresh portion of solder. Use a flux pen.
Reassembly with Vigilance: Reinforcing the Fix: Before closing the power brick, reassemble all components, and carefully examine the wiring. At the points where the wires enter the power brick, consider adding extra reinforcement. Ensure that wires are securely positioned and that nothing is pinched or stressed.
Testing and the Final Judgement
The Ultimate Test: Voltage Verification. Before connecting the charger to your laptop, reconnect it to the wall outlet and use your multimeter to verify that it is supplying the correct voltage. Take the same reading as you did before opening the charger. If the voltage now reads successfully, congratulations, you have succeeded. If not, revisit your connections, ensuring all wires are firmly connected and that solder joints are complete.
The Moment of Truth; Power Up! After a successful voltage check, reconnect your reworked charger to your laptop. Observe the charging indicator. If the indicator illuminates and the laptop begins to charge, you've successfully revived your charger. If the light is on, but the laptop does not charge, the problem may lie elsewhere.
Beyond the Repair: Preventing Future Failures
Your valiant efforts to repair your charger have paid off. Now, it's time to consider preventing future issues through thoughtful steps.
Cable Management: Minimize the Stress: The way we handle our chargers profoundly affects their lifespan. Avoid tightly coiling the power cord when storing it. Instead, loosely loop the cable and secure it with a Velcro strap. Avoid coiling the cable around the power brick.
Protective Measures: Sheathing and Shielding: Consider using cord protectors or cable sleeves to protect the cable from abrasion, cutting, and sharp bends. These can be purchased online or from most electronics stores.
Voltage Considerations: Surge Protection and Power Quality: Always plug your laptop charger into a surge protector. This protects against voltage spikes and power surges, that can cause damage.
Storage Strategies: Avoiding Extreme Conditions: Store your laptop charger in a cool, dry place, away from direct sunlight, excessive heat, and moisture. These extreme conditions can weaken plastic and can damage internal components.
By applying these techniques, you have not only conquered the immediate crisis of a dead laptop charger, but you've also equipped yourself with valuable knowledge and skills. Embrace these insights; the next time your digital life hangs in the balance, you will be ready.
