water on laptop keyboard keys not working

Title: How To Fix a Water Damaged Laptop
Channel: HowToBasic
How To Fix a Water Damaged Laptop by HowToBasic
water on laptop keyboard keys not working, spilled water on laptop keyboard some keys not working reddit, spilled coffee on laptop keyboard some keys not working, spilled milk on laptop keyboard some keys not working, spilled water on lenovo laptop keyboard some keys not working, water on keyboard keys not working, water on laptop keyboard not working, spilled water on laptop keyboard some keys not working
Laptop Keyboard Disaster! Water Ruined My Keys - HELP!
Laptop Keyboard Catastrophe: When Liquid Meets Logic (and Loses!)
Oh, the sinking feeling! It all started innocently enough. One minute, I was enjoying a refreshing beverage. The next, disaster struck. My laptop keyboard faced its ultimate nemesis: a rogue splash of water. The aftermath? A keyboard that seemed to have a mind of its own. This is a story of technological tears and, hopefully, triumph.
The Initial Shock: A Keyboard's Silent Scream
First, a wave of pure panic washed over me. My primary work tool was suddenly compromised. Before I could react, liquid cascaded across the keys. The immediate silence was almost worse. Then, the erratic typing commenced. Letters danced on the screen, mocking my efforts to regain control. It was a digital ballet of the absurd. Consequently, I knew I was in trouble.
Assessing the Damage: A Deep Dive into the Damp
Immediately, I sprang into action. I needed to assess the situation. I flipped the laptop over, hoping to drain the unwanted intruder. Water droplets splattered onto the desk with each movement. I carefully examined each key. Some were sticky, others unresponsive. The situation looked grim. Moreover, I felt defeated.
Emergency Procedures: My First, Fumbling Attempts
My online search began. Google was my ally in this crisis. I frantically typed in search terms. "Water damaged laptop keyboard" became my mantra. Articles and forum posts flooded my screen. I absorbed everything, hoping for a miracle. I had to try something. So, I grabbed a hairdryer, setting it to cool. I gently blew air across the keys, hoping to dry them. However, the results were negligible.
The Rice Gambit: A Desperate Plea to Ancient Wisdom
Next, I heard about the rice trick. I carefully placed the laptop in a bag filled with uncooked rice. They say rice absorbs moisture. I left it overnight. I genuinely, clung to hope. I prayed for the best.
The Grim Reality: Facing the Cold, Hard Truth
The next morning brought a sobering reality. The keyboard remained unresponsive. Some keys still typed random characters. Others stubbornly refused to work. I understood the gravity of my situation. The rice trick hadn't worked. Therefore, a more drastic solution was needed.
Exploring Repair Options: Navigating the Tech Landscape
Now, I had to consider my options. Could I repair the keyboard myself? Replacing the entire keyboard seemed daunting. Furthermore, I knew I wasn't technically qualified. Then, I looked into professional repair services. I researched local computer repair shops. The prices varied widely. Ultimately, I needed an estimate.
The DIY Dilemma: Should You Dare to Disassemble?
I researched online. I thought about opening up my laptop. I quickly watched several videos. I saw complex designs and delicate circuit boards. The idea suddenly seemed overwhelming. I hesitated to take it apart. I feared causing more damage. After all, I did not want to do more harm than good.
Seeking Professional Help: Handing Over the Reins
I decided to call a reputable repair shop. They offered a free diagnostic. This sounded promising. I explained my situation. They calmly assured me they could help. I felt a sense of relief. Thus, I scheduled an appointment.
The Repair Process: Patience is a Virtue, Usually
The repair process took a few days. The technicians kept me updated. They found a corroded circuit board. Fortunately, they could replace it. I was thrilled to hear it. I had to wait patiently. Finally, they called. My laptop was ready!
The Keyboard's Resurrection: A Happy Ending
Picking up my laptop was pure joy. The keyboard worked flawlessly. It was like it was brand new. Therefore, I learned several valuable lessons. Firstly, keep drinks away from your tech. Secondly, act fast when accidents happen. Finally, sometimes, professional help is best.
Preventative Measures: Guarding Against Future Disasters
Now, I am more vigilant. I invested in a spill-proof keyboard cover. I even started to eat and drink away from my laptop. Also, I backed up all my important files. This simple action gave me peace of mind. In the end, I learned the importance of protection.
Final Thoughts: A Keyboard's Tale of Tribulation and Triumph
This experience was a crash course in laptop care. It highlighted the vulnerability of electronics. It reinforced the value of preventative measures. Throughout it all, I learned to adapt. Though, I’ll never forget my keyboard’s watery demise. Luckily, I got it fixed. And now, everything is perfect.
Laptop for Work 2023: The Ultimate Productivity Powerhouse!Laptop Keyboard Disaster! Water Ruined My Keys - HELP!
Alright, everyone, let's be honest, we've all been there. Picture this: you're cruising along, maybe tackling a work project, chatting with friends, or even just binging your favorite show, and BAM! Disaster strikes. For many of us, that disaster comes in the form of a rogue spill, specifically, one that decides to take up residence in the most vulnerable part of our beloved laptop: the keyboard. And let’s face it, a watery laptop keyboard is a tech tragedy of epic proportions. It’s like the digital equivalent of your dog eating your homework, only with a much higher chance of total and utter system failure.
1. The Dreaded Spill: Recognizing the Keyboard Catastrophe
First things first, let's acknowledge the elephant (or, should we say, the spilled beverage) in the room. You just had a keyboard moment. Maybe it was a rogue coffee cup, a clumsy hand with a glass of water, or perhaps the sneaky condensation from a cold drink. No matter the culprit, the result is the same: your keys are likely playing a different tune now, and that tune probably isn't a happy one. Immediate recognition of the problem is the first vital step. Ignoring it is like pretending a leaky roof won't eventually flood your entire house.
2. Quick Action: Time is of the Essence!
Okay, so you've witnessed the catastrophe. Now, what do you do? The single most important rule is to act fast. Every second that liquid spends inside your laptop is another second it's potentially wreaking havoc. Think of it as a digital ticking time bomb.
- Step 1: Power Down Immediately: Shut down your laptop completely. Don't just put it to sleep; a full shutdown is crucial.
- Step 2: Unplug the Power: Disconnect the power adapter. This prevents any electrical damage.
- Step 3: Flip It Over: Gently flip your laptop upside down, ideally over a towel or absorbent surface. This allows gravity to help drain the liquid.
3. Drain and Dry: The Initial Salvage Operation
Now that you've acted decisively, you need to start the drying process. This is where patience and a gentle touch are key. Don't be tempted to use a hairdryer, even on a low setting; the heat can damage internal components.
- Gentle Tapping: Gently tap the keyboard to help dislodge any trapped liquid.
- Absorption is Key: Use a soft, absorbent cloth or paper towels to blot away any visible liquid.
- The Waiting Game: Leave your laptop upside down in a dry, well-ventilated area for at least 24-48 hours. This is the bare minimum. For a more thorough drying, consider leaving it for longer, perhaps even 72 hours, especially if a large amount of liquid was involved.
4. Disassembly Deliberations: When Should You Take it Apart?
This is where things get a little tricky. If the spill was minimal and you're seeing only superficial issues (sticky keys, for instance), the above steps might be enough. However, if the damage seems more extensive, or if certain keys are completely unresponsive, you might need to consider disassembling the keyboard.
- Pros of Disassembly: Allows for a more thorough cleaning, potentially removing sticky residue and corrosion.
- Cons of Disassembly: Can be complex, especially for beginners. You risk damaging the laptop if you're not careful. Requires the right tools. If you're not tech-savvy, this is where you might need to call in the professionals.
5. Tools of the Trade: What You'll Need
Assuming you're feeling brave enough to go the disassembly route, you'll need a few essential tools:
- Small Phillips Head Screwdriver: For removing the screws on the bottom of the laptop.
- Plastic Pry Tool or Spudger: For safely prying apart the keyboard and other components without scratching them.
- Microfiber Cloths: For cleaning the internal parts.
- Isopropyl Alcohol (90% or higher): For cleaning any corrosion or sticky residue.
- Patience and Precision: The most important tools of all!
6. The Disassembly Dance: A Delicate Procedure
This is where you channel your inner surgeon, but for gadgets. There’s a simple rule.
- Consult Your Manual: Find your laptop's service manual online. This provides detailed instructions.
- Take Photos: Take pictures of each step as you disassemble. This will be invaluable for reassembly.
- Organize Screws: Keep the screws organized and labeled so you know where they go.
- Gentle Does It: Don't force anything. If something doesn't come apart easily, reassess the situation.
7. Cleaning the Keyboard: A Deep Dive
Once the keyboard is disassembled, you can begin the cleaning process.
- Remove Keycaps: Gently pry off each keycap. Be careful not to break any of the plastic clips.
- Clean the Keycaps: Wash the keycaps separately with soap and water, making sure to dry them thoroughly.
- Clean the Keyboard Membrane: Use the isopropyl alcohol and microfiber cloth to clean the keyboard membrane. Carefully remove any sticky residue or corrosion.
- Let it Dry: Allow all components to dry completely before reassembling.
8. Reassembly Renaissance: Putting it All Back Together
This is like putting together a complex puzzle.
- Refer to Your Photos: Use the photos you took during disassembly as a guide.
- Reverse the Steps: Follow the disassembly steps in reverse.
- Don't Overtighten: Avoid overtightening the screws.
- Test Your Work: Before closing the laptop, test the keyboard to ensure all keys are functioning correctly.
9. Beyond the Keyboard: Potential Hidden Damage
Water damage can go beyond the keyboard. It can spread to other components.
- Motherboard: The most vulnerable component is the motherboard.
- Other Components: Liquid can enter other components.
- Signs of Damage: Check for corrosion, discoloration, or any signs of liquid.
10. Professional Help: When to Call in the Cavalry
Sometimes, no matter how careful you are, the damage is beyond your capabilities. There's no shame in admitting defeat – or when you have gone as far as it is safe to go.
- Severe Damage: Excessive liquid, electrical issues, motherboard problems. The best course of action is a professional repair.
- Lack of Confidence: If you're not comfortable with the disassembly process, seek professional help.
- Consider the Age and Value: If your laptop is old or not worth much, the cost of repair might outweigh the benefits.
11. Prevention is Key: Shielding Your Tech from Spills
The best defense is a good offense.
- Keep Liquids Away: The simplest advice.
- Use a Spill-Proof Cover: These can protect your keyboard.
- Be Mindful of the Environment: Be careful around children and pets.
12. Data Recovery: Preserving Your Digital Life
If your laptop is beyond repair, you might be worried about losing your data.
- Backups are Critical: Always back up your data.
- Data Recovery Services: If you haven't backed up, data recovery services can help.
- Act Quickly: The sooner you act, the better the chances of data recovery.
13. The Keyboard Replacement Odyssey: Sourcing a New Keyboard
If the damage is irreparable, it's time for a new keyboard.
- Find the Right Replacement: Research your laptop model carefully to find a compatible keyboard.
- Online Retailers: Amazon, eBay, and other online retailers are great.
- Local Repair Shops: Local shops can often source and install keyboards.
- Professional Installation: Consider having a professional install the new keyboard.
14. The Insurance Angle: Does Your Policy Cover It?
You might be surprised to learn that your insurance could help with the cost of a damaged laptop.
- Homeowners or Renters Insurance: Might cover water damage.
- Check Your Policy: Review your policy details.
- Extended Warranties: Could provide coverage.
15. The Aftermath: Assessing the Damage and Moving On
Even if you managed to save your keyboard, there might be other consequences.
- Internal Corrosion: Keep an eye out for internal corrosion.
- Unexpected Issues: Your laptop might experience later problems.
- Consider a Full Diagnostic: Have a technician give your device a once-over.
Closing Section
So, there you have it! We've navigated the treacherous waters of the laptop keyboard disaster together. It's a tough experience, but with a little bit of quick thinking, careful action, and a bit of luck, you can often bring your keyboard, and perhaps your digital life, back from the brink. Remember, patience is your best friend, and don't hesitate to seek professional help if you're in over your head. Hopefully, this guide has provided you with the knowledge and confidence to tackle this
Laptop Touchpad Dead? This SHOCKING Fix Will Save You!Fix Some keys on Laptop Keyboard Not Working in Windows 10 Solve keyboard keys Won't typing

By Victor Explains Fix Some keys on Laptop Keyboard Not Working in Windows 10 Solve keyboard keys Won't typing by Victor Explains
Repair Laptop Keyboard Water damaged Wasserschaden Part 1 Disassembly
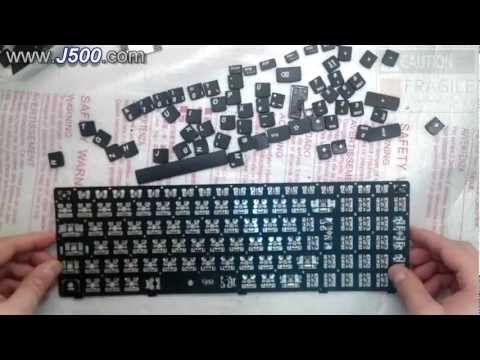
By Laptop Repair j500j500 Repair Laptop Keyboard Water damaged Wasserschaden Part 1 Disassembly by Laptop Repair j500j500
This Logitech Keyboard became a BATH Can I fix a water damaged keyboard Fix it Friday

By Kip Hakes This Logitech Keyboard became a BATH Can I fix a water damaged keyboard Fix it Friday by Kip Hakes
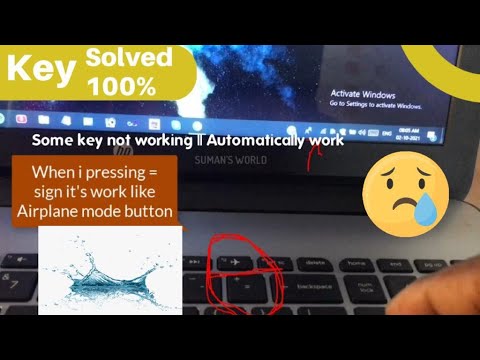
Title: Laptop keyboard water damage, not working solved laptopkeyboard
Channel: SUMAN'S WORLD
Laptop keyboard water damage, not working solved laptopkeyboard by SUMAN'S WORLD
Change Wifi Settings
Laptop Keyboard Disaster! Water Ruined My Keys - A Comprehensive Guide to Recovery
The heart sinks. The coffee, the tea, the errant splash of water – all now dancing across the pristine surface of your laptop keyboard. Moments ago, you were typing, browsing, creating. Now, a silent, insidious enemy has infiltrated the very core of your digital companion. This is not just an inconvenience; it's a potential data catastrophe. Fear not, however. We're here to guide you through the aftermath of a laptop keyboard water damage event, offering actionable steps and expert insights to maximize your chances of a successful recovery.
Immediate Actions: The Critical First Moments
Time is of the essence. The immediate actions you take will significantly influence the severity of the damage and the likelihood of a full recovery. Delaying these steps can lead to corrosion and short circuits, making the situation exponentially worse.
Step 1: Disconnect Power Immediately. The instant liquid comes into contact with your keyboard, the clock starts ticking. The first priority is to prevent any electrical short circuits. Unplug the power adapter from your laptop, and if possible, remove the battery. This immediately cuts off the flow of electricity, minimizing the risk of permanent damage.
Step 2: Invert and Drain. Quickly flip your laptop upside down. Gravity is your friend here. Hold the laptop at a 90-degree angle, ideally over a sink or absorbent surface (paper towels, a towel specifically). Gently shake the laptop to encourage any trapped liquid to drain out. Pay particular attention to areas where liquid appears to have pooled, such as the space between keys.
Step 3: Surface Cleaning (Gentle but Thorough). Use a soft, absorbent cloth, like a microfiber towel, to gently wipe away any visible liquid. Do not press hard, as this can force liquid further into the keyboard. Focus on blotting, not wiping. Pay specific attention to the keys and the surrounding areas to ensure all liquid is absorbed.
The Aftermath: Detailed Inspection and Preparation
Once the initial crisis is addressed, a more in-depth assessment of the damage is critical. Avoid the temptation to immediately try to power up the laptop. Rushing this step can be detrimental.
Step 4: Keyboard Disassembly (If Comfortable and Qualified). This is a more advanced step, relevant if you have experience disassembling electronics. Refer to your laptop's service manual or search for online guides specific to your model. Carefully remove the keyboard (usually held in place with screws). This will allow you to access the underlying components and assess the extent of the liquid damage. Make sure to label all screws and other parts so that you can reassemble the laptop effectively.
Step 5: Keycap Removal and Inspection. Even if you don't dismantle the entire keyboard, consider removing some of the keycaps, especially those that seem to have been directly impacted by the liquid. Use a keycap puller (available online or at electronics stores) to gently pry off the keys. Inspect the switches underneath for any signs of corrosion, sticky residue, or liquid.
Step 6: Moisture Mitigation Techniques: Airflow is Key. Whether or not you disassemble the computer, place the laptop in a well-ventilated area. Avoid direct sunlight or heat sources like radiators, which can cause warping. The goal is to allow for natural evaporation. You can also carefully use a hairdryer on the lowest setting, but maintain a safe distance to avoid overheating and concentrate on non-electronic components. Be patient; this process can take several days, especially with a severe liquid spill. Never use compressed air to blow out the liquid, as this may further distribute the liquid within the keyboard.
Deep Cleaning: Addressing Residue and Corrosion
Liquid damage doesn't just involve the initial impact. Once the liquid evaporates, it often leaves behind residue, which can be corrosive and interfere with electrical connections. A thorough cleaning is essential.
Step 7: The Isopropyl Alcohol Advantage. The single most effective substance for cleaning electronics is isopropyl alcohol (IPA), specifically 90% or higher concentration. IPA evaporates quickly and doesn't leave behind any residue. If the keyboard is disassembled, use a small brush dipped in IPA to gently clean the keyboard's surface. Focus on the switches and surrounding areas to remove any residue.
Step 8: Cotton Swabs and Precision Cleaning. Q-tips or cotton swabs are useful for focused cleaning. Dip them in IPA and carefully clean areas where liquid seems to have accumulated. If the keycaps are off, you can also use them to clean the keycaps themselves.
Step 9: Corrosion Prevention: The DeoxIT Solution. In cases of severe corrosion, consider using a specialized electrical contact cleaner/lubricant, such as DeoxIT. Follow the manufacturer's instructions carefully. This is especially important if your laptop was exposed to sugary liquids, which can cause significant corrosion.
Reassembly and Testing: The Moment of Truth
After thorough cleaning, the reassembly and testing phase is critical.
Step 10: Keyboard Reassembly (If Applicable). Carefully reassemble the keyboard, ensuring that all screws and components are correctly placed. Refer to your disassembly notes or service manual to ensure proper configuration.
Step 11: Initial Power-Up (Cautiously). After allowing the keyboard to completely dry, cautiously reconnect the power adapter and/or reinsert the battery (if removed). Press the power button. Observe the laptop’s behavior closely. Does it power on as usual?
Step 12: Functional Testing: The Key Indicators. Once the laptop is powered on, test the keyboard thoroughly. Open a text editor or word processor and type every key, checking for responsiveness. Pay particular attention to keys that were directly impacted by the liquid. Does the keyboard function correctly? Are all keys registering? Are there any stuck keys or unresponsive switches?
Step 13: Additional Troubleshooting (If Issues Persist). If certain keys are not functioning, it might indicate further damage. You can try the following alternatives:
- External Keyboard: Connect a compatible external keyboard to verify that the issue is isolated to the internal keyboard.
- BIOS/UEFI Check: Access the BIOS/UEFI setup utility (usually by pressing the DEL, F2, F12, or ESC keys during startup) and test the keyboard within this environment. This isolates the problem from the operating system.
- Driver Reinstallation: The keyboard may have corrupted drivers; reinstall the keyboard drivers.
Long-Term Considerations and Data Preservation
Even if your laptop appears to be functioning, there are steps to prevent the long-term effects of liquid damage.
Step 14: Data Backup: The Unsung Hero. A laptop keyboard disaster highlights the importance of regular data backups. If you didn't have a recent backup, now is the time. Use cloud-based backup services or an external hard drive to protect your valuable files.
Step 15: Professional Assessment (When to Seek Help). If the laptop is still not functioning, consult a professional laptop repair service. They may be able to diagnose and repair more extensive damage, such as corroded components or short circuits.
Step 16: Prevention Measures. Invest in a keyboard cover. Even a basic keyboard cover represents a simple, cost-effective method of defense against liquid spills. Place your laptop on a stable surface, away from liquids and food.
Step 17: The Warranty Question: Check Your Coverage. Check your laptop's warranty. Some warranties cover accidental damage, while others do not. If the damage is covered, contact the manufacturer for assistance.
Step 18: The Last Resort: Keyboard Replacement. If the damage is too extensive, replacing the keyboard might be necessary. Replacement keyboards are available online and through laptop repair services.
The laptop keyboard disaster is a challenging situation. However, by acting quickly and following these steps, we'll increase your chances of salvaging your laptop and preserving your data. Good luck!
