lenovo laptop touchpad click not working

Title: Fix HP Touchpad Not Working in Windows 11 10 How To Solve hp Laptop touchpad Issues
Channel: Victor Explains
Fix HP Touchpad Not Working in Windows 11 10 How To Solve hp Laptop touchpad Issues by Victor Explains
lenovo laptop touchpad click not working, lenovo laptop touchpad buttons not working, lenovo laptop touchpad right click not working, lenovo laptop touchpad left click not working, lenovo laptop touchpad double tap not working, laptop touchpad click not working, lenovo thinkpad touchpad click not working
Lenovo Laptop Touchpad Dead? FIX This NOW!
Lenovo Touchpad Troubles? Don't Panic! Get It Working Again!
Hey there, tech adventurer! Are you staring down at a lifeless touchpad on your Lenovo laptop? You're not alone. It's a frustrating situation, I completely understand. A unresponsive touchpad can halt your workflow. But fear not! We'll troubleshoot this together, turning that frustration into triumph.
Identifying the Culprit: Pinpointing the Problem
Firstly, take a deep breath. Before you assume the worst, let's explore the possibilities. Is the touchpad truly dead, or is there a simple fix? We need to carefully examine the situation. Perhaps, the device is disabled. It could also be a driver issue. Maybe, a rogue setting has crippled its function. Let's start with the basics.
The Simple Solutions First: Quick Fixes to Try
Sometimes, the easiest solutions are the most effective. We'll start with those. Firstly, check for a simple oversight. Is your touchpad accidentally turned off? Lenovo laptops often have a dedicated button or key combination. Usually, it's a function key combined with a touchpad icon. Experiment with these keys.
Next, restart your laptop. It's a classic for a reason. A simple reboot can resolve minor glitches. Moreover, it refreshes the system. If a software hiccup is the cause, you're in luck. Restarting can often clear it immediately.
Furthermore, clean the touchpad. Debris and dirt can accumulate. They can interfere with its function. Use a soft, lint-free cloth to wipe it down gently. Avoid excessive moisture.
Driver Dilemmas: Updating or Reinstalling is Key
If a simple reboot didn’t work, let's investigate the touchpad driver. Outdated or corrupted drivers frequently cause problems. Don't worry. Updating or reinstalling them is usually straightforward.
Therefore, you'll need to access the Device Manager. You can find it in the Windows search bar. Once open, look for "Mice and other pointing devices." Expand this category. Locate your touchpad entry. Right-click and select "Update driver." Windows will automatically search for updates.
Alternatively, you can reinstall the driver. Right-click on your touchpad device. Then, choose "Uninstall device." After uninstalling, restart your laptop. Windows will automatically reinstall the driver upon reboot. This process often resolves driver-related issues.
BIOS Blues and Power Settings: Digging a Little Deeper
Occasionally, the issue lies deeper, within the BIOS or power settings. Accessing the BIOS can seem daunting. Don’t worry, it's not always that complex. Consult your Lenovo laptop's manual. The manual provides specific instructions. These are usually done by pressing a specific key during startup.
Within the BIOS, check touchpad settings. Ensure the touchpad is enabled. You might also find power-saving options. Sometimes, these settings can inadvertently disable the touchpad. Reviewing them is a must.
Furthermore, power settings can affect touchpad performance. Access your power plan settings through the control panel. Ensure the power plan isn’t overly aggressive. Aggressive settings can sometimes limit touchpad functionality.
Hardware Headaches: When the Touchpad Itself Fails
If you've exhausted all the software solutions, it’s possible there’s a hardware issue. This is, perhaps, a more serious problem. It could involve physical damage to the touchpad. Perhaps, internal connections have become loose.
Carefully inspect the touchpad. Look for any visible damage. Cracks, scratches, or swelling are signs of trouble. If you see any, consider professional repair.
Moreover, if you’re comfortable, you could open your laptop. Accessing the touchpad usually requires removing the bottom cover. Make sure the laptop is turned off and unplugged. Consult your laptop’s service manual beforehand. Verify the connections between the touchpad and the motherboard.
Troubleshooting Tips: The Art of the Process
Testing is a must. Run a diagnostic check. Lenovo offers diagnostic tools. These can help identify hardware failures. Use them to pinpoint the problem.
Always backup your data. Before making any significant changes, back up essential files. This protects your documents and memories. You'll be safe.
Lastly, seek professional help if needed. Don't hesitate to contact Lenovo support. Also, consult with a qualified technician. They have the experience. They can diagnose and fix complex problems more effectively. Professional help is sometimes worth the cost.
Conclusion: Back in the Game!
There you have it! We've walked through the most common fixes for a dead Lenovo touchpad. Hopefully, one of these solutions gets you up and running again. If you've overcome this tech hurdle, share your experiences below! Good luck, and happy computing!
HP Laptop Keyboard Disaster: Solved! (Quick Fix)Lenovo Laptop Touchpad Dead? FIX This NOW!
Hey everyone! Ever been there? You're in the zone, fingers flying across the keyboard, and then… poof… your touchpad just gives up the ghost. That helpless feeling when your cursor vanishes and you're suddenly a prisoner of your keyboard shortcuts is a universal tech-horror story, especially when it happens on your trusty Lenovo laptop. But breathe easy, because we've all been there, and more importantly, we've (usually) survived! This isn't the end of the world; it's just a minor digital hiccup. Let's dust off our detective hats and get that touchpad resurrected!
1. The Sudden Silence: Recognizing the Touchpad's SOS
Before we dive in, let's make sure we're even dealing with a dead touchpad and not user error. (Hey, we've all accidentally bumped that touchpad disable button more than once!). First things first, is the touchpad completely unresponsive? No movement whatsoever? Or is it just acting wonky, jumping around, or not responding to certain gestures? The nature of the problem will slightly alter the solution! Think of it like a car: a flat tire is one thing, a completely dead engine is quite another.
2. The "Easy Button" First: Quick Fixes to Try Immediately
Before we start fiddling with settings or tearing things apart (unless absolutely necessary), let's try the digital version of "turning it off and on again." These are quick wins, the low-hanging fruit of tech troubleshooting.
The F-Key Shuffle: Many Lenovo laptops have a dedicated function key (usually an "Fn" key) combined with another key (usually one of the F1-F12 keys) that toggles the touchpad on or off. Look for a small touchpad icon on one of these keys. It might be a tiny square with lines emanating from it, or something similar. Press "Fn" and this key simultaneously. Sometimes, that's all it takes!
Restart, Restart, Restart: This tried-and-true method works surprisingly often. Restart your Lenovo. A simple reboot can clear out temporary glitches and reset drivers. Think of it like hitting the "reset" button on your brain after a long day.
External Mouse Test: Plug in an external mouse. Does it work? If an external mouse is functional, that suggests the problem is likely with the touchpad itself, not a deeper system issue. This helps narrow down the possibilities.
3. Diving into Device Manager: A Driver's Tale
Okay, if the quick fixes didn't do the trick, we're going a little deeper. The Device Manager is the control center for all your hardware. It’s where we look for driver conflicts or outdated software.
Accessing the Device Manager: Right-click the Windows Start button (the little Windows icon, bottom left of your screen) and select "Device Manager."
Looking for Trouble: In the Device Manager, look for "Mice and other pointing devices." Expand this section. If you see your touchpad listed with a yellow exclamation mark or a red "X," that indicates a problem.
Driver Update: Right-click on your touchpad entry and select "Update driver." Choose "Search automatically for drivers." Let Windows do its thing and hopefully, find a new driver for you.
Driver Rollback (if applicable): If you recently updated your driver and the problem started afterward, try rolling back to the previous version. Right-click the touchpad entry, select "Properties," and go to the "Driver" tab. If the "Roll Back Driver" option is active, click it.
4. Settings Shenanigans: Touchpad Configuration
Windows has a fair amount of touchpad customization. Let's make sure nothing in the settings is interfering with our touchpad's operation.
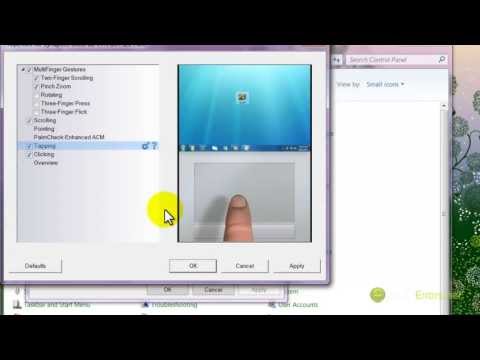
Accessing Touchpad Settings: Type "touchpad settings" in the Windows search bar and open the settings panel. Alternatively, go to "Settings" > "Devices" > "Touchpad."
Enable the Touchpad: The very first thing is to make sure the touchpad is enabled. There’s usually a toggle that says "Touchpad: On/Off." If it's off, well… there's your problem!
Sensitivity Settings: Check the touchpad sensitivity settings. Sometimes, accidental changes can make the touchpad overly sensitive, unresponsive, or jumpy. Experiment with the sensitivity sliders.
Gestures and Multi-Finger Actions: Are your multi-finger gestures working? (Like scrolling with two fingers). If these aren't working, there might be a problem with the drivers or settings related to them.
5. Virus Scans: The Digital Plague Doctor
Sometimes, nefarious software can mess with your system, and, on occasion, that includes touchpad function. Run a full virus scan using your preferred antivirus program. Make sure your antivirus is up-to-date before you start.
6. The BIOS Check-In: Firmware Fundamentals
The BIOS (Basic Input/Output System) is the firmware that controls your computer's hardware at a fundamental level. Sometimes, a glitch in the BIOS can cause problems.
Accessing the BIOS: Restart your Lenovo and press the appropriate key to enter the BIOS setup. The key varies depending on the model (Del, F2, F12, etc.). Check your Lenovo manual or search online for your specific model.
Touchpad Options: Once in the BIOS, look for a section related to "Touchpad" or "Mouse." Make sure the touchpad is enabled in the BIOS.
Resetting BIOS Defaults: If you’ve made any changes or suspect something might be off, you can often reset the BIOS to its default settings. Be careful here – fiddling with the BIOS can potentially cause problems if you don’t know what you’re doing.
7. Hardware Hurdles: When Things Get Physical
If all the software solutions have failed, we have to consider the possibility of a hardware issue.
Check for Physical Damage: Inspect your touchpad for any visible damage: cracks, dents, or excessive wear.
Loose Connections: Rarely, a loose connection inside the laptop could be the culprit. This is a more advanced repair, and it's often best left to a professional.
8. Lenovo's Rescue & Support: The Expert Intervention
Lenovo has its own support channels and resources.
Lenovo Vantage: Lenovo Vantage is a software solution that can diagnose problems and provide other support options. It can also update drivers and perform system scans.
Lenovo Support Website: Visit the Lenovo support website and enter your laptop's model number. Search for troubleshooting guides or contact customer support.
Warranty Check: If your laptop is still under warranty, contact Lenovo support. They may be able to repair or replace your laptop.
9. The Grand Finale: Putting It All Together
We've covered a lot of ground! Remember, the best approach is methodical: start with the easy fixes, then move to more advanced troubleshooting. Don't feel discouraged if you don't solve the problem immediately. Sometimes, it takes a few tries!
10. Avoiding Future Touchpad Troubles: The Proactive Approach
Prevention is key! Here's how to keep that touchpad happy and healthy:
- Keep Your Drivers Updated: Regularly update your drivers, especially the touchpad driver.
- Handle Your Laptop with Care: Avoid dropping your laptop or exposing it to extreme conditions.
- Clean Your Touchpad Regularly: Dust, dirt, and grime can interfere with touchpad performance. Use a soft, lint-free cloth to clean it.
- Consider a Wireless Mouse: Having a backup is a good idea! If the touchpad is giving you consistent problems, consider a wireless mouse.
11. Troubleshooting Tips for Specific Lenovo Models
Different Lenovo models have slight variations in their hardware and software, which can affect how these solutions work. The following are some general tips to consider:
- Model-Specific Research: Before undertaking any troubleshooting steps, conduct a specific search that includes your Lenovo laptop model, such as "Lenovo [Model Number] touchpad not working."
- Driver Updates: Always ensure that you install and utilize the drivers that are specific to your Lenovo model, straight from Lenovo's website for the greatest compatibility.
- Support Forums: Read the Lenovo laptop user forums. Other users may have encountered similar issues and may have answers to your questions.
12. Understanding Touchpad Gestures and Their Effects
As the touchpad is fundamental for your laptop's use, it is also essential to understand the gestures and how they affect the experience.
- Two-Finger Scrolling: Two-finger scrolling is the most common touchpad feature, offering a fast and intuitive method for browsing web pages, documents, and other scrollable content.
- Three-Finger Swipes: These gestures, which may be customized, let you navigate between apps, display the desktop, or activate other features, such as the Cortana assistant.
- Four-Finger Gestures: Four-finger gestures can be set up for tasks like controlling the volume, launching apps, or opening the action center.
13. The Science Behind Touchpad Functionality
Understanding the science behind touchpads can help to improve the troubleshooting process.
- Capacitive Touch Technology: Modern touchpads often employ capacitive sensors, detecting the changes in electrical capacitance caused by
Lenovo Touchpad Not Working in Windows 11 2025 Tutorial

By TechFixIT Lenovo Touchpad Not Working in Windows 11 2025 Tutorial by TechFixIT
Laptop Touchpad Not Working in Windows 11 - 3 Ways to Fix

By Tech White Laptop Touchpad Not Working in Windows 11 - 3 Ways to Fix by Tech White
Fix Double Click On Touchpad Not Working

By Tricks That Make you Smart Fix Double Click On Touchpad Not Working by Tricks That Make you Smart
Title: Fix Touchpad Tap to click doesn't work
Channel: AvoidErrors
Fix Touchpad Tap to click doesn't work by AvoidErrors
Working With Laptop
Lenovo Laptop Touchpad Dead? FIX This NOW!
We understand the frustration. Your Lenovo laptop, a dependable workhorse, suddenly betrays you. You're navigating with a mouse, cursing the missing touch and feel of a functioning touchpad. Don't despair. We are here to guide you through a definitive troubleshooting journey, transforming your touchpad from inert to interactive. Forget the mouse; let's bring your Lenovo laptop back to its tactile best.
Initial Diagnostics: Identifying the Culprit
Before diving into solutions, we must first establish the nature of the problem. Is the touchpad completely unresponsive, or is it exhibiting erratic behavior? Does the problem manifest consistently, or does it come and go? These initial observations will greatly influence our troubleshooting path.
1. The Obvious: Physical Inspection.
- Cleanliness: The simplest solution is often the forgotten one. Examine the touchpad surface for debris. Dust, crumbs, or even a sticky residue can impede cursor movement. Clean the touchpad meticulously with a soft, lint-free cloth, slightly dampened with water. Avoid harsh chemicals.
- Damage Assessment: Scrutinize the touchpad's surface and surrounding area. Are there any visible cracks, scratches, or signs of physical damage? Such damage might indicate a hardware issue requiring professional attention.
2. The Software Side: Driver Verification.
- Crucial drivers: Your touchpad relies on specific drivers to function. These drivers translate your finger movements into on-screen cursor actions.
- Windows key + X: This shortcut brings up the "Power User Menu". Select "Device Manager."
- Locate the Touchpad: Scroll through the list of devices. Look for an entry labeled "Mice and other pointing devices." Expand this section to see if your touchpad is listed.
- Driver Status: Look for any warning symbols (yellow exclamation marks or red crosses) next to the touchpad entry. These symbols indicate driver issues. A greyed-out device suggests it might be disabled.
Driver Troubleshooting: Restoring Functionality
Driver problems are a common culprit behind touchpad malfunctions. Fortunately, they are often easily rectified.
1. Driver Update:
- Right-click the touchpad entry: This presents a context menu.
- Update Driver: Select "Update driver." Then, choose "Search automatically for drivers." Windows will attempt to locate and install the latest drivers.
- Restart: After the update completes, or if no update is found, restart your laptop.
2. Driver Rollback:
- Driver Properties: If a recent driver update coincided with the touchpad failure, you might need to revert to an older version. Right-click the touchpad entry, and select “Properties."
- Driver Tab: Navigate to the "Driver" tab.
- Roll Back Driver: If the "Roll Back Driver" option is available, click it. This will restore the previous driver version.
- Restart for Change: Restart your system.
3. Driver Reinstallation:
- Uninstall the Driver: In "Device Manager," right-click the touchpad entry and choose "Uninstall device." Follow the prompts.
- Restart: Restart your laptop. Windows will automatically attempt to reinstall the correct driver.
- Manufacturer's Website: If Windows fails to install the driver, visit the Lenovo website. Find your specific laptop model and download the touchpad driver from the "Support" or "Drivers & Software" section. Install this driver manually.
BIOS and Settings: Fine-Tuning the Touch Experience
Sometimes, the solution lies within hidden settings. Let's delve into BIOS settings and Windows configurations to unlock your touchpad's potential.
1. BIOS Settings (Advanced Control):
- Boot into BIOS: The method for accessing the BIOS varies by laptop. However, it typically involves pressing a key (such as F2, F12, Del, or Esc) repeatedly during startup. Consult your Lenovo laptop's manual for precise instructions.
- Navigation: Once in the BIOS, navigate using the arrow keys and the Enter key.
- Touchpad Settings: Explore the BIOS menus. Look for sections related to "Touchpad," "Pointing Device," or "Internal Device Configuration."
- Enable and Configure: Ensure the touchpad is enabled. If any configuration options are provided (e.g., Palm Check, Sensitivity), experiment with these settings to optimize performance.
- Save and Exit: Save the changes and exit the BIOS. Your laptop will reboot.
2. Windows Touchpad Settings:
- Settings: Open Windows Settings (Windows key + I).
- Devices: Select "Devices."
- Touchpad: Choose "Touchpad."
- Configuration: Customize the touchpad settings, including:
- Touchpad Enable/Disable: Ensure the touchpad is enabled.
- Sensitivity: Adjust the cursor sensitivity.
- Gestures: Enable and configure multi-touch gestures (e.g., two-finger scrolling, three-finger swipes).
Hardware Considerations: Addressing Underlying Issues
If software solutions fail, it’s time to consider potential hardware problems.
1. External Hardware Conflicts:
- USB Devices: Disconnect all non-essential USB devices (e.g., printers, external hard drives). Sometimes, a faulty USB device can interfere with the touchpad’s functionality. Reconnect devices one by one to identify any conflicts.
2. Internal Component Check (Advanced):
- Professional Assessment: Diagnosing hardware issues is best left to qualified technicians. Opening your laptop can void the warranty and potentially cause further damage.
- Symptoms:
- Intermittent Failure: The touchpad may work sporadically if there is a loose connection internally.
- Physical Damage: A damaged touchpad often requires replacement.
- Liquid Spills: Liquid damage can cause corrosion and short circuits within the laptop’s components.
Troubleshooting Tips and Tricks: Refining the Approach
Here are additional troubleshooting tips and techniques to diagnose and resolve touchpad issues.
1. Power Cycle:
- Shutdown: Fully shut down your Lenovo laptop.
- Battery Removal (If Possible): If possible, remove the battery (consult your laptop's manual for instructions).
- Power Button Press: Press and hold the power button for 30 seconds to release any residual electrical charge.
- Reconnect: Reconnect the battery (if applicable) and power adapter.
- Restart: Power on your laptop and test the touchpad.
2. System Restore:
- Identify Restore Points: If the touchpad problem started recently, use System Restore to revert your system to a previous state. This can undo software updates or driver installations that may have caused the issue.
- Access System Restore: Search for "Create a restore point" in the Windows search bar and open the "System Properties" window. Click on "System Restore" button.
- Select a Restore Point: Select a restore point from before the touchpad started malfunctioning.
- Follow Prompts: Follow the on-screen prompts to initiate the system restore process.
3. Safe Mode:
- Boot into Safe Mode: Restart your laptop and repeatedly press F8 (or Shift + F8 on some systems) during startup to enter the Advanced Boot Options menu. Then, select "Safe Mode."
- Driver Isolation: In Safe Mode, Windows loads with a minimal set of drivers. If the touchpad works in Safe Mode, it suggests a driver or software conflict is causing the problem.
- Troubleshoot in Safe Mode: Reinstall the touchpad driver, disable recently installed software, or run a malware scan to identify and remove potential conflicts.
When to Seek Professional Assistance:
If none of these troubleshooting steps resolve your touchpad issue, it's time to consult a professional.
- Warranty: If your Lenovo laptop is still under warranty, contact Lenovo support or an authorized service center. They can diagnose the issue and provide repair or replacement options.
- Hardware Defect: If you suspect a hardware defect (e.g., internal component failure, liquid damage), take your laptop to a qualified computer repair technician.
- Complexity: If you're uncomfortable working with internal components or navigating advanced software settings, seek professional help.
We hope these comprehensive troubleshooting steps have restored your Lenovo laptop's touchpad, returning you to a smooth, responsive, and frustration-free computing experience.
