how to fix a laptop keyboard not working

Title: How to Solve Keyboard Keys Not Working shorts keyboard pc
Channel: TonaziTube
How to Solve Keyboard Keys Not Working shorts keyboard pc by TonaziTube
how to fix a laptop keyboard not working, how to fix a laptop keyboard key not working, how to fix laptop keyboard not working windows 10, how to fix laptop keyboard not working properly, how to fix laptop keyboard not working windows 11, how to fix lenovo laptop keyboard not working, how to fix my laptop keyboard not working, how to fix hp laptop keyboard not working, how to fix acer laptop keyboard not working, how to fix asus laptop keyboard not working
Laptop Keyboard Dead? FIX IT NOW! (Easy Steps)
My Laptop's Keyboard Is Kaput! Don't Panic, Let's Fix It!
Ugh, the dreaded keyboard freeze. It's a digital nightmare. You’re typing away, immersed in your work. Suddenly, nothing. Your fingers tap uselessly. The cursor sits, mocking your efforts. It is incredibly frustrating. But before you chuck your laptop out the window, breathe! There's hope. We're going to tackle this head-on. So, let us get started.
Troubleshooting the Digital Graveyard: Initial Checks
First, let's rule out the simple stuff. We will start there. Because let's be honest, sometimes it is something silly. First, is it really dead? Try a reboot. Sometimes, the system gets a bit… wonky. Restarting can be a miracle worker. Press and hold the power button. Then you can power it back on.
Next, confirm your suspicion. Does the external keyboard work? Plug in a USB keyboard. If it does, the issue is likely with your laptop keyboard. If the external keyboard also fails, the problem is probably deeper. Consequently, it might be a system-wide issue. However, let's assume the external keyboard works. In that case, we'll focus on the internal one.
Software Shenanigans: Software Solutions to Keyboard Issues
Software glitches can cause all sorts of odd problems. So, let's investigate some potential culprits. The keyboard’s driver is key. A corrupt or outdated driver is a common cause of keyboard malfunctions. Therefore, let’s bring out the new driver. Here is how to update it.
Go to your Device Manager. You can find it in the Control Panel which is in your Windows search bar. Expand the "Keyboards" section. See your keyboard listed there? Right-click on it. Select "Update driver." Let Windows automatically search for the newest version. Furthermore, if that doesn't work.
Try uninstalling and then reinstalling the driver. Right-click the keyboard again. Select "Uninstall device." Restart your laptop. Windows should automatically reinstall the driver. It's a simple process. Sometimes, this simple technique resolves the problem.
Next, consider recent software installations or updates. Did you install new software right before the keyboard went rogue? Some programs conflict with system processes. Furthermore, they may interfere with other components. Consequently, try uninstalling the suspicious software. See if that resolves the issue. It's worth a try.
Hardware Hurdles: Diagnosing Physical Keyboard Faults
Okay, software seems fine. That means we might be facing hardware issues. Now, things become slightly more complex. But don’t worry. The journey ends with a working keyboard.
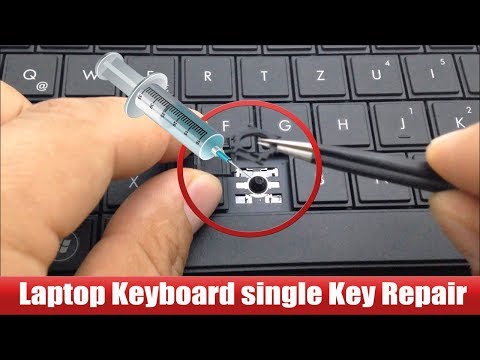
The first step is visual inspection. Turn off your laptop. Carefully examine the keyboard. Are there any obvious problems? Are any keys physically damaged? Moreover, is there debris lodged between the keys? Use a can of compressed air. Get in there. Clean out any dust or crumbs. This can often fix a sticky or unresponsive key. However, if the keys are physically damaged, you might need a repair.
If you are comfortable with more complex tasks, you might attempt another method. Many laptops have removable keyboard panels. Research your laptop model's disassembly guide. You can find these guides online. Look at your laptop’s brand and type. Then search for “keyboard replacement.” However, proceed cautiously. If you are unsure, seek professional help.
The Liquid Spill Disaster: Addressing Water Damage
Liquid spills are the keyboard's worst enemy. Coffee, tea, soda – they all spell trouble. If you spilled something, act fast. Immediate action is vital. Turn off your laptop immediately. Unplug the power adapter. Then, get a towel.
Carefully flip the laptop upside down. Try to drain the liquid. Let the liquid escape. If possible, remove the battery. Next, leave the laptop open to air dry. Give it at least 24-48 hours. Avoid using a hairdryer. Heat can worsen the problem. However, if you can't wait that long.
Consider taking your laptop to a professional. Liquid damage can corrode internal components. A specialist can assess the damage and recommend repairs. It is always best to seek expert assistance.
When to Call in the Professionals: Repair vs. Replacement
Sometimes, the problem is beyond your personal remedies. After all, there’s no shame in admitting defeat. If you've tried everything and the keyboard remains unresponsive. It's time to consider professional help. In fact, if you are not comfortable with hardware repairs, skip the DIY.
A laptop repair technician can diagnose the exact problem. They have the tools and expertise to fix more complex issues. Moreover, they can provide an estimated repair cost. Weigh the cost of repair against the laptop's age and value. Sometimes, a new keyboard is the best solution. In other cases, the entire laptop may need to be replaced.
Preventing Future Keyboard Catastrophes: Proactive Measures
Prevention is always better than cure. So, let's discuss ways to protect your keyboard. Avoid eating or drinking near your laptop. Prevent spills in the first place.
Consider using a keyboard cover. These covers shield against dust and spills. They are a low-cost investment. Moreover, they are an incredibly effective preventative measure. Clean your keyboard regularly. Use a soft cloth and a mild cleaning solution. Finally, back up your important data. A dead keyboard can be a sign of a bigger issue.
Conclusion: Typing Towards Success
Keyboard problems are frustrating. But they don't have to be the end of the world. We've covered a range of troubleshooting steps. From simple software updates to more complex hardware checks. Hopefully, your keyboard is now back in action.
Remember to stay calm. Follow these steps. Moreover, be patient. Your keyboard should be working properly. If not, consult a professional. Your digital life is waiting! Now, go forth and type!
My Acer Keyboard Died?! (Emergency Laptop Fix!)Laptop Keyboard Dead? FIX IT NOW! (Easy Steps)
Hey there, fellow tech adventurers! Ever found yourself staring at a blank laptop screen, your fingers itching to type, only to realize… your keyboard’s gone AWOL? Yeah, we’ve all been there. It's like your digital best friend suddenly decided to go on a silent retreat. But don't panic! Before you start contemplating a full-blown laptop transplant, let's troubleshoot. Because, trust me, nine times out of ten, a dead laptop keyboard is more of a temporary hiccup than a permanent digital tragedy. We're going to roll up our sleeves and get that keyboard back to work, and hopefully, we'll do it without having to call in the tech cavalry.
1. The Silent Killer: Identifying the Problem
First things first: let's diagnose the patient. Is it a full-blown keyboard coma, or just a few keys acting up? Maybe only the "A" and "S" keys are refusing to cooperate. Knowing the extent of the problem is key (pun intended!). Is it a hardware issue, or is software playing a dirty trick? Is your laptop physically damaged, like after a sudden coffee spill incident (we've all been there, right?)? The answers will guide us. Think of it like a medical check-up – we need to understand the symptoms before we prescribe the cure.
2. The Obvious Suspects: Quick & Easy Fixes
Let's start with the low-hanging fruit – the easy fixes that often do the trick. These are the digital equivalents of checking if your car's plugged into the wall before calling AAA.
- Restart Your Laptop: Sounds simple, right? But a good old-fashioned restart can magically fix a multitude of tech woes. It's like hitting the reset button on your brain after a long day. Do it. Now. Seriously.
- Check Your Connection (If Applicable): If you're using an external keyboard, make sure it's plugged in securely to your laptop or that your Bluetooth connection is stable. Think of it like making sure the phone line is connected before you attempt to call someone for help.
- Battery Life: Have you checked your batteries if you're using an external keyboard? Again, another deceptively simple step, but often overlooked.
3. Software Showdown: Software Conflicts and Keyboard Drivers
Sometimes, the problem isn't hardware; it's a software squabble. Think of it like a turf war between apps.
Driver Issues: Keyboard drivers are the software that allows your keyboard to communicate with your laptop. Outdated, corrupted, or incompatible drivers can cause issues. So, how do you fix it?
- Update Your Drivers: This is usually our first go-to solution. Go to your device manager (search for it in your Windows search bar or access in your control panel), find your keyboard, right-click, and select "Update driver." Let Windows search for the latest version.
- Roll Back Your Drivers: If the problems started after a driver update, roll back to a previous version. Same process as above, but look for the "Roll Back Driver" option.
- Reinstall Drivers: If updating or rolling back doesn't work, try uninstalling and reinstalling your keyboard drivers. This is like starting fresh. Sometimes a clean slate is the best solution.
Malware Madness: Yes, believe it or not, sometimes malware can interfere with your keyboard's functionality. Run a full scan with your antivirus software to rule this out.
4. Sticky Keys and Other Physical Foes: Cleaning Your Keyboard
Now, let's get our hands a little dirty. Dust, crumbs, and sticky residue are the arch-enemies of any keyboard. It's the digital equivalent of a clogged drain.
- The Gentle Brushdown: Turn off your laptop and gently brush between the keys with a soft brush (like a toothbrush or a keyboard cleaning brush).
- The Canned Air Attack: Use compressed air to blast away any stubborn debris. Aim the nozzle at an angle to dislodge crumbs and dust. Don’t hold the can too close – you don’t want to damage anything.
- The Key Cap Removal Mission (Proceed with Caution!): If the problem persists, you might need to remove keycaps for a more thorough cleaning. Important: Take pictures before removing the caps so you can put them back correctly. Use a small, flat tool (like a plastic spudger) to gently pry the keycaps off. Clean the area underneath with a cotton swab dipped in isopropyl alcohol (make sure your laptop is off and unplugged!). If you are unsure, don't attempt keycap removal.
5. The Great Spill: What to Do if Your Laptop Got Wet
Oh dear. The dreaded coffee, tea, or juice ambush. Liquid and electronics are not friends. What do you do?
- Act Fast!: Unplug the laptop immediately and turn it upside down to drain any liquid.
- Dry It Out: Let the laptop dry out completely – at least 24-48 hours. Rice, while a common method, is not the best. It is more effective to disassemble the laptop, if you have sufficient technical know-how.
- Professional Help: If you're not comfortable disassembling the laptop or if the problem persists, take it to a professional repair shop.
6. Check for Filter Keys and Sticky Keys
Sometimes the answer is right there in the settings.
- Filter Keys: This Windows setting is designed to ignore brief or repeated keystrokes and can sometimes make your keyboard seem like it's not working. Turn it off in your Ease of Access settings.
- Sticky Keys: This feature lets you press modifier keys (Ctrl, Alt, Shift) sequentially instead of simultaneously. Sometimes it gets triggered by accident and can cause keyboard quirks. Turn it off (also in Ease of Access settings).
7. External Keyboard as a Temporary Solution
While you're troubleshooting, a temporary solution is a lifesaver.
- Plug and Play: Connect an external USB keyboard to your laptop. This allows you to continue working while you get things figured out.
- On-Screen Keyboard: Windows and Mac both offer on-screen keyboards. It's not ideal, but it's better than nothing.
8. The Hardware Hustle: When It's Time for Repairs
If these troubleshooting steps don't work, it might be a hardware issue.
- Assess the Damage: Is the keyboard completely dead, or are some keys still working?
- Professional Inspection: A professional repair shop can diagnose the problem and recommend a solution.
- Keyboard Replacement: Replacing a laptop keyboard can be a DIY project (with the right tools and skills), but it's often best left to professionals.
9. The Power of the BIOS (If you use a desktop computer)
If your keyboard isn't working at the BIOS level, it’s a serious hardware issue.
- Check the BIOS: Sometimes the BIOS settings can interfere with keyboard functionality. Boot into your BIOS (usually by pressing Del, F2, F12, or Esc during startup – check your laptop's manual). If the keyboard works in BIOS, the problem is likely a software issue within your operating system. If it doesn't, it's probably a hardware problem.
10. The Last Resort: Data Recovery and a New Laptop
If all else fails, it might be time to face the music.
- Data Backup: Before getting a new laptop, back up your important files from the hard drive.
- Consider Data Recovery: If you cannot access your files, consider professional data recovery services.
- Laptop Replacement: This is the most extreme measure.
11. Prevention is Key: Keyboard Maintenance Tips
Let's try to prevent future keyboard meltdowns.
- Keep it Clean: Regularly clean your keyboard.
- Avoid Spills: Keep liquids away from your laptop.
- Protective Layers: Consider a keyboard cover.
12. Troubleshooting External Keyboards
If you're using an external keyboard, some extra steps might be needed.
- Check the connection: Ensure it's plugged in securely.
- Try Different Ports: Use a different USB port or try a Bluetooth connection if applicable.
- Check Batteries: If it's wireless, replace the batteries.
13. How to Deal with Water Damage Effectively
Water damage can be a tricky problem. Act quickly to save your device.
- Immediate Action: Shut down the laptop and remove the battery.
- Professional Help: If possible, seek professional repair services.
- Warranty Check: See if your device’s warranty covers water damage.
14. Understanding Keyboard Types and Their Common Issues
Learn about the different keyboard technologies.
- Mechanical Keyboards: Durable but can develop problems with switches.
- Membrane Keyboards: Cheaper but more susceptible to damage from issues with liquid spills.
- Laptop Keyboards: Often are fragile and are more susceptible to key failure and connection issues.
15. When to Call in the Professionals
Sometimes, it's time to let an expert do the work.
- Persistent Problems: If
How to Fix Some Keys Not Working on Laptop Keyboard Keyboard Not Working

By Tech White How to Fix Some Keys Not Working on Laptop Keyboard Keyboard Not Working by Tech White
How to Fix Laptop Keyboard Not Working Windows 11, 10, 8, 7

By EasyTechs How to Fix Laptop Keyboard Not Working Windows 11, 10, 8, 7 by EasyTechs
Laptop Keyboard key repair very easy way.
By Hit Short Films Laptop Keyboard key repair very easy way. by Hit Short Films

Title: How To Fix Troubleshoot Laptop Computer Key, Keys, or Keyboard Not Working
Channel: PC Monkey
How To Fix Troubleshoot Laptop Computer Key, Keys, or Keyboard Not Working by PC Monkey
Laptop Wifi Connect
Laptop Keyboard Dead? FIX IT NOW! (Easy Steps)
A Frustrating Reality: The Non-Responsive Laptop Keyboard
The heart of your digital world – the laptop – faces a sudden incapacitation. You reach for the keyboard, a familiar command center, only to find it utterly unresponsive. The cursor remains at bay, unmoving, unyielding. This is a scenario that countless laptop users have encountered, a digital emergency that can bring productivity to a screeching halt. Panic sets in, and the initial thought is often "What do I do?!" This guide is formulated to methodically navigate through the diagnostic questions and offer a structured plan of action for troubleshooting a dead laptop keyboard, restoring functionality, and returning you to your digital tasks.
Step 1: The Initial Assessment: Is Your Keyboard Truly Dead?
Before launching into complex solutions, confirm the problem. The keyboard might not be entirely defunct; the symptoms may be pointing to a different issue.
Restart Your Laptop: A simple reboot can often resolve temporary software glitches or driver conflicts that might be causing the keyboard to malfunction. A fresh start clears the system’s internal processes, offering an immediate solution.
External Keyboard Test: Connect an external USB keyboard. If the external keyboard works flawlessly, the problem is isolated to the laptop's internal keyboard or its related connection. If the external keyboard also fails, the issue might stem from something more fundamental, such as a problem with the operating system or USB connection.
Boot into Safe Mode: Start your laptop into Safe Mode. This mode loads Windows with a minimal set of drivers, which can identify if the problem is related to a third-party driver interfering with keyboard function. Search online for how to start your specific laptop in Safe Mode, since there are many different manufacturer keys to start it. If the keyboard works in Safe Mode, the culprit is almost certainly a recently installed program or driver.
Caps Lock/Num Lock Test: Check if the Caps Lock or Num Lock lights are responsive. Are they toggling on and off? If these lights do not respond, the issue is almost certainly hardware or connection related. Conversely, if they react, the OS is receiving some signals from the keyboard, suggesting a software-related problem.
Step 2: Software Solutions: Addressing Driver Conflicts and Software Bugs
Assuming the initial steps confirm the keyboard's dysfunction, software-related issues call for a more in-depth investigation.
Update Keyboard Drivers: Outdated, damaged, or corrupted drivers are a common cause of keyboard issues. Open Device Manager (search for it in the Windows search bar). Look for "Keyboards" and expand the category. Right-click on your keyboard device (it may be listed as "Standard PS/2 Keyboard" or something similar) and select "Update driver." Choose "Search automatically for drivers." Windows will search online for the newest drivers. If it finds an update, follow the on-screen instructions to install it. Restart your laptop upon completion.
Uninstall and Reinstall Keyboard Drivers: If updating the drivers did not work, try uninstalling them. In Device Manager, right-click on your keyboard device and choose "Uninstall device." Restart your laptop. Upon reboot, Windows will automatically attempt to reinstall the drivers.
Run the Windows Troubleshooter: Windows has built-in troubleshooters designed to diagnose and fix common problems. Navigate to Settings > System > Troubleshoot > Other troubleshooters. Find "Keyboard" in the list and run the troubleshooter. This automated tool often identifies and resolves simple driver issues.
Scan for Malware: Malware can sometimes interfere with system functions, causing a keyboard to act erratically. Run a full system scan using your antivirus software. Ensure your antivirus software is updated with the latest definitions to catch any new threats.
Check for Recent Software Installations: Did the keyboard malfunction immediately after installing a new program or driver? Uninstalling the recently installed software might resolve the problem. Go to Settings > Apps > Apps & features and uninstall any suspicious or recently installed applications.
Step 3: Hardware Inspection and Troubleshooting
If software solutions prove futile, the problem might reside within the hardware. A deeper examination is required.
Clean the Keyboard: Dust, crumbs, and other debris can accumulate under the keys, causing them to stick or become unresponsive.
Shut Down and Disconnect: Completely shut down your laptop and disconnect the power adapter.
Flip and Shake: Turn the laptop upside down and gently shake it to dislodge any loose debris.
Compressed Air: Use compressed air (available at electronics stores) to blow out the keyboard, targeting any visible debris.
Gentle Vacuuming: With caution, and using a brush attachment, you can carefully vacuum the keyboard surface.
Check the Keyboard Cable Connection (For Laptops with Removable Keyboards): Many laptops have a keyboard that is connected to the motherboard via a small cable.
Power Down and Internal Access: Shut down your laptop, disconnect the power adapter, and remove the battery (if possible). Consult your laptop's manual to locate the service panel or screws securing the keyboard.
Careful Disassembly: With the laptop off, carefully remove the keyboard. There will usually be small clips or screws that secure it to the chassis. Refer to your laptop's service manual or a tutorial video for the correct approach.
Inspect the Cable: Once exposed, gently disconnect the keyboard cable from the motherboard. Examine both the cable and the connector for any signs of damage, such as kinks or bent pins.
Reconnection: Reconnect the cable, ensuring it is firmly seated. Reassemble the laptop and test the keyboard.
Check for Water Damage: Liquid spills are a common culprit for keyboard failure. If any liquid was spilled on the keyboard, immediately shut down your laptop, disconnect the power, and do not turn it back on until it's been thoroughly dried.
Drying: Allow the laptop to dry completely. You can place it in a well-ventilated area for several days or use a desiccant, such as silica gel packs.
Professional Help: Seek professional repair services if there's evidence of water damage, such as sticky residue or corrosion on the internal components.
Keyboard Replacement Considerations: If the above steps don't restore your keyboard's functionality, it's very likely the keyboard itself is faulty.
Laptop Model: Determine the exact model of your laptop. Specific replacement keyboards are designed for each individual model. Searching by your model number is essential.
Online Research: Search online retailers like Amazon, eBay, or specialized laptop parts stores for the replacement keyboard.
Installation: Depending on your technical expertise, you can attempt to replace the keyboard yourself by consulting online videos or following your laptop's service manual. Otherwise, consider taking your laptop to a qualified repair technician.
Step 4: Advanced Troubleshooting Techniques (If All Else Fails)
If initial attempts at fixing your keyboard are fruitless, more advanced solutions may prove necessary.
System Restore: A System Restore allows you to revert your computer to a previous state, before the keyboard started malfunctioning. Search for "Create a restore point" in Windows and select "System Restore." Choose a restore point from a date when the keyboard was known to be working. Be aware that system restore may uninstall some programs.
Reinstall the Operating System: As a last resort, backing up your data and reinstalling the operating system might solve the problem. This is a more time-consuming and complex process but can fix deeper software issues. Ensure you back up all important data before attempting to reinstall Windows.
Professional Diagnostics: If, after these steps, your keyboard remains dead, it is time to consult a professional. A technician can perform detailed hardware diagnostics to pinpoint the exact cause of the failure and suggest a repair plan.
Step 5: Preventative Measures: Keeping Your Keyboard Functional
Once your keyboard is functioning, take precautions to protect it.
Keyboard Covers: Use a keyboard cover to protect against spills, dust, and debris.
Regular Cleaning: Regularly clean your keyboard with compressed air and a soft cloth.
Gentle Typing: Avoid excessive force when typing.
Proper Storage: When not in use, close the laptop lid carefully to protect the keyboard from damage.
Conclusion: Reclaiming Control of Your Laptop
Finding your laptop keyboard unresponsive presents an obstacle in the digital world, but it is frequently solvable. By systematically working through these steps, from basic restarts and driver updates to thorough hardware inspections and, if required, hardware replacement, you can diagnose the problem and restore the functionality of your keyboard. Remember to practice preventative measures to prolong its life. Your laptop is a crucial tool, and with this guide, you have the knowledge to get it back up and running.
