headphones not working on laptop windows 7
Title: Setting up headphones and microphone on Windows 7
Channel: Kerry J
Setting up headphones and microphone on Windows 7 by Kerry J
headphones not working on laptop windows 7
Laptop Headphones Dead? Windows 7 FIX (Guaranteed!)
Laptop Headphones Silent? Don't Panic! Windows 7 Audio Resurrection Guaranteed!
Ah, the dreaded silence. You're ready to dive into that epic movie, jam out to your favorite tunes, or finally concentrate on that crucial online meeting. But alas, your laptop headphones betray you. That irritating absence of sound! Deep breaths. Before you chuck your laptop across the room, let's troubleshoot. Fortunately, fixing this issue on Windows 7 can be surprisingly straightforward. Consequently, you might resolve this frustrating problem quickly.
Is It Really Your Headphones, Or Something Else?
First things first, rule out the obvious. Now, I know, I know, it sounds basic. Yet, check your headphones. Are they plugged in securely? Furthermore, test them on another device. They might be the culprit. If they work perfectly on your phone or another computer, you can confidently focus your efforts on your laptop. However, let's not ignore the obvious. Try a different pair of headphones. Perhaps your current ones are damaged.
Checking the Basics: Volume and Mute Settings
Okay, headphones confirmed good. Now, it’s time to navigate the often-overlooked controls. The volume control icon in your system tray is your first stop. Is it muted? Is the volume cranked all the way down? It seems simple, yet it's a common oversight. In addition, click the volume icon. Look for the volume slider. Adjust it to ensure you're not accidentally muted. Also, make sure the audio output is set to your headphones.
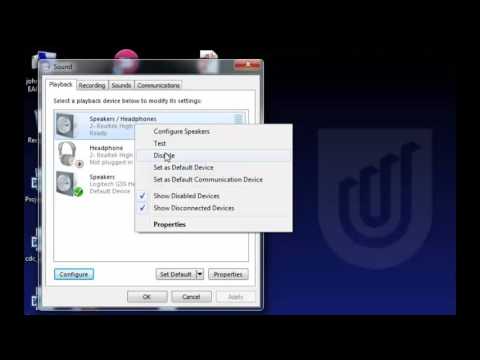
Dive Into the Playback Devices Menu
Next, let's delve deeper into Windows 7's audio settings. Right-click the volume icon in the system tray again. You'll see options. Then, click "Playback devices." This opens a window displaying all connected audio devices. Consequently, you'll see your laptop's speakers and, hopefully, your headphones listed.
Here's where you perform a crucial check. Right-click on your headphones icon. If it's grayed out or disabled, that's your problem! Therefore, choose “Enable.” After enabling, right-click again. Select "Set as Default Device." This confirms your headphones are the primary audio output. Furthermore, test the headphones. Play some music or a test sound. Problem solved? Hopefully, yes!
Driver Dilemmas: A Windows 7 Culprit
Drivers run everything. Sometimes, outdated or corrupted audio drivers cause headaches. Hence, driver issues are a frequent cause of audio problems. Let's troubleshoot this.
First, open the Device Manager. You can find it via the Start menu search bar. Type "Device Manager" and click the result. In Device Manager, look for "Sound, video and game controllers." Expand this section. You'll see your sound card listed. It’s usually a generic label, such as "Realtek High Definition Audio." Right-click on the device. Now what? Select "Update driver software."
Windows will search for updated drivers online. Let it work its magic. After the update completes, restart your laptop. Thus, Windows 7 will reinstall the updated driver during the reboot. After the restart, test your headphones again. If updating didn't work, you might need to uninstall the driver.
To uninstall the driver, right-click the audio device in Device Manager. Then, select “Uninstall.” Check the box to remove the driver software completely. Restart your laptop again. Windows will automatically try reinstalling a generic driver. Test your headphones afterward.
Advanced Troubleshooting: The Audio Troubleshooter
Windows 7 includes a built-in troubleshooter. It's not a magic wand, but it can sometimes identify the problem. To use it, go back to the Control Panel. From there, select "Troubleshooting." Under “Hardware and Sound,” select “Troubleshoot audio playback.” The troubleshooter guides you through a series of steps. It checks for common issues. Let it run and follow its prompts. Then, it can suggest potential fixes.
Still Silent? Check BIOS Settings
If all else fails, your BIOS settings might be the issue. Accessing the BIOS requires restarting your laptop. Press a specific key (often Del, F2, F12, or Esc) during startup. The key varies depending on your laptop manufacturer. Once in BIOS, look for audio-related settings. This is usually under "Advanced" or "Onboard Devices." Ensure the audio device is enabled. Make sure it's not disabled. Save your BIOS changes and restart your laptop.
Final Thoughts (and Hopeful Sounds!)
Hopefully, one of these steps restored sound to your laptop headphones! Audio problems can be frustrating. However, many solutions are surprisingly easy to implement. Don't give up! In conclusion, always double-check the obvious. Then, work your way through the troubleshooting steps. Your headphones should be singing again soon. If all else fails, you might need professional assistance. However, these simple fixes resolve a lot of issues. Go forth and enjoy your audio!
2019's BEST Budget Work Laptop? (Shockingly Affordable!)Laptop Headphones Dead? Windows 7 FIX (Guaranteed!)
Hey there, fellow tech travelers! Have you ever sunk into your comfy chair, ready for a movie night or a serious Spotify session, only to be greeted by… silence? Yup, that dreaded moment when your laptop headphones decide to go AWOL. And if you're still rocking Windows 7 (hey, no judgment, I was there!), the frustration can feel like trying to navigate a maze blindfolded. But fear not, because we're about to unlock the secrets and bring those headphones back to life. Trust me, this isn't just another generic article; we're diving deep, sharing tried-and-true solutions that have worked for years.
1. The Silent Treatment: Why Did My Laptop Headphones Go Dark?
Before we jump into the fixes, let's understand the enemy. What could be causing this headphone headache? It's a bit like diagnosing a car issue – you need to know what's wrong before you can fix it. The culprit could be anything from a simple software glitch to a more complex hardware problem. We'll run through the common suspects.
2. The Usual Suspects: Common Headphone Problems
Think of your headphones as a delicate instrument. Several issues can throw them off-key:
- Driver Issues: Outdated, corrupted, or simply missing drivers are the most frequent offenders. Imagine them as the conductor of your audio orchestra; without them, the music stops.
- Hardware Malfunctions: Your headphone jack itself might be loose, damaged, or perhaps the headphones themselves have a broken wire. It's like a broken record – the sound just won't play.
- Volume Control Chaos: Sometimes, the simplest things get overlooked. Are your system volumes turned down or muted? Happens to the best of us!
- Software Conflicts: Another program might be hogging the audio output, creating a roadblock. Think of it as competing bands fighting for stage time.
- Incorrect Default Device: Your system could be routing audio to the wrong device – like sending a letter to the wrong address.
3. Driver Detective: Checking and Updating Your Audio Drivers
This, my friends, is often the key to the kingdom. We'll start by examining your audio drivers:
- Access Device Manager: Click the Start menu, type "Device Manager," and hit Enter. This is like opening a map of your computer's components.
- Hunt for Sound, video and game controllers: Expand the list and look for your audio devices. They might be listed under their specific model or as "High Definition Audio Device."
- Right-click and Update Driver Software: If there's a yellow exclamation mark, it's a red flag! Right-click the device and select "Update driver software." Windows will attempt to find and install the latest driver.
- Manual Updates (if needed): If automatic updates fail, you can visit the manufacturer's website (Realtek, for example) and download the latest driver for your specific laptop model. It might seem technical, but it's often the most effective solution.
4. The Mute Button Mirage: Double-Checking Volume Controls
Don't laugh; this happens to the best of us! Before you go launching into complex troubleshooting, make sure the obvious isn't the problem:
- System Volume: Check the speaker icon in the system tray (bottom right). Is it muted or turned down to zero?
- Application Volume: Some applications have their own volume controls. Make sure the volume isn't muted within the app (Spotify, VLC, etc.).
- Headphone Volume: Many headphones have a volume wheel or buttons. Make sure they're not accidentally turned down.
5. Audio Output Odyssey: Setting the Default Audio Device
Windows sometimes gets confused about where to send the audio. Let's set things straight:
- Right-click the Speaker Icon: In the system tray, right-click the speaker icon and select "Playback devices." This opens the audio settings.
- Choose Your Headphones: Locate your headphones (they might be listed as "Speakers" if they're plugged into the headphone jack).
- Set as Default: Right-click on your headphones and select "Set as Default Device." This tells Windows to use your headphones for audio output.
- Test the Sound: Now, play a test sound (like the Windows “ding”) to ensure your headphone is now working.
6. The Hardware Hustle: Inspecting the Headphone Jack and the Headphones
Sometimes, the issue is physical, not digital. Let's investigate:
- Inspect the Jack: Look closely at the headphone jack on your laptop. Is it loose, bent, or damaged? If so, it might require a repair.
- Test Different Headphones: Plug in a different pair of headphones to see if they work. If they do, the problem lies with your original headphones.
- Test on Another Device: Try your headphones on your phone, tablet, or another computer to confirm they're functioning correctly.
7. Software Showdown: Closing Conflicting Applications
Sometimes, other applications monopolize your audio. Close any apps that might be interfering:
- Identify Potential Culprits: Think about what you were doing when the sound stopped. Were you running any video editors, DJ software, or virtual audio mixers?
- Close Unnecessary Programs: Close those programs to see if it frees up the audio output.
- Restart if needed: Sometimes, a simple restart is enough to reset everything.
8. Troubleshoot with a Wink : Using the Windows Troubleshooter
Windows 7 includes a built-in troubleshooter designed to tackle audio problems.
- Access the troubleshooter: Right-click the speaker icon in the system tray and select "Troubleshoot sound problems."
- Follow the prompts: Windows will guide you through a series of tests and attempt to diagnose and fix the issue.
9. The Last Resort: System Restore - Going Back in Time
If none of the above steps work, a system restore can be a lifesaver. This rolls back your system to a previous state when everything was working correctly.
- Open System Restore: Click the Start menu, type "System Restore," and hit Enter.
- Choose a Restore Point: Select a restore point from a time before the headphone issue began.
- Follow the prompts: Windows will revert your system to the chosen point; make sure you have essential data backed up.
10. Decoding Codec Chaos : Checking for Codec Conflicts
Sometimes, conflicting audio codecs (like the behind-the-scenes "translators" of audio) can cause issues.
- Codec Identification: If you've installed custom codec packs, they might be the problem.
- Uninstall and Reinstall: Try uninstalling any recently installed codec packs and restarting your system. A fresh installation of the default codec pack can sometimes resolve this.
11. Firewall Fiascos: Verifying Firewall Settings are Clear
In rare instances, your firewall might be blocking audio programs.
- Check Firewall Rules: Access your firewall settings and make sure any audio-related programs (like your media player) are allowed to access the internet and network.
12. The Sound Card Saga: Diagnosing Sound Card Problems
If you suspect a sound card issue (more common in older laptops), you might need to delve deeper:
- Device Manager Check: Ensure your sound card is listed in Device Manager without any errors.
- Reinstall Sound Card Drivers: Consider uninstalling and reinstalling your sound card drivers from Device Manager.
- Sound Card Repair (if needed): In extreme cases, a faulty sound card might require hardware repair.
13. Power Saving Puzzles: Disable Power Saving for the Audio Device
Windows 7 can sometimes put audio devices into a power-saving state, which can cause them to malfunction.
- Access Device Manager: Go to Device Manager (explained earlier).
- Navigate to the Audio Device: Expand the "Sound, video and game controllers" section.
- Open Properties: Right-click on your audio device and select "Properties."
- Uncheck Power Saving: Go to the "Power Management" tab and uncheck the box that says "Allow the computer to turn off this device to save power."
14. The Windows Update Whispers: Check for Windows Updates
Sometimes, even older operating systems get updates that can fix driver issues.
- Go to Windows Update: Click the Start menu and search for "Windows Update."
- Install Available Updates: Check for and install any available updates, including optional driver updates.
15. When All Else Fails: Seeking Professional Help
If you've tried everything and your headphones are still playing the silent game, it's time to wave the white flag and consider professional help.
- Consult a Technician: A qualified computer technician can diagnose and repair hardware issues.
- Consider New Headphones: Sometimes, the headphones themselves are the problem, especially as the drivers may be corrupted without your immediate knowledge.
And there you have it! We've explored every nook and cranny, every hidden pathway, to try and get your laptop headphones back up and singing. I know it can be frustrating when things go amiss, but with a little patience and these steps, you're well on your way
Lenovo Touchscreen DEAD? FIX This NOW!Fix Bluetooth Doesn't Find Any Device in Windows 7 How To Solve can't find bluetooth devices

By Victor Explains Fix Bluetooth Doesn't Find Any Device in Windows 7 How To Solve can't find bluetooth devices by Victor Explains
Fix No Audio Output Device is installed in Windows 7 How To Solve no audio Sound Problem

By Victor Explains Fix No Audio Output Device is installed in Windows 7 How To Solve no audio Sound Problem by Victor Explains
FIXED Front Audio Jack Not Working Windows Error Problem Very Easily & Quickly

By TechinPost FIXED Front Audio Jack Not Working Windows Error Problem Very Easily & Quickly by TechinPost

Title: Front Audio Jack not working Windows 7
Channel: Vocal Information
Front Audio Jack not working Windows 7 by Vocal Information
Laptop Wifi Connect
Laptop Headphones Dead? Reviving Audio on Windows 7 (Step-by-Step Guide)
It’s the ultimate tech frustration: you settle in, ready to enjoy your favorite tunes, stream a movie, or dive into a video call, only to be met with… silence. Your laptop headphones, once delivering crystal-clear audio, are now stubbornly refusing to cooperate. Don't panic. Before you resign yourself to a speakerphone existence or even consider the dreaded trip to the repair shop, let us guide you through a comprehensive troubleshooting process designed to bring your headphones back to life on your Windows 7 machine. This is more than just a checklist; it's a deep dive, a methodical approach to ensure you've exhausted every possible solution.
Preliminary Checks: The First Line of Defense
Before we delve into complex fixes, let's address the simplest, often overlooked solutions. These initial checks can often resolve the issue without requiring advanced intervention.
Physical Connection Matters: Ensure your headphones are securely plugged into the correct audio jack. On most laptops, this is the 3.5mm headphone jack, usually marked with a headphone symbol or a small speaker icon. Double-check the connection; sometimes, a loose plug is all it takes. Also, inspect the headphone cable for any damage. A frayed or broken cable can interrupt the audio signal. Try gently wiggling the cable near the connector; if the audio cuts in and out, you've likely found the culprit (and a replacement cable is in order).
Volume Control Verification: This may sound elementary, but it's a vital step. First, check the physical volume controls on your headphones (if they have them). Then, ensure the volume is turned up in Windows. Look for the speaker icon in your system tray (the area near your clock). Click it. Is the volume slider all the way down? Raise the slider. Also, click the mixer icon (it may look like a mixing board) to verify that the audio for your specific application (music player, web browser, etc.) isn't muted or turned down individually.
Device-Specific Troubleshooting: Some laptops have dedicated mute buttons or volume knobs. Ensure you haven't accidentally muted the audio system. Examine the keyboard for buttons typically indicated with speaker icons, and check your laptop's side panels and front facade for volume controls.
Try Different Headphones: This is a critical diagnostic step. If possible, connect a different pair of headphones to your laptop. If these new headphones work flawlessly, you've isolated the problem to your original headphones, which may be faulty and need replacing. If the second pair of headphones also fails, the issue lies within the laptop itself. Proceed to the next sections for advanced troubleshooting.
Audio Device Management: Unveiling Your Headphones' Status
Windows 7's Device Manager offers a powerful suite of tools for managing your audio devices. We'll use this to identify the headphones, check their status, and potentially update drivers.
Accessing the Device Manager:
- Click the Windows "Start" button.
- In the search bar, type "Device Manager" and press Enter.
- Alternatively, you can right-click on "Computer" (on your desktop or in the Start menu) and select "Manage," then click "Device Manager."
Locating Your Audio Devices: In the Device Manager window, expand the "Sound, video and game controllers" category. Here, you should see a list of your audio devices, including your laptop's built-in speakers and (hopefully) your headphones.
Identifying Issues with Device Icons: Pay close attention to the icons next to each device.
- A yellow exclamation mark indicates a problem.
- A red "X" means the device is disabled.
Troubleshooting Device Problems:
- If you see a yellow exclamation mark, right-click on the problematic device (likely your headphones) and select "Properties." In the "General" tab, you'll find an error message that can help pinpoint the issue.
- If the device is disabled (red "X"), right-click the device and select "Enable."
Driver Updates: The Key to Compatibility: If the headphones are not showing up correctly, or if the drivers are outdated, you may need to update or reinstall them.
- Right-click on your audio device (headphones) and select "Update Driver Software."
- Choose "Search automatically for updated driver software." Windows will attempt to find and install the latest drivers.
- If Windows fails to find suitable drivers, you can try downloading drivers directly from your laptop manufacturer's website (Dell, HP, Lenovo, etc.) by searching your laptop model number. Download and install those drivers.
Sound Playback Control: Configuring the Audio Output in Windows
Windows 7's Sound Playback settings allow you to select your default audio device and configure various audio properties.
Accessing Sound Playback Settings:
- Right-click the speaker icon in your system tray (near the clock).
- Select "Playback devices."
Selecting Your Default Playback Device: In the "Playback" tab, you'll see a list of available audio devices, including your headphones and your laptop's speakers.
- If your headphones are listed, but not selected as the default, right-click on your headphones and select "Set as Default Device." This tells Windows to send all audio to your headphones.
- If your headphones aren't listed, that means Windows isn't detecting them. Go to the steps in the device manager and ensure they are properly enabled.
- If your headphones are listed but show as "Not plugged in," even though they are, try unplugging and replugging them.
Testing Your Audio Device: After selecting your headphones as the default device, click the "Test" button. You should hear a test sound, which confirms that audio is being routed correctly.
- If you don't hear anything, double-check the volume controls as before. Then, click the "Properties" button to investigate further.
Exploring Device Properties: In the properties window for your headphones:
- Go to the "Levels" tab and ensure the volume slider is up and not muted. Check the balance settings as well if you think one side of the headphones is not working.
- In the "Advanced" tab, you can select the audio quality (sample rate and bit depth). Experiment with different settings to see if it improves the sound.
- In the "Enhancements" tab, you can also find any audio enhancements that might have been enabled. Sometimes, these enhancements can conflict with your headphones. Try disabling them to see if it makes a difference.
Advanced Troubleshooting: Diving Deeper into Potential Solutions
If the above steps haven’t resolved the problem, we need to explore some more advanced techniques.
Uninstalling and Reinstalling Audio Drivers: Sometimes, corrupted drivers can cause audio problems. Completely removing and then reinstalling the drivers often works miracles.
- Go back to the Device Manager (as described previously).
- Expand the "Sound, video and game controllers" category.
- Right-click on your audio device (the headphones or the audio controller) and select "Uninstall."
- Confirm the uninstallation.
- Restart your laptop. Windows should automatically attempt to reinstall the drivers upon restart.
Rolling Back Driver Updates: If the audio problem started after you updated your audio drivers, the new drivers might be the issue.
- In the Device Manager, right-click on your audio device and select "Properties."
- Go to the "Driver" tab.
- Click the "Roll Back Driver" button. This will revert to the previous driver version. If the button is grayed out, it means no previous driver version is available.
Checking for Conflicting Software: Some software, such as virtual audio devices, audio equalizers, or audio-enhancing apps, can sometimes interfere with the normal audio output.
- Review your installed programs, and consider uninstalling any software that seems related to audio. Restart your machine to make sure.
- Test your headphones after uninstalling them, and if the audio magically appears, then the previously installed software was, indeed, the issue.
Run the Windows Troubleshooter: Windows 7 includes a built-in troubleshooter for audio problems. It automatically attempts to diagnose and fix any issues with your audio devices.
- In the system tray, right-click on the speaker icon.
- Select "Troubleshoot sound problems."
- Follow the on-screen instructions.
Final Considerations and Potential Hardware Issues
You’ve worked through all of the above steps, and still no sound? Let's explore other possibilities, including the most dreaded scenario.
- Internal Component Failure: Internal failure is always a possibility. The audio jack on your laptop could be mechanically damaged (loose connections, corrosion) or the audio codec chip on the motherboard might have failed. Unfortunately, these issues often require professional repair or replacement of the laptop's components.
- Headphone Jack Failure: If your headphones work on other devices and the other troubleshooting steps have failed, the headphone jack could be damaged.
- Speaker Protection Systems and Auto-Mute: Some laptops have built in systems to prevent internal damage to the speakers. If the system detects
