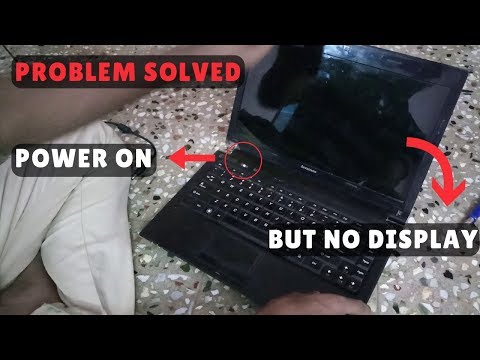
laptop working but no display

Title: Fix it Laptop ON but Display Black Black Screen Problem Laptop Starts but No Display
Channel: Tech Process
Fix it Laptop ON but Display Black Black Screen Problem Laptop Starts but No Display by Tech Process
laptop working but no display, laptop running but no display, laptop fan working but no display, lenovo laptop running but no display, hp laptop running but no display, hp laptop fan working but no display, dell laptop fan working but no display, laptop fan not working and no display, laptop turns on but no display
Laptop Screen Dead? FIX It NOW! (Working Internal)
Cracked Screen Catastrophe? Bring Your Laptop Back to Life!
That sinking feeling. You flip open your laptop, expecting the familiar glow of the screen. Instead, you're met with a black abyss. Or maybe it's a web of cracks, each radiating a silent message of digital despair. Before you resign yourself to a costly replacement, there's hope. Your laptop's screen might be salvageable! Even if the outer display is toast, the internal components might still be humming.
Diagnosing the Digital Demise: Is the Screen Truly Gone?
Firstly, let’s conduct preliminary troubleshooting. Is the screen completely dark, or just faintly showing something? Moreover, is there any sign of power at all? Does the power button illuminate? These are vital questions. If the screen remains unresponsive, proceed with these crucial tests.
Connect your laptop to an external monitor. If the external display works, the issue likely resides with the internal screen or its connections. This is good news, believe it or not! Then, you can use your laptop. So, don't panic and consider this.
Next, listen carefully. Do you hear the familiar sounds of your operating system booting up? The whir of the fan? The chime of Windows or the Apple boot-up sound? These clues indicate that the laptop is functioning. Therefore, the problem centers on the display.
Deep Dive: Potential Culprits Behind the Black Screen
Several factors could be at play. The most common culprit? A detached or damaged display cable. This thin cable connects the motherboard to the screen. It feeds the power and the data needed for the image. Because it's frequently moved, it can come loose or fray over time.
Another possibility involves the inverter board. This board converts power from the battery to the backlight. Further, if the inverter fails, the backlight won't function. Consequently leading to a dark screen. Sometimes, a simple software glitch could be to blame. So, let’s start by fixing those first.
The Troubleshooting Toolkit: Your First Steps to Recovery
Begin with the basics. Power down your laptop completely. Remove the battery (if possible) and the power adapter. Hold the power button down for 30 seconds. Consequently, this drains any residual power from the system.
After that, reconnect the power adapter (without the battery). Attempt to boot up and see if the screen comes alive. If the screen remains blank, try a different power outlet. Sometimes the simplest solutions are the most effective!
Another common solution is to adjust the screen brightness settings. Though, you cannot see the display, pressing the brightness keys (usually function keys like F2 and F3) might inadvertently make the screen brighter. So, press them and see what happens.
Unleashing the Internal Rescue Operation: Disassembly and Inspection
This step requires some technical aptitude. Therefore, proceed with caution. Consult your laptop's service manual (search online for your specific model). This provides step-by-step instructions for disassembly. First, remove all screws from around the screen bezel. Then very carefully pry off the plastic bezel, working your way around the screen.
Once the bezel is removed, you'll see the screen assembly. Note: there'll be many screws holding the screen to the back of the lid. Carefully detach the display cable. Inspect it closely for any damage. Look for kinks, tears, or loose connections.
If the cable appears damaged, replace it. This involves purchasing a replacement cable from an online retailer. Reconnect the cable securely. If the cable seems fine, inspect the inverter board (usually located near the screen). Look for any signs of damage, like burnt components.
Reassembly: Putting the Pieces Back Together
Carefully reassemble the screen assembly, replacing all screws. Snap the bezel back into place. Reconnect the battery and power on your laptop. Cross your fingers! Hopefully, the screen is back to life. If not, don't lose hope.
Seeking Expert Assistance: Knowing When to Call for Help
If you've tried these steps and the screen remains dark, it's time to consider professional help. A local computer repair shop possesses the expertise. They have the tools to diagnose more complex issues. Moreover, they can replace parts such as the screen or the backlight.
Repair costs vary. Therefore, get an estimate before authorizing any work. Consider the cost of repair. Also, consider whether it’s worth the investment, compared to buying a new laptop. Often, a simple fix can save you money and extend the life of your device.
The Takeaway: Don't Give Up On Your Laptop!
A dead laptop screen can seem like a disaster. However, it doesn't necessarily mean the end of your digital life. Remember, the internal components might function perfectly. Additionally, with a little troubleshooting and potential repairs, you can revive your laptop. So, don't rush to replace it. Instead, take action and explore your options. Happy fixing!
Laptop Disaster! My Work Life Just Crashed (And How I Survived)Laptop Screen Dead? FIX It NOW! (Working Internal)
Alright, let's face it. You're staring at a black screen. Your heart sinks. Your laptop, your trusty digital companion, is unresponsive. A dead laptop screen can feel like the digital apocalypse has arrived, especially when you know the power is on, the fans are whirring, and the little light is blinking – but the screen? Nada. Zip. Zilch. Don't panic. Deep breaths. We've all been there, staring into the abyss of a black screen, wondering if all your precious data, those late-night writing sessions, and that killer presentation are all gone. Fear not, because we're going to dive deep into the potential causes and, more importantly, the fixes for a laptop screen that's stubbornly refusing to light up, even if the internal components seem to be running just fine. Think of us as your digital screen-saving superheroes. Let's get this show back on the road!
1. The Dreaded "No-Screen" Scenario: Understanding the Problem
First things first. Let's establish what we're dealing with. We're talking about a laptop screen that’s completely black, even though the laptop seems to be on. You might hear the fan running, or maybe the power light is blinking. This difference is crucial. If the laptop is completely unresponsive, that's a different (and usually more serious) issue. But if you suspect everything else is working, then a dead screen is likely the culprit here. This could involve loose connections, damaged components, or even a software glitch. It's like your laptop is a car with a dead dashboard – the engine might be purring, but you can't see where you're going!
2. Preliminary Checks: Simple Solutions Before the Panic Sets In
Before you start tearing your hair out (or your laptop apart), let's run through some quick, easy checks. Think of these as your digital triage.
- The External Monitor Test: This is our first, and often most telling, test. Connect your laptop to an external monitor. If the external monitor works, then the problem is almost certainly with your laptop's screen or the connection to the screen – not the core hardware. This is like saying, "Okay, we know the infrastructure is working. The problem is definitely specific to the display!"
- The Brightness Button Shuffle: Sounds simple, but sometimes the brightness is just all the way down. Hit those brightness keys (usually Function + a brightness key – look for a sun icon). You’d be surprised how often this solves the problem!
- The "Force a Reboot" Technique: Hold down the power button until the laptop shuts down completely (usually 10-15 seconds). Then, turn it back on. Sometimes, a simple reboot can clear temporary glitches. This is like giving your mind a fresh start after a long day.
3. Diving Deeper: Internal Component Causes
Okay, so the easy fixes didn't work. Time to investigate some internal component causes. This is where things get a little more technical, but don't worry, we'll keep it understandable.
- Loose Connection Woes: Ribbon Cables and Beyond: Within your laptop, the screen is connected to the motherboard via a delicate ribbon cable. This cable can become loose over time, or even get dislodged during a bump or drop. This is a common culprit! A loose cable is like a frayed wire preventing the light from reaching the screen.
- The Inverter Board: The Little Powerhouse: The inverter board (or the display's backlight), is responsible for actually lighting up that LCD panel. If this fails, you'll get that characteristic black screen. The inverter board delivers the power that illuminates the screen. Think of it as the lightbulb behind your display.
- LED Backlight Failure: Newer laptops often use LED backlights. These are generally more durable than older LCDs, but they can still fail. Problems with the LED backlight system can lead to display issues, like dimness or flickering.
- The Display Panel Itself: Sad, but true. Sometimes, the LCD panel itself just gives up the ghost. This is often the most expensive repair, as the whole screen assembly usually needs to be replaced.
4. Troubleshooting Step-by-Step: Working Towards a Fix
Now, let's put on our detective hats and walk through some real troubleshooting steps. Always unplug the laptop and remove the battery before attempting any internal repairs. Safety first!
Step 1: The External Monitor Confirmation: As mentioned earlier, this is crucial to rule out (or confirm) a screen issue.
Step 2: The "Careful Disassembly" Approach: If an external monitor works, it's time to open up the laptop (with the power off and the battery removed) and carefully check connections. This is not for the faint of heart. You'll need:
A small Phillips head screwdriver.
A plastic spudger or pry tool (to avoid scratching things).
A good flashlight!
Locate the Screen Cable: Usually, this connects to the motherboard at the bottom of the laptop.
Gently Disconnect and Reconnect: Unplug the cable and plug it back in, ensuring it's firmly seated. Examine the cable for any visible damage.
Reassemble and Test: Power up the laptop (after re-inserting the battery).
Step 3: Checking the Inverter Board: If you're comfortable, and armed with a multimeter, you can test the inverter board if you can't see the screen (it's unlikely if the screen is fully black). This will vary depending on your model.
Step 4: Seek Professional Help (When Necessary): If you're not comfortable with any of these internal checks, or if the problems persist, it's time to consult a qualified laptop repair technician. It's better to admit defeat than to risk making things worse.
5. Software Glitches: Less Common but Still Possible
Sometimes, it's not hardware at all! Software can cause a dead screen.
- Driver Issues: A corrupted or outdated display driver can cause your screen to go blank. You might be able to access Safe Mode to uninstall and reinstall the driver.
- Operating System Corruption: In very rare cases, a corrupted operating system can cause display problems. This would involve a full system recovery or reinstall, which is a significant undertaking.
6. Prevention Is Key: Keeping Your Screen Alive
Prevention, as they say, is better than cure. Here are some tips to keep your laptop screen happy and healthy:
- Handle with Care: Avoid dropping your laptop or subjecting it to excessive force. Think of your laptop as a precious vase - it needs to be handled with care!
- Keep it Clean: Dust and debris can accumulate and potentially cause problems. Use a microfiber cloth to clean the screen and vents.
- Proper Storage: Don't leave your laptop in extreme temperatures (e.g., a hot car).
- Regular Backups: Back up your important data regularly, just in case the worst happens!
7. Cost of Repair: Budgeting for the Fix
The cost of repair varies widely depending on the problem.
- Loose Connection: Potentially free (if you can fix it yourself).
- Inverter Board Replacement: $50-$150 (parts and labor).
- Screen Replacement: $100-$400+ (parts and labor).
- Professional Labor Costs: Factor in labor costs from a qualified technician.
8. DIY vs. Professional: When to Call in the Cavalry
Knowing when to call in a professional is key. If you:
- are uncomfortable opening your laptop…
- tried the basic troubleshooting steps and failed…
- suspect a more complex hardware issue…
… then it's time to call in the cavalry!
9. Data Recovery: Saving Your Precious Files
If the screen is completely dead, the good news is that your data may still be accessible. Even if the screen is dead, the hard drive (or SSD) might still be fine. A professional data recovery service can often extract your data, or you can attempt to remove the hard drive and connect it to another computer.
10. Laptop Screen Replacement: The New Beginning
If a screen replacement is necessary, don't despair! It's often a relatively straightforward process for a technician. After the repair, your laptop will be like new, ready for the next chapter.
11. The Art of Troubleshooting: A Skill For Life
Troubleshooting a dead laptop screen is a valuable skill. You'll learn about your computer's inner workings, and you'll gain confidence in your ability to solve problems. This process is analogous to learning a new language – initially daunting, but immensely rewarding once you grasp the basics.
12. Patience is a Virtue: The Key to Success
Patience is crucial throughout the troubleshooting process. Don't rush. Take your time. Double-check everything. And if things get too frustrating, take a break! Solving technical problems can be mentally exhausting or overwhelming.
13. What to do if you can
Laptop to Desktop Power: Work From Anywhere!Laptop power on but No display problem Black Screen solved
By Think Big Laptop power on but No display problem Black Screen solved by Think Big
FIX Lenovo laptop Has Power but NO DISPLAY Black Screen Issue

By Tuto2Info Videos FIX Lenovo laptop Has Power but NO DISPLAY Black Screen Issue by Tuto2Info Videos
Laptop backlight ON but no picture - Hp 14-cf2044nia laptop, screen repair

By Electronics Repair School Laptop backlight ON but no picture - Hp 14-cf2044nia laptop, screen repair by Electronics Repair School

Title: All Laptop Screen Black Problem Fix 100 Laptop Screen Blank Problem
Channel: Tuto2Info Videos
All Laptop Screen Black Problem Fix 100 Laptop Screen Blank Problem by Tuto2Info Videos
Laptop Wifi Connect
Laptop Screen Dead? FIX It NOW! (Working Internal)
It's a chilling moment. The comforting glow of your laptop screen abruptly vanishes. The machine hums, the fan whirs, but the digital window to your world is dark, silent. Panic sets in. Before you resign yourself to the financial and logistical woes of a repair shop, let's explore a path of troubleshooting focused on the potential of a working internal system -- a critical distinction. This guide is meticulously crafted to empower you to diagnose and, potentially, revive your laptop's dead screen, assuming the core functionality of your device remains intact.
Step 1: The Initial Assessment: Confirming the Internal Alive
The very first step is to ascertain if the screen truly died, or if the problem lies elsewhere. A malfunctioning display can be a symptom of a myriad of underlying issues but with a properly functioning internal system, the path to repair is significantly less challenging. This is where your detective work begins.
External Monitor Test: The gold standard is an external monitor. Connect your laptop to a monitor or TV via HDMI, VGA, or DisplayPort. If the external display shows an image, your laptop's internal hardware (CPU, GPU, RAM, hard drive/SSD) is likely functioning. This dramatically narrows the scope. If no image appears on the external monitor, further intricate troubleshooting is needed.
Boot-Up Indicators: Listen carefully during the boot-up sequence. Do you hear the Windows chime, the Apple startup sound, or the familiar sounds associated with your operating system? The presence of these sounds strongly suggests the internal components are operative, even if the screen remains dark.
Caps Lock/Num Lock Test: Press the Caps Lock or Num Lock key. Does the corresponding light on your keyboard toggle on and off? This simple test can confirm whether the system is responsive to input, even without a visible display. A functioning keyboard indicates a possible working internal system.
Step 2: Backlight or Display Panel? Deciphering the Darkness
Once you've confirmed internal functionality, the next stage involves differentiating between a backlight failure and a display panel malfunction. This is crucial, because the solutions differ.
Shine a Light Test: In a darkened room, shine a flashlight at a narrow angle directly onto the laptop screen. If you can faintly see the desktop, icons or other visual elements, the screen is likely displaying an image, but the backlight has failed. If the screen remains completely black, the display panel itself may have issues, or, in some cases, the backlight and display panel have gone simultaneously.
Dimly Lit Environments: Try to view the screen in very dark, dimly lit conditions. This can also reveal the presence of a faint image. If you have a partially working screen, this method can detect it.
Step 3: The Power of the Power Adapter: A Critical Check
A surprising number of display problems stem from power-related issues. Ensure the laptop is receiving adequate power to function, as this impacts both the backlight and the display panel.
Battery Check: Try booting up the laptop with the AC adapter disconnected and with the battery fully charged. If the screen works with the battery but not with the adapter, then the issue might be the adapter, or, in some cases, a faulty charging circuit on the motherboard.
Adapter Examination: Inspect the AC adapter for any physical damage, such as frayed wires or loose connections. Try a different AC adapter (if available) to see if that resolves the problem.
Step 4: The External Connections Puzzle: Testing Internal Display Output
If your laptop connects to external displays successfully, and you suspect a hardware issue with the internal display, we can explore potential issues with the physical connections within the laptop.
Display Cable Examination: The display cable connects the motherboard to the display panel. Over time, this cable can become loose, damaged, or corroded.
Disassembly Prudence: Caution: This step involves opening your laptop. Only proceed if you are comfortable with basic hardware tasks. Consult your laptop's service manual or research online guides specific to your model. Incorrect disassembly can lead to further damage.
Cable Re-seating: Once you've accessed the display cable connection on both the motherboard and the display panel, carefully disconnect and reconnect it. Ensure the connection is seated properly. Sometimes, a simple re-seating can resolve the issue.
Screen Replacement: If it is determined that the display panel of the laptop is faulty, the screen will have to be replaced. This replacement can be a complex process, and, unless you are confident in your abilities, it is recommended that you take the laptop to a professional.
Step 5: Driver Dilemmas and Software Solutions
While less common than hardware issues, conflicts between the operating system and graphics drivers can sometimes cause a blank screen. We need to rule this out.
Safe Mode Activation: Booting into Safe Mode is a crucial. Safe Mode loads a minimal set of drivers, including basic display drivers. If the screen works in Safe Mode, it suggests a software or driver conflict. To enter Safe Mode, repeatedly press the designated key (usually F8, F10, or Shift + F8) during the startup sequence.
Driver Reinstallation: If Safe Mode reveals a working display, uninstall and reinstall your graphics drivers. Access the Device Manager (search for it in the Windows search bar or use the Control Panel). Locate your display adapter and right-click to uninstall then reinstall the driver. Download the latest drivers from your laptop manufacturer's website.
Step 6: Brightness Control and Other Potential Issues
Sometimes, the fix can be incredibly simple. Let's not overlook the basics.
Brightness Control: Ensure the screen brightness isn't accidentally turned all the way down. Use the function keys (Fn + Brightness Up/Down keys) or the brightness controls in your operating system settings.
External Peripherals: Disconnect any peripherals connected to the laptop (USB devices, external hard drives, etc.). Sometimes, a faulty peripheral can interfere with the display.
Step 7: Seeking Professional Assistance: When to Call in the Experts
Despite your diligent efforts, if the screen remains dead after exhausting these troubleshooting steps, it's time to seek professional help.
Diagnosing the Core Issue: A qualified technician can accurately diagnose the root cause of the problem (e.g., faulty backlight, damaged display panel, motherboard issues).
Advanced Repairs: Sophisticated equipment and specialized knowledge are required for certain repairs, such as motherboard component replacements or backlight refurbishment.
Preventing Further Damage: Attempting repairs beyond your technical expertise may result in further and more costly damage. Trusting a professional safeguards your laptop's long-term health.
Conclusion: The Path of Persistence
A dead laptop screen is a frustrating experience, but it doesn’t necessarily signify the end. By following this detailed guide, you’ve equipped yourself with the knowledge to methodically diagnose the issue and potentially revive your laptop. Remember to approach each step with patience and care. Even if the problem proves beyond your capacity for repair, this process provides valuable information to the technician, facilitating a smoother and more cost-effective resolution. Good luck!
