how to check laptop mic is working or not

Title: Fix Microphone Not Working on Windows 10
Channel: The Geek Page
Fix Microphone Not Working on Windows 10 by The Geek Page
how to check laptop mic is working or not, how to check if my laptop mic is working or not, how to check whether microphone is working or not in laptop, how to check microphone is working or not in laptop
Is Your Laptop Mic DEAD? (Quick Fix!)
Laptop Microphone Troubles? Breathe Easy – Solutions Ahead!
So, your laptop’s microphone has decided to take a vacation? Frustrating, isn't it? It’s that moment of panic when you realize you can't join the Zoom call. Or when that important voice note won’t record. But hold on, before you resign yourself to a silent existence, let's explore some quick fixes. It's time to bring that microphone back to life!
Is It Really Dead, Or Just On Mute? The Obvious First Steps
First things first: let’s rule out the simplest culprits. We need to eliminate the obvious. Perhaps your microphone is merely… muted. Seems silly, right? Trust me, it happens to the best of us.
Look closely at your laptop's taskbar. There's likely a speaker icon in the lower-right corner. Click on it. See if there’s a microphone icon nearby, or maybe inside the sound settings. If a mute symbol is present, tap it. Then, test your mic again. Is there any audio now?
Also, double-check your conferencing apps. Software like Zoom, Teams, or Skype all have their own audio settings. Make sure your microphone is selected as the input device within the app. It's extremely easy to accidentally pick the wrong device. Moreover, verify the volume isn't turned all the way down in the application's settings.
Drivers, Drivers, Drivers: The Digital Roadblocks
If the quick mute check didn’t solve the issue, let's move on. Oftentimes, faulty drivers are the source of audio woes. Think of drivers as the language the microphone uses to chat with your computer.
You should update or reinstall these drivers. Here's how: Search for "Device Manager" in the Windows search bar. Click on it to launch the utility.
Now, expand the "Audio inputs and outputs" section. You might see different devices listed here; it might include your laptop's microphone. Right-click your microphone device and select "Update driver." Windows will search for the latest version. Afterwards, restart your computer.
Alternatively, right-click your microphone again, but this time choose "Uninstall device." Then, restart your laptop. Windows will automatically reinstall the driver, potentially fixing the problem. Furthermore, check if your microphone requires drivers from the manufacturer. Go to their website and download the specific driver for your laptop model.
Hardware Hurdles: Checking Physical Connections
Okay, let's delve a bit deeper into potential hardware problems. Before we get too technical, examine the microphone input.
Is your laptop’s microphone a built-in one? Or are you using an external microphone connected to the audio jack? If you’re using an external microphone, make sure it's properly plugged in. Also, check the cable for any damage. Consequently, try a different microphone. This helps determine if the issue is with your laptop or the microphone itself.
If your internal microphone isn’t working, perhaps there’s a physical problem. Sometimes, internal hardware connections can become loose. However, this is less likely. Unless you’re comfortable opening up your laptop, it’s best to consult a professional for internal hardware issues.
System Settings Shenanigans: Adjusting Audio Input
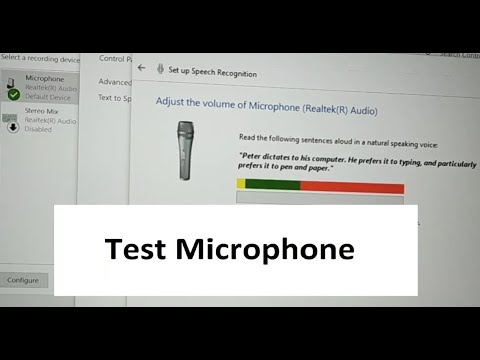
Let's investigate your system's sound settings. These are where the true magic often happens. Right-click the speaker icon in the taskbar again. Select "Open Sound settings."
In the "Input" section, you should see your microphone listed. Ensure the correct microphone is selected as the input device. Drag the volume slider up to a comfortable level. Also, test the microphone. You should see the input level bars move as you speak. If they don't, the microphone isn't receiving any sound.
Furthermore, if the microphone still refuses to cooperate, delve deeper into "Sound Control Panel." You can find this in the "Related Settings" section. Click on "Sound Control Panel." In the “Recording” tab, right-click on your microphone and select “Properties.” In here, you can adjust a variety of settings.
Software Conflicts and Compatibility Concerns
Sometimes, software conflicts can wreak havoc on your audio. Believe it or not, certain programs can interfere with your microphone's functionality.
First, close any programs that might be using the microphone. This includes applications like voice recorders, video editors, or other communication tools. Then, try testing the microphone again.
In addition, outdated software or software with compatibility issues could cause problems. Ensure your operating system and any relevant audio-related programs are up to date. Consider uninstalling then reinstalling the problem software. Consequently, this fixes issues that stem from corrupted files.
When to call in the Experts
If you've exhausted all these steps, it’s time to consider the possibility of a hardware failure. Regrettably, if your microphone is built-in and none of the software solutions work, there might be a more serious issue.
You should consider contacting your laptop manufacturer or a qualified computer repair technician. Let the experts handle the more complex diagnostics. Even more, they can assess the situation and recommend the best solution for your particular situation. It could be an internal component has failed.
Final Thoughts: Don't Give Up!
Dealing with a dead microphone is frustrating, but don't give up! Always, begin with the simplest solutions. Work your way through the troubleshooting steps. Therefore, in most cases, you can revive your laptop's microphone. So go ahead, give it a try and get back to your online calls! Good luck!
HP Laptop Wi-Fi DEAD After Creators Update? FIX IT NOW!Is Your Laptop Mic DEAD? (Quick Fix!)
Hey there, tech enthusiasts! Ever been in the middle of a crucial Zoom meeting, a heart-to-heart with a loved one, or even just trying to record a quick voice memo, only to be met with the dreaded silence? You speak, but the world doesn’t hear. Your laptop mic, that tiny unsung hero, seems to have decided to take an extended vacation. Sound familiar? Trust me, we’ve all been there. And the panic? It’s real. But before you start frantically searching for a new laptop or blaming the internet gods, let’s take a deep breath. Often, the issue isn’t a total mic meltdown, but rather a simple glitch that can be easily rectified. This guide is your digital first-aid kit for a silent microphone. We're going to dive deep, explore the potential culprits, and get you back in the audio game in no time!
Don't Panic! Decoding the Silent Treatment
First things first: don’t jump to conclusions. Think of your laptop mic situation like a tangled ball of yarn. Before you start hacking away at it, let's untangle the strands. The first step is understanding the problem. Is it a hardware issue, or are we dealing with a software snag? The good news is, in a surprising number of cases, it’s the latter.
The Obvious Suspects: Quick Checks Before the Big Guns
Before we start digging into the more technical aspects, let’s cover the basics. Think of these as your initial "are you sure you plugged it in?" kind of checks. They sound simple, but often, they're the solution!
- Check the Mute Button: This might seem painfully obvious, but trust me, we’ve all done it. Look for a physical mute button on your laptop (sometimes a dedicated key, sometimes integrated into a function key). Also, carefully examine the software you're using (Zoom, Skype, etc.). Many apps have their own mute buttons, which can override your system settings. It's easy to accidentally click one, so double-check!
- External Microphone: If you are using an external microphone (headset with a mic, for instance), ensure it's properly plugged in and selected as the input device in your laptop’s sound settings. Sometimes, the system defaults to the built-in mic even when an external one is connected.
- Volume Levels: Make sure your laptop's volume isn’t set to zero (or almost zero). This applies to both the system volume and the application volume.
Diving Deeper: The Software Side of Things - Windows Edition
Alright, if the basics didn't do the trick, it’s time to get a little more technical. Let's start with the Windows warriors out there.
Microphone Settings: Your Control Center
- Access Sound Settings: Right-click the speaker icon in your system tray (bottom-right corner of your screen) and select "Open Sound settings." Alternatively, go to Settings > System > Sound.
- Input Selection: In the "Input" section, ensure your built-in microphone is selected as the input device. If you have an external mic, make sure it is selected. If multiple devices are listed, try switching between them to see if one is working.
- Test Your Microphone: Under "Input," you'll see a microphone test section. Speak into your mic. If the meter doesn't react, then we have a problem.
- Troubleshooting: Windows has a built-in troubleshooter for audio issues. Click on "Troubleshoot" in the Input settings. Give it a try. It might just surprise you!
App Permissions: Letting the Apps Hear You
Many applications require permission to access your microphone. If you’ve recently installed a new app or updated an existing one, it's possible that the app doesn’t have the necessary access.
- Privacy Settings: Go to Settings > Privacy > Microphone.
- App Access: Ensure the "Microphone access" setting is toggled on. Then, scroll down and make sure the specific apps you want to use with your microphone have permission to access it.
Driver Issues: The Silent Software
Drivers are little pieces of software that translate between your hardware and your operating system. Sometimes, they get corrupted, outdated, or just plain buggy.
- Device Manager: Open Device Manager (search for it in the Windows search bar).
- Sound, video, and game controllers: Expand this category. You should see your microphone listed here (it might be listed as "Microphone Array" or something similar).
- Driver Update: Right-click on your microphone and select "Update driver." Choose "Search automatically for drivers." If it finds an update, install it.
- Driver Rollback (If recent update causing issues): If you recently updated your driver and the mic stopped working, try rolling back to the previous version. Right-click the microphone and select "Properties." Go to the "Driver" tab and click "Roll Back Driver."
The Apple Angle: Mac Mic Troubleshooting
For our Mac-loving friends, the troubleshooting process is similar, but the interface is a bit different.
System Preferences: Sound Settings Mastery
- Open System Preferences: Click the Apple menu in the top-left corner of your screen and select "System Preferences." (Or, in newer macOS versions, go to System Settings).
- Sound Settings: Click on "Sound."
- Input Tab: Select the "Input" tab.
- Select Your Microphone: Make sure your built-in microphone (or your external microphone) is selected.
- Input Level: While speaking into the microphone, observe the "Input level" meter. It should react to your voice. If it doesn’t, something's amiss. Adjust the input volume slider.
Privacy Settings: Granting Microphone Access
Privacy settings are crucial on macOS.
- System Preferences: Go to System Preferences.
- Security & Privacy: Click on "Security & Privacy."
- Microphone Access: Select the "Microphone" tab.
- App Permissions: Ensure that any apps you want to use with your microphone have a checkmark next to them, allowing them to access your microphone.
Driver Check: (Less common, but still a possibility)
While Mac drivers are generally well-managed, it’s still worth checking, especially after a macOS update.
- Hardware Issues: First, ensure it is not a possible hardware issue.
- Restart Your Mac: This can clear minor software glitches. Try a restart and test the microphone again after rebooting.
- Apple Diagnostics: Run Apple Diagnostics (formerly Apple Hardware Test) by restarting your Mac and holding down the "D" key during startup. This will test your hardware, including the microphone.
Software Conflicts: The App Interference
Sometimes, other applications can hog the microphone, preventing other apps from using it.
- Close Unnecessary Apps: Close any programs that might be using your microphone, especially apps like voice recorders, video editors, or other communication software.
- App Conflicts: Certain apps, especially virtual audio drivers, can sometimes interfere. If you have any of these types of apps installed, you might try temporarily disabling them to see if that resolves the issue.
The Ultimate Test: Recording a Quick Sound Bite
Before proclaiming your mic truly dead, record a quick voice memo. This step helps you isolate the issue. If the recording does capture your voice, the problem lies in the app you're trying to use, not the microphone itself. However, if you hear nothing, then you know the microphone is likely the culprit.
Hardware Hang-Ups: When All Else Fails
If you’ve tried all the software solutions and your mic is still silent, it's time to consider hardware problems. This is rare, but it happens.
- Internal Microphone: If you're using the built-in microphone, the problem could be a loose connection or damage to the microphone itself.
- External Microphone: Inspect the microphone cable (if wired) or consider if the mic needs charging (if wireless). Test the microphone with another device to rule out an issue with the microphone itself.
- Hardware Repair: If the microphone is damaged, you may need to take your laptop to a repair shop.
The Reboot Route: Sometimes, a Simple Fix Works Wonders
Restarting your laptop might seem like a cliché, but it often works. A restart clears temporary files and processes, resolving minor software glitches. It's like giving your computer a fresh start.
The Final Word: Persistence Pays Off
Don't give up hope! Laptop mic issues can be frustrating, but with a little troubleshooting, you can usually get things working again. If all else fails, consider professional repair or purchasing an external microphone.
Conclusion: Back in the Sound Game!
So, there you have it. Your comprehensive guide to reviving a potentially "dead" laptop microphone. We’ve covered everything from the basics to the more technical solutions. Remember, most of the time, the issue is a software glitch, easily fixed with a few clicks. And hopefully, armed with this knowledge, you're back in the sound game. Now go forth and be heard!
FAQs: Your Burning Questions Answered
- **My microphone was working perfectly fine, and then
how to test a microphone working or not, sound recording or not
By Shabd Tech Support how to test a microphone working or not, sound recording or not by Shabd Tech Support
How To Fix External Microphone Not Working In Windows 1011

By Windows Techsolutions How To Fix External Microphone Not Working In Windows 1011 by Windows Techsolutions
How To Fix Microphone Not Working on Asus Laptop
By Your Fix Guide How To Fix Microphone Not Working on Asus Laptop by Your Fix Guide

Title: PC Me Mobile Ke Mic SetUp Kaise Kare Mic PC Me SetUp karna ke baad chalega
Channel: START GURU
PC Me Mobile Ke Mic SetUp Kaise Kare Mic PC Me SetUp karna ke baad chalega by START GURU
Laptop Wifi Hotspot
Here's the article:
The Enduring Allure: Why Antique Jewelry Remains Timeless and Coveted
For centuries, jewelry has transcended its purely ornamental function, evolving into potent symbols of status, love, and legacy. Among the myriad forms of adornment, antique jewelry holds a unique position, captivating collectors and enthusiasts with its distinct character, historical resonance, and inherent beauty. This article delves into the captivating world of antique jewelry, exploring its enduring appeal, the factors that contribute to its value, and the secrets to appreciating its intricate craftsmanship. We'll navigate the fascinating timelines, from the Georgian era to the Art Deco period, unraveling the stylistic nuances that define each epoch.
A Journey Through Time: The Historical Context of Antique Jewelry
The allure of antique jewelry lies partly in its connection to the past. Each piece whispers stories of bygone eras, reflecting the tastes, technologies, and societal values of the time it was created.
Georgian Era (1714-1830): This period marked the beginning of mass production of jewelry, with advancements in techniques such as the use of the "foil back". Characterized by delicate designs. The Georgian period saw the rise of sentimental jewelry, including mourning pieces crafted from human hair, reflecting the prevalence of short lifespans and high mortality rates. Gemstone choices favored vibrant colors: emeralds, rubies, and garnets were often paired with diamonds in elaborate floral or bow-shaped motifs. Materials like foiled-backed gems heightened the brilliance and color, as they reflected light back through open backs.
Victorian Era (1837-1901): The Victorian era, encompassing Queen Victoria’s reign, is broadly divided into three sub-periods, each with its distinct stylistic characteristics. Early Victorian jewelry, influenced by the romanticism of the time, favored elaborate floral and nature-inspired motifs. The use of materials like gold and enamel, and the setting of rose-cut diamonds and colored gemstones, such as amethysts and seed pearls, was prominent. The "Mid-Victorian" era, influenced by Victoria’s mourning for Prince Albert, witnessed a surge in mourning jewelry crafted from black materials such as jet, onyx, and vulcanite, often inlaid with pearls and gold. The later part, or "Aesthetic Movement" saw a shift towards greater artistic freedom, favoring asymmetrical designs, less formal compositions, and the use of Japanese influences.
Edwardian Era (1901-1910): Named after King Edward VII, this era is known for its light, feminine designs, and the introduction of platinum, which allowed for intricate lacework-like settings. Filigree and delicate milgrain details were common, with the use of diamonds, particularly the newly introduced Old European cut, which added to the sparkle. Necklaces grew longer and more elaborate, often featuring pendants or sautoirs. The "Garland Style," with its floral motifs and graceful lines, was the definitive look.
Art Nouveau (1890-1910): Marked by a focus on organic forms, flowing lines, and a celebration of nature. This movement saw jewelry reflecting the curves of the human body, with stylized floral, insect, and animal motifs. The use of enamel, gemstones, and unconventional materials like horn and glass, and the incorporation of fluid lines and asymmetrical designs are characteristic. Renowned artists like René Lalique are associated with the movement.
Art Deco (1920s-1930s): A departure from the organic lines of Art Nouveau, the Art Deco era embraced geometric forms, bold colors, and luxurious materials. Jewelry designers incorporated sleek lines, angular shapes, and graphic patterns, expressing the modern spirit. Materials such as platinum, diamonds, emeralds, sapphires, and onyx were frequently used. This period saw the influence of Egyptian and Eastern cultures.
Unraveling the Value: Factors Determining Antique Jewelry's Worth
The value of antique jewelry is determined by a complex interplay of factors, each contributing to its desirability and price.
Rarity and Authenticity: The scarcity of a piece is a primary driver of its value. Pieces crafted by renowned designers or from specific historical periods are highly coveted. The authenticity of a piece is crucial, so expert verification is critical. Original hallmarks, maker's marks, and any accompanying documentation significantly increase the piece's value. For example, a signed piece from a designer like Cartier or Tiffany will be considerably more valuable than an unsigned piece.
Materials and Craftsmanship: The quality and type of materials are significant. The purity of precious metals, the quality of gemstones (cut, color, clarity), and the method of construction all influence its value. Hand-crafted pieces with intricate details, such as elaborate engravings, filigree work, or enamel designs, are often valued higher than those produced by mass-manufacturing techniques. Similarly, a diamond with exceptional clarity or a very rare colored gemstone will be a substantial factor.
Design and Style: The aesthetic appeal of a piece, its design, and its stylistic relevance to a particular historical period play a vital role. Jewelry reflecting the Art Deco or Art Nouveau movements, for example, are particularly sought after for their unique designs. The condition of the piece, including the integrity of the stones, the security of the settings, and the overall wear, is of great importance. Pieces in exceptionally well-preserved condition command higher prices.
Condition and Provenance: The condition of a piece significantly impacts its value. Evidence of repair, restoration, or damage can detract from the price. The provenance of a piece, its history of ownership, and documented history of ownership, can add significant value, particularly if the piece was owned by a famous person or associated with a significant event.
Appreciating the Details: How to Examine Antique Jewelry
Understanding the details of antique jewelry allows for a deep appreciation of its historical significance, and helps in assessing its value.
Examining the Materials: Inspect the materials to identify their quality and authenticity. Are the gemstones real? Is the base metal solid gold or gold-plated? Look for hallmarks that indicate the purity of the metal, such as the karat mark found on old gold jewelry. Gemstones can be evaluated by their color, clarity, cut, and carat weight. Note any imperfections, which can provide insights into the piece’s age and origin.
Analyzing the Design and Construction: Carefully examine the design, looking at the setting of the stones, the form of the clasp. Observe the methods of construction. Look for any specific designs or signatures associated with a particular era or designer.
Inspecting the Markings: Maker's marks, hallmarks, and any inscriptions can provide valuable information, including the maker, the metal content, the date of creation, and the origin. These marks can significantly influence its value. Familiarize yourself with the marks and symbols of the relevant eras.
Evaluating the Condition: Carefully assess the overall state of the piece. Does it show signs of prior repair? Are the stones secure? How much wear is apparent? A piece in pristine condition always has greater value than a piece that has suffered damage.
Caring for Your Treasures: Proper Maintenance and Preservation
Proper care and preservation are essential to maintain the beauty and value of antique jewelry for future generations.
Storage: Store each piece separately to avoid scratches. Use a jewelry box with individual compartments or soft pouches. Avoid storing jewelry in direct sunlight or humid environments, which will cause tarnish.
Cleaning: Clean jewelry gently and carefully, using a soft brush, mild soap, and warm water. Avoid commercial jewelry cleaners, which can damage certain gemstones or precious metals. For particularly delicate pieces, consult a professional jeweler.
Handling with Care: Avoid wearing jewelry while performing heavy manual labor or exercising. Remove jewelry before showering or swimming, as chlorine and salt water can be damaging.
Professional Maintenance: Have antique jewelry inspected and cleaned by a professional jeweler periodically. They can provide expert assessments and services such as professional gemstone setting and repair, identifying potential issues before they escalate.
The Enduring Legacy: Investing in Antique Jewelry
Antique jewelry’s enduring appeal stems from its beauty, historical significance, and investment potential. Each piece represents a unique creation from the past. As the scarcity of these pieces continues to grow, the demand, and the value, will likely increase. Antique jewelry allows you to connect with history. From the delicate filigree of the Edwardian era to the geometric precision of the Art Deco movement, antique jewelry offers an extraordinary opportunity to own wearable pieces of history. The pursuit of these treasures offers an exceptional way to connect with the past and to celebrate the enduring power of craftsmanship and design.
