hand sanitizer on laptop keyboard not working

Title: 1 Key Not Working How to Fix100 Laptop Keyboard One Key Not Working Problem Solvedmacnitesh
Channel: Mac Nitesh
1 Key Not Working How to Fix100 Laptop Keyboard One Key Not Working Problem Solvedmacnitesh by Mac Nitesh
Hand Sanitizer Ruined My Laptop Keyboard! (Easy Fix Inside)
My Laptop Keyboard's Sticky Situation: A Hand Sanitizer Mishap (and How I Fixed It!)
It happened. The unthinkable. My trusty laptop, my digital companion, fell victim to the most unexpected of foes: hand sanitizer. You know, that little bottle we've all been carrying around, squirting liberally to ward off germs? Well, mine decided to stage a revolt. The keyboard became a sticky, unresponsive mess. Believe me, I panicked.
The Day Disaster Struck: A Moment of Pure, Unadulterated Clumsiness
It was a seemingly ordinary morning. I was rushing, late for a video call, and juggling a coffee and my laptop. I reached for the hand sanitizer. Sploosh! A rogue squirt landed directly on my keyboard. My heart sank. I knew instantly; this wasn't going to be pretty. And honestly, it wasn't.
Initial Reactions: Denial, Then Despair
Initially, I tried to ignore it. Maybe, just maybe, it wouldn't be too bad. After all, how much damage could a tiny bit of sanitizer really do? I typed a few words. It became immediately clear: a whole lot. The keys were sluggish, sticking together like they were glued. I attempted to reboot. That’s when fear really took over.
The Research Phase: Diving into the Digital Depths
Clearly, I needed a plan. And fast. I took to the internet, searching frantically for solutions. I typed every relevant query. “Sticky keyboard,” “hand sanitizer keyboard damage,” and “laptop keyboard repair.” The search results were a mixed bag. Some articles offered vague advice. Others suggested things I was truly afraid to attempt. However, I kept reading.
Gathering My Tools: A Battle Plan Begins to Form
My research gave me hope. I discovered a general consensus: the key was cleaning. I grabbed my supplies. I gathered isopropyl alcohol (90% or higher), cotton swabs, a soft cloth, and a can of compressed air. I had my weapons: I was ready.
The Cleaning Operation: Precision and Patience are Key
First and foremost, I shut down my laptop and unplugged it. Safety first, always. Next, I gently tipped the laptop upside down to dislodge any loose liquid. Then, I carefully used the compressed air. I aimed it between the keys to try and blow out any lingering residue. This step was very important. Afterwards, I dipped a cotton swab into the isopropyl alcohol. I carefully swabbed around the problem keys, trying to dissolve the stickiness. Subsequently, I repeated this process several times.
The Moment of Truth: Testing the Results
After a good half-hour of cleaning, it was time. Time to power back on. My fingers were crossed. I pressed the power button and held my breath. Slow and steady, the laptop booted up. I opened a text editor. I began to type. Honestly, relief washed over me like a tidal wave.
Final Assessment: The Keyboard Lives!
Some keys needed a little extra coaxing. Nevertheless, the majority worked perfectly. I noticed some slight stickiness on a couple. I repeated the cleaning process on those specific keys. Now, my keyboard is back to its old self. It is a fully functioning digital friend once more.
Preventative Measures: Learning from My Mistakes
This experience was a valuable lesson. I learned the hard way. Obviously, it’s best to keep liquids away from electronics. I now use a keyboard cover. Also, I am extremely careful when using hand sanitizer near my laptop.
Conclusion: Hope for Sticky Situations
If you find yourself in a similar predicament, don't despair. There is hope. Following these steps could save your keyboard. Be patient, be careful, and don't give up. You can bring it back to life. And remember, accidents happen. So, now you know what to do.
Laptop & Lunch: The Ultimate Work Bag You NEED!Hand Sanitizer Ruined My Laptop Keyboard! (Easy Fix Inside)
Hey there, fellow tech enthusiasts and clumsy keyboard clackers! We've all been there, right? That moment of panic when you realize your precious laptop has come face-to-face with something it definitely shouldn't have. In my case, it was a rogue squirt of hand sanitizer. Yep, the very product designed to keep us germ-free decided to wage war on my keyboard. But don't you worry, because if you're reading this, chances are you're in the same boat, and, phew, I've got a simple fix that might just save your sanity, and your laptop!
1. The Hand Sanitizer Keyboard Catastrophe: A First-Person Account
Let's rewind. I'm working from home, diligently sanitizing my hands (as we've all become accustomed to), and wham! A generous splash of the stuff lands directly on my keyboard. My heart sank faster than a lead weight. I could practically see the tiny, sticky particles working their way between the keys, plotting my digital demise. It was a scene of pure, unadulterated panic. The keys felt sticky, unresponsive, and some were even… sticking! It was as if my keyboard had suddenly developed a bad case of the hiccups.
2. Why Is Hand Sanitizer a Keyboard's Worst Enemy?
So, why is hand sanitizer such a disaster for your keyboard? Think of it like this: Your keyboard is a delicate ecosystem of tiny switches, electronics, and, let's be honest, a fair amount of dust and crumbs. Hand sanitizer, with its alcohol content and gel-like consistency, is designed to evaporate. But as it evaporates, it can leave behind a sticky residue that gums up those delicate internal mechanisms. It's like pouring molasses into a watch – not a good look. This residue can jam the keys, make them unresponsive, and generally make your typing experience a hot mess.
3. Recognizing the Symptoms: Is Your Keyboard Truly Toast?
Before you throw your laptop out the window (tempting, I know!), let's assess the damage. Does your keyboard exhibit any of these telltale signs?
- Sticky Keys: The most obvious sign. Keys refuse to pop back up, or they stick in the down position.
- Unresponsive Keys: You press a key, and nothing happens. It’s like your keyboard has developed selective hearing.
- Double Typing: The dreaded symptom where a single key press results in two or more characters appearing on the screen.
- Odd Behavior: Random keys act up, or different keys activate other functions.
- Visual Clues: Can you physically see the residue or a sticky sheen on or between the keys?
If you're experiencing any of these, it's time to take action!
4. First, Don't Panic (Easier Said Than Done, I Know!)
Okay, deep breaths. It's easy to freak out, but panicking won't solve anything. I know, I know, it's like telling someone not to think about a pink elephant. But resisting the urge to immediately start pressing buttons and wiping things down is crucial. Resist the urge to aggressively scrub! This will only worsen the situation.
5. The DIY Rescue Mission: Your Keyboard's Knight in Shining Armor
Here's where the easy fix comes in. We're going to employ a simple, yet effective, method to clean your sticky keyboard. This worked for me, and with a bit of luck, it will work for you too.
What You'll Need:
- Isopropyl Alcohol (rubbing alcohol): 70% or higher concentration. This is the magic ingredient.
- Cotton Swabs: For precision application.
- Microfiber Cloth: For gentle wiping.
- Patience: Lots and lots of it.
The Step-by-Step Guide:
- Power Down and Unplug: Always disconnect your laptop from the power source and shut it down completely. Safety first, people!
- Gentle Initial Wipe: Lightly dampen your microfiber cloth with water (just a touch!) and gently wipe the keyboard surface. This helps remove any loose debris.
- The Alcohol Attack: Dip a cotton swab in isopropyl alcohol. Important: make sure the swab isn't dripping wet. We want to apply the alcohol precisely to the affected keys.
- Targeted Cleaning: Gently rub the alcohol-soaked swab around the sticky keys, ensuring the solution seeps in between the keys. Try to avoid getting the alcohol into other parts of the laptop.
- Patience Game: Let the alcohol sit for a few seconds. This allows it to dissolve the sticky residue.
- Repeat and Remove: Use a dry cotton swab or the corner of your microfiber cloth to wipe away the dissolved gunk. Keep repeating steps 3-5, wiping away the residue each time, until the keys feel clean and function normally.
- The Waiting Game: Allow the keyboard to dry completely before powering it back on. This can take anywhere from 30 minutes to a couple of hours, depending on how much liquid you applied.
- Testing and Victory Lap: Once dry, power on your laptop and test the affected keys. If they're still sticky, repeat the process. If they're working, congratulations! You’ve successfully rescued your keyboard! Time for a victory dance!
6. When To Seek Professional Help: Knowing Your Limits
While this DIY method is effective for many cases, sometimes the damage is beyond repair. If these attempts fail, you may need to seek professional assistance:
- Internal Damage: If the sanitizer has seeped into the internal components and you notice any hardware problems.
- Extensive Damage: If many keys are affected and unresponsive.
- You're Not Comfortable: If you're not comfortable disassembling or cleaning your laptop. It’s always better to be safe than sorry.
7. Preventative Measures: How To Keep Your Keyboard Safe in the Future
Prevention is always better than cure, right? Let's learn from our hand sanitizer keyboard mishaps! To protect your keyboard from future attacks:
- Keep Sanitizer Away: Always apply hand sanitizer away from your laptop. Accidents happen, but minimizing the risk is key.
- Keyboard Covers: Consider a keyboard cover. This is a great barrier against spills and debris.
- Regular Cleaning: Wipe down your keyboard regularly with a microfiber cloth to remove dust and grime.
- Invest in a Wireless Keyboard: If you’re working from home, a separate wireless keyboard might be a good idea. It allows you to keep your laptop a safe distance away from any potential sanitization accidents.
8. The Importance of Fast Action: Time Is of the Essence!
The sooner you address the problem, the better your chances of a successful fix. The longer you wait, the more time the hand sanitizer has to seep in and cause damage. It's like a spill–the quicker you clean it up, the less likely it is to leave a stain.
9. Types of Keyboards and Their Unique Challenges
Different keyboard types may present unique challenges:
- Mechanical Keyboards: These keyboards often have removable keycaps, making cleaning easier (and sometimes more involved).
- Membrane Keyboards: These keyboards are usually less sensitive to spills and may be easier to clean.
- Laptop Keyboards: These are the most vulnerable and require the most care. Always keep the laptop closed for these keyboard types.
10. Common Mistakes to Avoid During Cleaning
Avoid making these blunders:
- Using Excessive Liquid: Too much liquid can damage the internal components of your keyboard.
- Using Harsh Chemicals: Never use bleach, strong solvents, or abrasive cleaners.
- Ignoring the Power Down: Always turn off and unplug your laptop before cleaning.
- Rushing the Drying Process: Resist the urge to power on your laptop before it is completely dry.
11. The Alcohol Alternative: Are There Other Cleaning Solutions?
While isopropyl alcohol is the go-to solution, you might use other cleaning agents, though with caution:
- Specialized Keyboard Cleaners: There are keyboard-specific cleaning products that may be effective. Choose alcohol-free options.
- Distilled Water: In a pinch, you can use distilled water for light cleaning, but be very careful.
12. The Role of Air Pressure in Cleaning
Sometimes, compressed air can help dislodge stubborn debris trapped beneath keycaps. Be very careful, however, as excessive pressure can damage the keyboard.
13. Long-Term Effects: What to Expect After the Repair
After a successful clean, the keys may not return to their original feel, though this is rare. However, if addressed quickly and with the proper care, it might be difficult to tell that anything happened!
14. Alternatives to Replacing the Keyboard: Exploring Other Options
If the damage is severe, replacing the keyboard might be necessary. But don't fret:
- External Keyboard: You can use an external keyboard as a temporary or permanent solution.
- Laptop Repair Services: Professional repair services can often replace individual keys or the entire keyboard.
15. Embracing the Lesson: A Keyboard Cleaning Survival
USB Drive Dead? This ONE Trick Will FIX It!Clean your keyboard
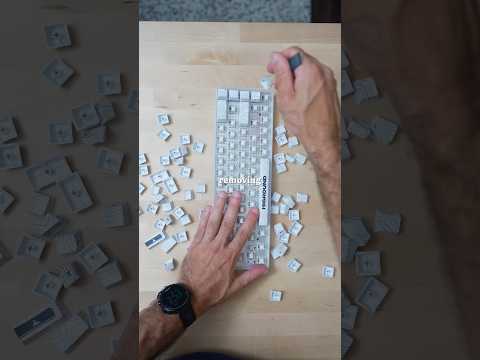
By Rillo Clean your keyboard by Rillo
All Laptop TouchPad Not Working Fix100 Touchpad OnOff Shortcut Keymacnitesh touchpadshorts

By Mac Nitesh All Laptop TouchPad Not Working Fix100 Touchpad OnOff Shortcut Keymacnitesh touchpadshorts by Mac Nitesh
BERSIHIN TOMBOL KEYBOARD PAKE HAND SANITIZER, EMANG BISA

By Jabingart BERSIHIN TOMBOL KEYBOARD PAKE HAND SANITIZER, EMANG BISA by Jabingart

Title: what to do when you spill water on your laptop shorts
Channel: Vivid Gold
what to do when you spill water on your laptop shorts by Vivid Gold
Change Wifi Settings
Hand Sanitizer Ruined My Laptop Keyboard! (Easy Fix Inside)
It’s the digital age, and our laptops are the windows to our world, our connection to work, communication, and entertainment. But what happens when the very tools we use to navigate this digital landscape fall victim to an unexpected foe? This is a story I know firsthand – a tale of keyboard woes triggered by a seemingly innocuous substance: hand sanitizer. I'll recount my experience – the panic, the frustration, and, thankfully, the ultimate triumph – and offer you a straightforward guide to potentially resurrect your own hand sanitizer-stricken laptop keyboard.
The Incident: When Clean Hands Met Digital Disaster
The day started like any other. I was diligently working on my laptop, fueled by copious amounts of coffee and the unwavering hope of a productive morning. I reached for my trusted hand sanitizer, a staple in these post-pandemic times. A quick squirt, a thorough rub, and, without a second thought, I reached for my keyboard. The rest, as they say, is history.
Initially, nothing seemed amiss. But as the day wore on, a subtle stickiness began to develop. The keys, once responsive and familiar, started feeling sluggish. Some keys, particularly the 'S' and the spacebar, began to stick down, refusing to spring back with their usual alacrity. My heart sank. This was not a minor inconvenience; it was a full-blown digital crisis. My laptop, my lifeline, was slowly but surely succumbing to the insidious effects of hand sanitizer.
The Culprit: Understanding the Enemy Within
Hand sanitizers, while lifesavers against germs, are not designed with the delicate components of a laptop keyboard in mind. Most hand sanitizers contain a high concentration of alcohol, typically isopropyl alcohol or ethanol, along with other additives like moisturizers and fragrances. While the alcohol evaporates, the other ingredients often linger, leaving behind a residue that can wreak havoc on the delicate mechanisms beneath the keys.
This residue, depending on the specific hand sanitizer used, can be sticky, gummy, or even corrosive. It infiltrates the spaces between the keys and the keyboard’s internal workings. It can gum up the switches, making them unresponsive or sticky. The longer this residue remains, the more damage it can inflict.
Assessing the Damage: A Critical First Step
Before you dive into any repairs, It's crucial to assess the extent of the damage is essential. This will help you determine the approach that’s most likely to be successful.
- Identify Affected Keys: Which keys are sticking? Are all keys affected, or just a few? Note which keys show the most prominent signs of damage, making a list of the misbehaving keystrokes.
- Visual Inspection (Carefully): Turn off and unplug your laptop. If possible, gently tilt the laptop and give it a gentle shake. This may reveal loose debris, such as crumbs, dust, or dried hand sanitizer residue beneath the keys.
- Test the Keys: Press each key to get a feel for the problem. Are they sticky, unresponsive, or do they feel "mushy" when depressed? Observe the mechanical sound the keyboard generates as it is being used.
- Consult the Manual: Take a look at your laptop manual or search online for cleaning guidelines. Some manufacturers provide specific recommendations for cleaning your keyboard.
The Arsenal: Gathering Your Repair Supplies
Armed with the right tools, you can tackle this challenge. Here’s what you’ll need:
- Microfiber Cloths: These are indispensable for cleaning delicate surfaces without scratching them. Keep several on hand.
- Isopropyl Alcohol (70% or 90%): This is the key ingredient for dissolving the hand sanitizer residue. Avoid higher concentrations, as they can damage some plastics.
- Cotton Swabs: Excellent for applying small amounts of alcohol to specific areas and cleaning hard-to-reach places.
- Compressed Air: A can of compressed air is your friend. It can help dislodge loose debris.
- Small Plastic Spudger or Guitar Pick (Optional): These tools can help gently pry up keys if necessary.
- Small Phillips Head Screwdriver (Optional): For laptops that require disassembly. Consult your laptop's hardware maintenance manual to check if this is required.
- A Well-Lit Workspace: Good lighting is essential for seeing the details of your keyboard.
The Recovery Protocol: Step-by-Step Keyboard Revival
Follow these steps carefully to restore functionality to your hand sanitizer-afflicted keyboard.
- Power Down and Prepare: Shut down your laptop and disconnect it from the power source. This crucial step will prevent any electrical hazards.
- The Initial Surface Clean: Gently wipe the keyboard surface with a clean, dry microfiber cloth to remove any loose debris. Take your time here, ensuring you remove any visible residue or particles.
- The Alcohol Application (Controlled Dosage): Dip a cotton swab into isopropyl alcohol, ensuring it's damp, not dripping. Carefully dab the swab around the sticky keys, focusing on the edges and crevices, where the residue is most likely to be concealed. Avoid getting the alcohol directly inside the keys themselves.
- The Key-by-Key Treatment: For particularly sticky keys, you may need to repeat the alcohol application multiple times. Allow the alcohol to dissolve the residue, and then use a dry portion of the microfiber cloth or a clean swab to wipe away the dissolved gunk.
- The Compressed Air Assist: After cleaning with alcohol, use the compressed air to blow out any remaining residue from under the keys. Direct the air at a slight angle to the keys, ensuring to work around the edges.
- The Drying Phase: Patience is Key: Allow the keyboard to dry completely. This may take several hours, or even overnight. Avoid using the laptop during this time.
- The Test Drive: Once completely dry, power up your laptop and test each key. Be patient; it may take a few minutes of use for all keys to fully function.
Advanced Techniques (For More Stubborn Cases)
Sometimes, the simple cleaning method isn't enough. If the keys are still sticky after three attempts, you can consider slightly advanced strategies.
- Key Removal (Proceed with Caution): If you're comfortable, you can carefully remove the keycaps. Use a plastic spudger or guitar pick to gently pry the keycaps off the keyboard. Be extremely cautious, as you can easily damage the keycaps or the delicate mechanisms beneath. Photograph the keyboard before removal to help with reassembly.
- Deep Cleaning (with Alcohol): Once you have removed the keycaps, you can clean the exposed areas more thoroughly with isopropyl alcohol and cotton swabs. Remember to let the alcohol completely dry before reassembling.
- Reassembly (Precision Matters): Replace the keycaps carefully, ensuring they click securely into place. Refer to your pre-removal photograph to make sure the placement of each one is correct.
Prevention: Shielding Your Keyboard from Future Assaults
The best defense is a good offense. You can take several steps to safeguard your keyboard from future incidents:
- Wash Your Hands First: Before using your laptop, wash your hands and dry them thoroughly. This is, in the long run, the best protection.
- Use a Keyboard Cover: A keyboard cover is a simple yet effective way to protect your laptop keyboard from spills, dust, and other debris. Choose a cover that fits your laptop model perfectly.
- Maintain Regular Cleaning: Wipe down your keyboard regularly with a clean, dry microfiber cloth.
- Strategic Hand Sanitizer Application: If you must use hand sanitizer when near your laptop, apply the sanitizer away from the computer and let your hands dry completely before touching the keyboard.
Post-Mortem: The Lesson Learned
My laptop keyboard survived the hand sanitizer onslaught, and so did my sanity. The recovery process, though initially daunting, proved surprisingly manageable, by meticulous care and a healthy dose of patience. The whole experience served as a valuable lesson: Always be aware of the potential risks associated with our daily habits, especially when those habits intersect with our valuable (and expensive) tech.
If you find yourself in a similar predicament, don't despair. With these steps, you should be able to get your keyboard back in working order.
