acer laptop webcam not working
Title: How To Fix Acer Laptop Camera not Working in Windows 10
Channel: Cap Trong Nam - How To
How To Fix Acer Laptop Camera not Working in Windows 10 by Cap Trong Nam - How To
acer laptop webcam not working, acer laptop webcam not working windows 11, acer aspire webcam not working, acer laptop webcam not showing in device manager, acer aspire 3 webcam not working, acer aspire e 15 webcam not working, laptop camera not working acer
Acer Webcam Dead? FIX IT NOW! (Easy Steps)
Acer Webcam Woes? Don't Panic, Let's Get You Back Online!
Having a dead webcam on your Acer device can be incredibly frustrating, right? You might be picturing missed video calls or the inability to participate in important meetings. But hold on! Before you start envisioning costly repairs or replacements, let’s dive into some solutions. Fortunately, reviving your webcam is often simpler than you think. This guide outlines some easy steps to get your camera functioning again.
Is Your Webcam Truly Dead? A Quick Check
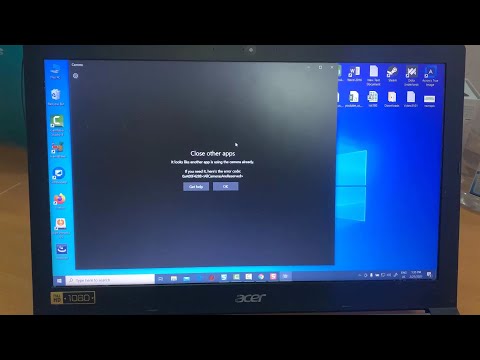
First, it’s crucial to confirm the problem. Before declaring your webcam defunct, perform a quick diagnostic. Open your preferred video conferencing application, like Zoom or Skype. Attempt to initiate a video call. If the image shows a black screen, or if no image appears, it’s time to investigate. Alternatively, you can access the built-in Camera app on your Acer laptop. Open it and check for functionality. Doing this will help you pinpoint whether the issue is indeed hardware-related or software-related. Then, you can move forward with targeted troubleshooting.
Software Solutions: Where the Magic Begins
Often, the issue resides within the software itself. Consequently, these fixes usually work like a charm.
Driver Detectives: Updating Your Webcam Driver
Outdated or corrupted drivers are notorious culprits. They cause many issues with your hardware. So, let's ensure your webcam driver is up to date. First, right-click the "Start" button on your Windows desktop. Select "Device Manager" from the menu. In the Device Manager window, locate "Imaging devices." Expand this section, and you should see your webcam listed. Right-click on your webcam driver. Choose "Update driver". Select ''Search automatically for drivers." Windows will search for and install the latest driver automatically. Restart your laptop afterward. This action often resolves the issue.
Permissions Please! Checking App Access
Modern operating systems have strict privacy settings. Therefore, it's essential to check if apps have permission to access your webcam. Go to your Windows settings. Navigate to "Privacy." Then, select "Camera." Ensure that the "Camera access for this device is on." Also, confirm that individual applications have the permission to use the camera. Toggle the switches for the apps you want to use with your webcam. Then, attempt to use the applications again.
Application Adjustments: Solving Software Conflicts
Sometimes, conflicts arise between applications. Moreover, this can interfere with your webcam. Close all applications using your webcam. This minimizes the chances of conflicts. Then, open only the application you wish to use. Verify if the webcam functions correctly. If the issue persists, try uninstalling and reinstalling the problematic application. This action often clears the software conflict.
Hardware Hurdles: Investigating Physical Connections
If software solutions yield no results, we advance to hardware considerations. But don't worry; often, the solutions are straightforward.
The Basic Check: Ensuring Physical Connections
If you have an external webcam, check the physical connection. This includes ensuring the USB cable is securely connected. Make sure there are no loose connections. Try plugging the webcam into a different USB port. This eliminates the possibility of a faulty port.
Acer's Webcam's Physical Issues
Some Acer laptops have integrated webcams. If your webcam is built-in, inspect the area surrounding the camera. Verify there is no physical obstruction covering the lens. Dust or debris can block the lens, causing a black screen. Gently wipe the lens with a soft cloth.
Advanced Troubleshooting: Delving Deeper
Sometimes, more elaborate troubleshooting is necessary. These steps might get the webcam healthy again.
BIOS/UEFI Configuration: Double-Checking Settings
Some Acer laptops have settings for the webcam in the BIOS or UEFI. Restart your Acer laptop. Access the BIOS/UEFI setup. This usually involves pressing a specific key during startup (such as Delete, F2, or F12). Review the settings for the webcam. Ensure the webcam is enabled in the BIOS.
Factory Reset as a Last Resort
If all else fails, consider a factory reset to return your laptop to its original state. This option removes all software and data on your hard drive. First, back up all your critical files and data. Access the recovery options within Windows. Select the option to reset your computer. Following this step will reset everything. Then, reinstall all of your preferred programs and applications.
Prevention is Key: Maintaining Webcam Health
Prevention saves you time and trouble. So, follow these simple tips.
Regular Maintenance: Keeping it Clean
Clean the webcam lens regularly with a soft cloth. Therefore, it eliminates any accumulated dust or debris. Clean the lens regularly to maintain optimal image clarity.
Software Updates and Security Measures
Update your laptop's operating system and drivers frequently. This action ensures compatibility and security. Also, always install reliable antivirus software. This protects your system from malware.
Final Thoughts and Next Steps
Hopefully, these steps have helped revive your Acer webcam! If these solutions don’t work, consider contacting Acer support for further assistance. You might have a hardware issue requiring professional repair. However, most issues are software-related and easily fixed. Consider these points. You can now use your Acer webcam without any trouble, whether you're video chatting or connecting in an online meeting!
RAM Overload? The SHOCKING Truth About Work Laptop Memory!Acer Webcam Dead? FIX IT NOW! (Easy Steps)
Hey there, fellow tech enthusiasts! Ever stared blankly at your Acer laptop screen, hoping to see a friendly face on the other end of a video call, only to be met with… nothing? A flickering image? Or, even worse, a black screen of despair? We’ve all been there. It's incredibly frustrating when your webcam decides to take a vacation just when you need it most – whether it's for a crucial work meeting, a catch-up with family, or just showing off your new haircut. But don’t you worry, because we’re going to wrestle that stubborn Acer webcam back to life! Consider this your personal tech rescue mission.
1. The Dreaded Black Screen: Why Did My Acer Webcam Die?
Before we jump into solutions, let's understand the enemy. A dead webcam isn't usually a single cause situation, but often a confluence of factors. Think of it like a puzzle with many pieces. The culprits can range from simple software glitches to complicated hardware issues. It could be a driver problem (the software translator between your webcam and your computer), a privacy setting gone rogue, or even a physical malfunction. Sometimes, a simple restart is all it takes, like shaking a magic 8-ball. Other times, we need to dig a little deeper.
2. The First Line of Defense: Simple Checks and Easy Fixes
Before we unleash the big guns, let’s start with the basics. Think of this as your pre-flight checklist.
- Restart Your Acer Laptop: It seems almost too simple, but a restart can magically solve a multitude of tech woes. It clears temporary files and refreshes the system. It's the digital equivalent of taking a deep breath.
- Check the Physical Webcam: Make sure the webcam isn’t physically obstructed. Is there a sticky note covering it? A little bit of dust? Give it a careful wipe with a soft cloth if necessary. It is like making sure your glasses are clean.
- Check the Webcam Indicator Light: Most Acer laptops have a tiny light next to the webcam. Is it on when you're trying to use it? If not, that's a clue something is amiss.
3. Unmasking Privacy Settings: The Hidden Webcam Police
Believe it or not, sometimes your own privacy settings can be the culprit. Windows (or whatever operating system your Acer uses) has built-in privacy controls that can block webcam access.
- Check Windows Privacy: Go to your settings (the gear icon in the Start menu). Then, navigate to "Privacy" and find "Camera." Make sure webcam access is enabled for the apps you want to use, such as Zoom, Skype, or Teams. It's like checking the locks on your front door.
- App-Specific Permissions: Even if the general setting is enabled, specific apps might still be blocked. Look within the app's settings to ensure it has camera access. Just because you have a key, doesn't mean you've unlocked the door.
4. Driver Dilemmas: Your Webcam's Software Translator
Drivers are essential, like the software language your webcam uses to communicate with your computer. Outdated or corrupted drivers are a common issue. Don't worry, we are going to fix it.
- Updating Drivers:
- Right-click the Start Menu (Windows logo).
- Select "Device Manager."
- In the list, find "Imaging devices" or "Cameras".
- Right-click on your Acer webcam.
- Select "Update driver." Choose "Search automatically for drivers." Think of it as giving your computer a refresher course.
- Reinstalling Drivers: If updating doesn't work, try uninstalling and then reinstalling the driver. In Device Manager, right-click the webcam, choose "Uninstall device." Restart your laptop, and Windows should automatically reinstall the driver. It is like starting from scratch, building a better house.
5. The App Test: Is It the Webcam or the Software?
Sometimes, the problem isn't the webcam itself, but the specific application you're using with it.
- Test with a Different App: Try using your webcam with a different application. Does it work in the built-in "Camera" app in Windows? What about Skype, Zoom, or Discord? This helps pinpoint if the issue is isolated to a particular program. Like figuring out if the faucet works on one sink but not another.
- Check App Settings: Double-check the app's settings to make sure it's using the correct webcam. You might have multiple cameras connected, and it might be selecting the wrong one.
6. Hardware Hurdles: When It Gets Physical
If all the software solutions fail, it’s possible there might be a hardware issue. This is less common, but still a possibility.
- Check the Webcam Connection (Internal): If you're comfortable with it and your Acer model allows, you can (carefully!) open your laptop (after powering it off and removing the battery or disconnecting from power!) and check the webcam's internal connection. This is usually a small ribbon cable. Make sure it's securely connected. This is like checking the batteries on your remote control. If you are uncomfortable doing this consult professionals.
- Professional Help: If you suspect a hardware fault, it’s best to consult a computer repair technician. They have the expertise and tools to diagnose and fix hardware problems.
7. Power Management: The Energy Vampire
Sometimes, Windows might be trying to conserve power by turning off your webcam.
- Disable Power Saving: In Device Manager (see step 4), right-click your webcam, choose "Properties," and go to the "Power Management" tab. Uncheck the box that says "Allow the computer to turn off this device to save power."
8. Virus Check and Malware Scan
Malware can sometimes interfere with webcam functionality.
- Run a Full Scan: Use your antivirus software to perform a full system scan to check for any malicious software that might be causing issues. It’s the digital equivalent of clearing out any digital vampires living in your system.
9. Sound Card Interference
Uncommon but possible, a faulty sound card can sometimes interfere with webcam functionality.
- Update or Reinstall Sound Card Drivers: Similar to updating webcam drivers, try updating or reinstalling your sound card drivers. Check your Acer support website for the latest drivers.
10. BIOS Updates: The Motherboard's Firmware
Updating your BIOS (Basic Input/Output System) can sometimes resolve compatibility issues.
- Check Acer's Website: Go to Acer's support website for your specific laptop model and check for BIOS updates. Install them carefully, following the instructions provided. It's like updating the operating system of your motherboard.
11. Roll Back Windows Updates
Recent Windows updates can sometimes introduce bugs that affect webcam functionality.
- Uninstall Recent Updates: Go to Settings > Update & Security > Windows Update > View update history and uninstall the updates that were recently installed.
12. Reset Your Acer Laptop
If you've exhausted all other options, resetting your Acer laptop to its factory settings can sometimes be a solution. This will erase all your data, so make sure you back up everything important before you begin!
- Factory Reset Procedure: Find the factory reset option in your Acer laptop's settings. Be aware that the steps can vary based on the version of the operating system being used. Be sure to refer to your laptop's user manual or Acer's support website for specific instructions. This is like hitting the reset button on your computer.
13. External Webcam as a Temporary Fix
If your built-in camera is truly dead, an external webcam can always be used as replacement for the main camera.
- Buy and Connect: An external webcam would always be an easy solution. Simply plug into a USB port and follow the setup instructions.
14. The Acer Support Advantage
Don't forget that Acer provides support for its products.
- Acer Support Website: Visit Acer's support website, locate your laptop model, and look for troubleshooting guides or contact customer support.
15. The Ultimate Test: Does It Work Now?
After trying all these steps, it's time to test your webcam again. Open your favorite video call software and check the camera feed. If it works, congratulations! If not, it might be time to seek professional help.
Closing Thoughts:
Navigating the world of tech can sometimes feel like wading through a swamp, but hopefully, these steps have helped you clear the muck and get your Acer webcam back in action. Remember, troubleshooting is often a process of elimination. Don’t be discouraged if the first solution doesn’t work. Try each one methodically, and you're likely to find the answer. If all else fails, don't hesitate to seek professional help. After all, no one wants to miss out on seeing the smiles over a video call. We can do this!
Frequently Asked Questions (FAQs)
Q1: My webcam was working fine, then suddenly stopped. What could have caused it?
A: Several things can trigger a sudden webcam failure. The main culprits include: a recent Windows update causing driver conflicts, a privacy setting being inadvertently changed, a corrupted driver, or in some cases, a software glitch in the app you're
Acer Laptop Ethernet ONLY? Wireless GONE! (Fix This NOW!)Fix Camera Not Working Windows 10 Windows Webcam Not Working Laptop camera not working

By EasyTechGeek Fix Camera Not Working Windows 10 Windows Webcam Not Working Laptop camera not working by EasyTechGeek
Asus Laptop Camera Not Working - Quick Fix Tech Studio Tube

By Tech Studio Tube Asus Laptop Camera Not Working - Quick Fix Tech Studio Tube by Tech Studio Tube
Acer Webcam Not Working in Windows 11 and Windows 10

By TechFixIT Acer Webcam Not Working in Windows 11 and Windows 10 by TechFixIT

Title: ACER Predator 17 Apakah Ada Kameranya
Channel: HardReset.Info
ACER Predator 17 Apakah Ada Kameranya by HardReset.Info
My Laptop Work
Acer Webcam Dead? FIX IT NOW! (Easy Steps)
Have you encountered the frustrating gray screen or the dreaded "no camera detected" error message when trying to connect with loved ones, colleagues, or even just yourself through your Acer webcam? Don't despair! A dead webcam doesn't necessarily signal the end of your video conferencing days. More often than not, the issue is resolvable with a few straightforward troubleshooting steps. This guide will walk you through the most common culprits and the corresponding solutions, designed to have your Acer webcam up and running smoothly in no time.
1. Initial Checks: The Quickest Fixes
Before diving into more complex solutions, let's eliminate the obvious. These initial checks are quick, easy, and often resolve the problem immediately.
Physical Connection: Ensure your webcam is securely connected. If your Acer webcam is an external model, verify the USB cable is firmly plugged into both your computer and the webcam itself. Try a different USB port. Sometimes, a faulty port can be the source of the issue. Internal webcams, integrated into your laptop, don't require this check. However, inspecting the physical components and the surrounding frame of the laptop can save you a lot of time.
Power Cycle: A simple restart can work wonders. Reboot your Acer laptop or desktop computer. This clears temporary glitches that might be interfering with webcam functionality. If you're using an external webcam, unplug it before restarting, and plug it back in after your computer has fully rebooted.
Webcam Switch/Button: Some Acer laptops have a physical switch or a dedicated function key (often labeled with a camera icon) to disable the webcam. Double-check that this switch is flipped to the "on" position or that you haven't accidentally disabled the webcam using a function key combination (e.g., Fn + a camera icon key). This is a surprisingly common culprit.
2. Driver Diagnostics: The Heart of the Matter
Drivers are the software components that allow your operating system to communicate with your hardware, including your webcam. Outdated, corrupted, or missing drivers are among the leading causes of webcam failure.
Device Manager Inspection: Access the Device Manager. You can typically find this by searching for "Device Manager" in the Windows search bar. Expand the "Cameras" or "Imaging devices" section. If your webcam is listed, but has a yellow exclamation mark, it indicates a driver issue. If the webcam is not listed at all, it might suggest a hardware problem or a driver that is not correctly installed.
Driver Update: Right-click on your Acer webcam in the Device Manager and select "Update driver." Choose "Search automatically for drivers." Windows will attempt to find and install the latest drivers.
Manual Driver Update/Reinstall: If the automatic update fails, you may need to manually update or reinstall the driver. In the Device Manager, right-click on the webcam and select "Uninstall device." Then, restart your computer. Windows should attempt to reinstall the driver upon reboot. If not, visit the Acer support website. Enter your laptop's model number or webcam model number in the search bar. Navigate to the "Drivers and Downloads" section. Download the latest webcam driver for your operating system (Windows 10, Windows 11, etc.) and install it.
Rollback Driver: If the webcam stopped working after a recent driver update, you can try rolling back to a previous driver version. In the Device Manager, right-click your webcam and select "Properties." Go to the "Driver" tab. If the "Roll Back Driver" button is enabled, click it.
3. Software Conflicts and Camera Permissions:
Sometimes, the issue isn't with the webcam itself, but with the software trying to access it or settings within your operating system.
Application Conflicts: Close all applications that might be using the webcam, such as video conferencing software (Zoom, Microsoft Teams, Skype), camera apps, or any other program that utilizes video input. One application hogging the webcam's resources can prevent others from accessing it.
Camera Permissions (Windows): Ensure that the application you're trying to use has permission to access the webcam. Go to Windows Settings (search for "Settings" in the Windows search bar). Click on "Privacy & security" (or "Privacy" in some older Windows versions). Select "Camera" from the list on the left. Toggle "Camera access" and "Let apps access your camera" to "On." Under "Choose which apps can access your camera," verify that the application you're using is enabled.
Camera Permissions (macOS): In macOS, go to System Preferences (Apple menu > System Preferences) and click on "Security & Privacy." Select the "Privacy" tab. Click "Camera" in the sidebar. Check the boxes next to each app that you want to allow access to your camera.
4. The BIOS Check: Hardware-Level Configuration
In some cases, the problem may reside within your computer's BIOS (Basic Input/Output System), specifically if the webcam has been disabled. This is a less common issue, but it’s worth exploring.
Accessing the BIOS: The method for accessing the BIOS varies depending on your Acer laptop or desktop model. Typically, you'll need to press a specific key (e.g., Del, F2, F12, Esc) during the startup process immediately after powering on your computer. Consult your Acer manual or search online for instructions specific to your model.
Webcam Settings within BIOS: Once in the BIOS, navigate through the menus until you find settings related to onboard devices or hardware. Look for options related to the integrated webcam. Ensure that the webcam is enabled. The exact location and wording may vary depending on the BIOS version and your Acer model.
Save and Exit: After confirming, save the changes and exit the BIOS. Your computer will then restart.
5. Hardware Troubles: When All Else Fails
If you've exhausted all the software and driver troubleshooting steps, the problem may lie with the webcam's hardware.
Inspect the Webcam Lens: Carefully examine the webcam lens for any physical obstructions, such as dust, smudges, or damage. Gently clean the lens with a soft, lint-free cloth.
External Webcam Test (if applicable): If you're using an external webcam, try connecting it to a different computer. If the webcam works on another computer, the issue is likely with your Acer laptop or desktop. If the webcam still doesn't work, the webcam itself might be faulty.
Internal Webcam: Contact Acer Support: If you've tried all other troubleshooting steps and the internal webcam still isn't functioning, contact Acer support. They can provide further assistance, potentially including hardware diagnostics or repair options.
6. Additional Considerations and Tips
Operating System Updates: Keep your operating system (Windows or macOS) up-to-date. Updates often include driver improvements and bug fixes that can resolve webcam issues.
Antivirus Interference: Some antivirus software can interfere with webcam functionality. Temporarily disable your antivirus software (if you're comfortable doing so) and test the webcam. If it works, you may need to adjust your antivirus settings to allow the webcam to function correctly.
System Restore (Windows): As a last resort, consider using System Restore (Windows) to revert your system to a previous state before the webcam problems started. This can undo recent changes that might be causing the issue.
Fresh Installation: If all else fails, consider reinstalling your operating system as a measure of last resort. This will require backing up all of your data. This is the most time-consuming solution, but it guarantees a clean installation of your operating system and drivers.
By systematically working through these steps, you'll significantly increase your chances of diagnosing and resolving the issue with your Acer webcam. Don't be discouraged if the first solution doesn't work. Each step brings you closer to identifying the root cause of the problem and getting you back to enjoying seamless video communication.
